Build Token Locking & Signed Reward Claims with BuildBear's Time Advancement Plugin
A hands-on tutorial for creating a QuestManager contract that locks tokens, verifies admin signatures, and distributes rewards. Test real on-chain time-based flows with BuildBear’s Time Advancement.
Introduction
In this tutorial, we’ll build Token Rewards Contract system that lets owners or admins create quests, lock reward funds (native or ERC20), and distribute them to winners after the quest ends.
Instead of using mocked timestamps in tests, you’ll use BuildBear’s Time Advancement feature to actually warp the blockchain time forward inside your Sandbox. This lets you see your contract’s behavior as if days had passed, directly in the BuildBear Explorer and Debugger.
What We Will Learn
In this guide, we will build and explore a Quest-Manager smart contract, focusing on handling time-sensitive rewards and leveraging BuildBear's Time Advancement feature to test and interact with smart contracts.
- Contract Foundation: Create and deploy a Quest-Manager contract capable of locking reward funds, both in native tokens (like ETH/POL) and standard ERC20 tokens.
- Quest Creation: Learn how to initialize a new quest by defining its reward pool and setting a completion deadline using a Unix timestamp.
- Reward Mechanics: Fund a quest by locking native tokens directly into the contract, understanding how the contract securely holds the rewards.
- Off-Chain Verification: Implement a secure claim system where users can claim rewards only with a valid, off-chain signature from an admin, preventing unauthorized access.
- Testing Time Constraints: Simulate a real-world scenario by attempting to claim a reward before the quest's end time, confirming that the transaction is correctly reverted.
- BuildBear's Time Advancement: Discover how BuildBear's environment allows you to fast-forward time in your testnet, solving the classic challenge of testing time-dependent logic without long waits.
- Successful Reward Claim: Advance the blockchain's timestamp and successfully execute a reward claim, verifying that the user receives the correct amount.
- BuildBear Explorer: Use the BuildBear Explorer to monitor all contract deployments, transactions, and internal calls in real-time, just like a mainnet block explorer.
- Debugging with Sentio: Dive deep into transaction execution by using the integrated Sentio debugger to step through code, inspect variables, and resolve issues efficiently.
Project Repository
We’ve published this tutorial’s code on GitHub:
Directory and Project Structure
How It Works
Quest Lifecycle Diagram
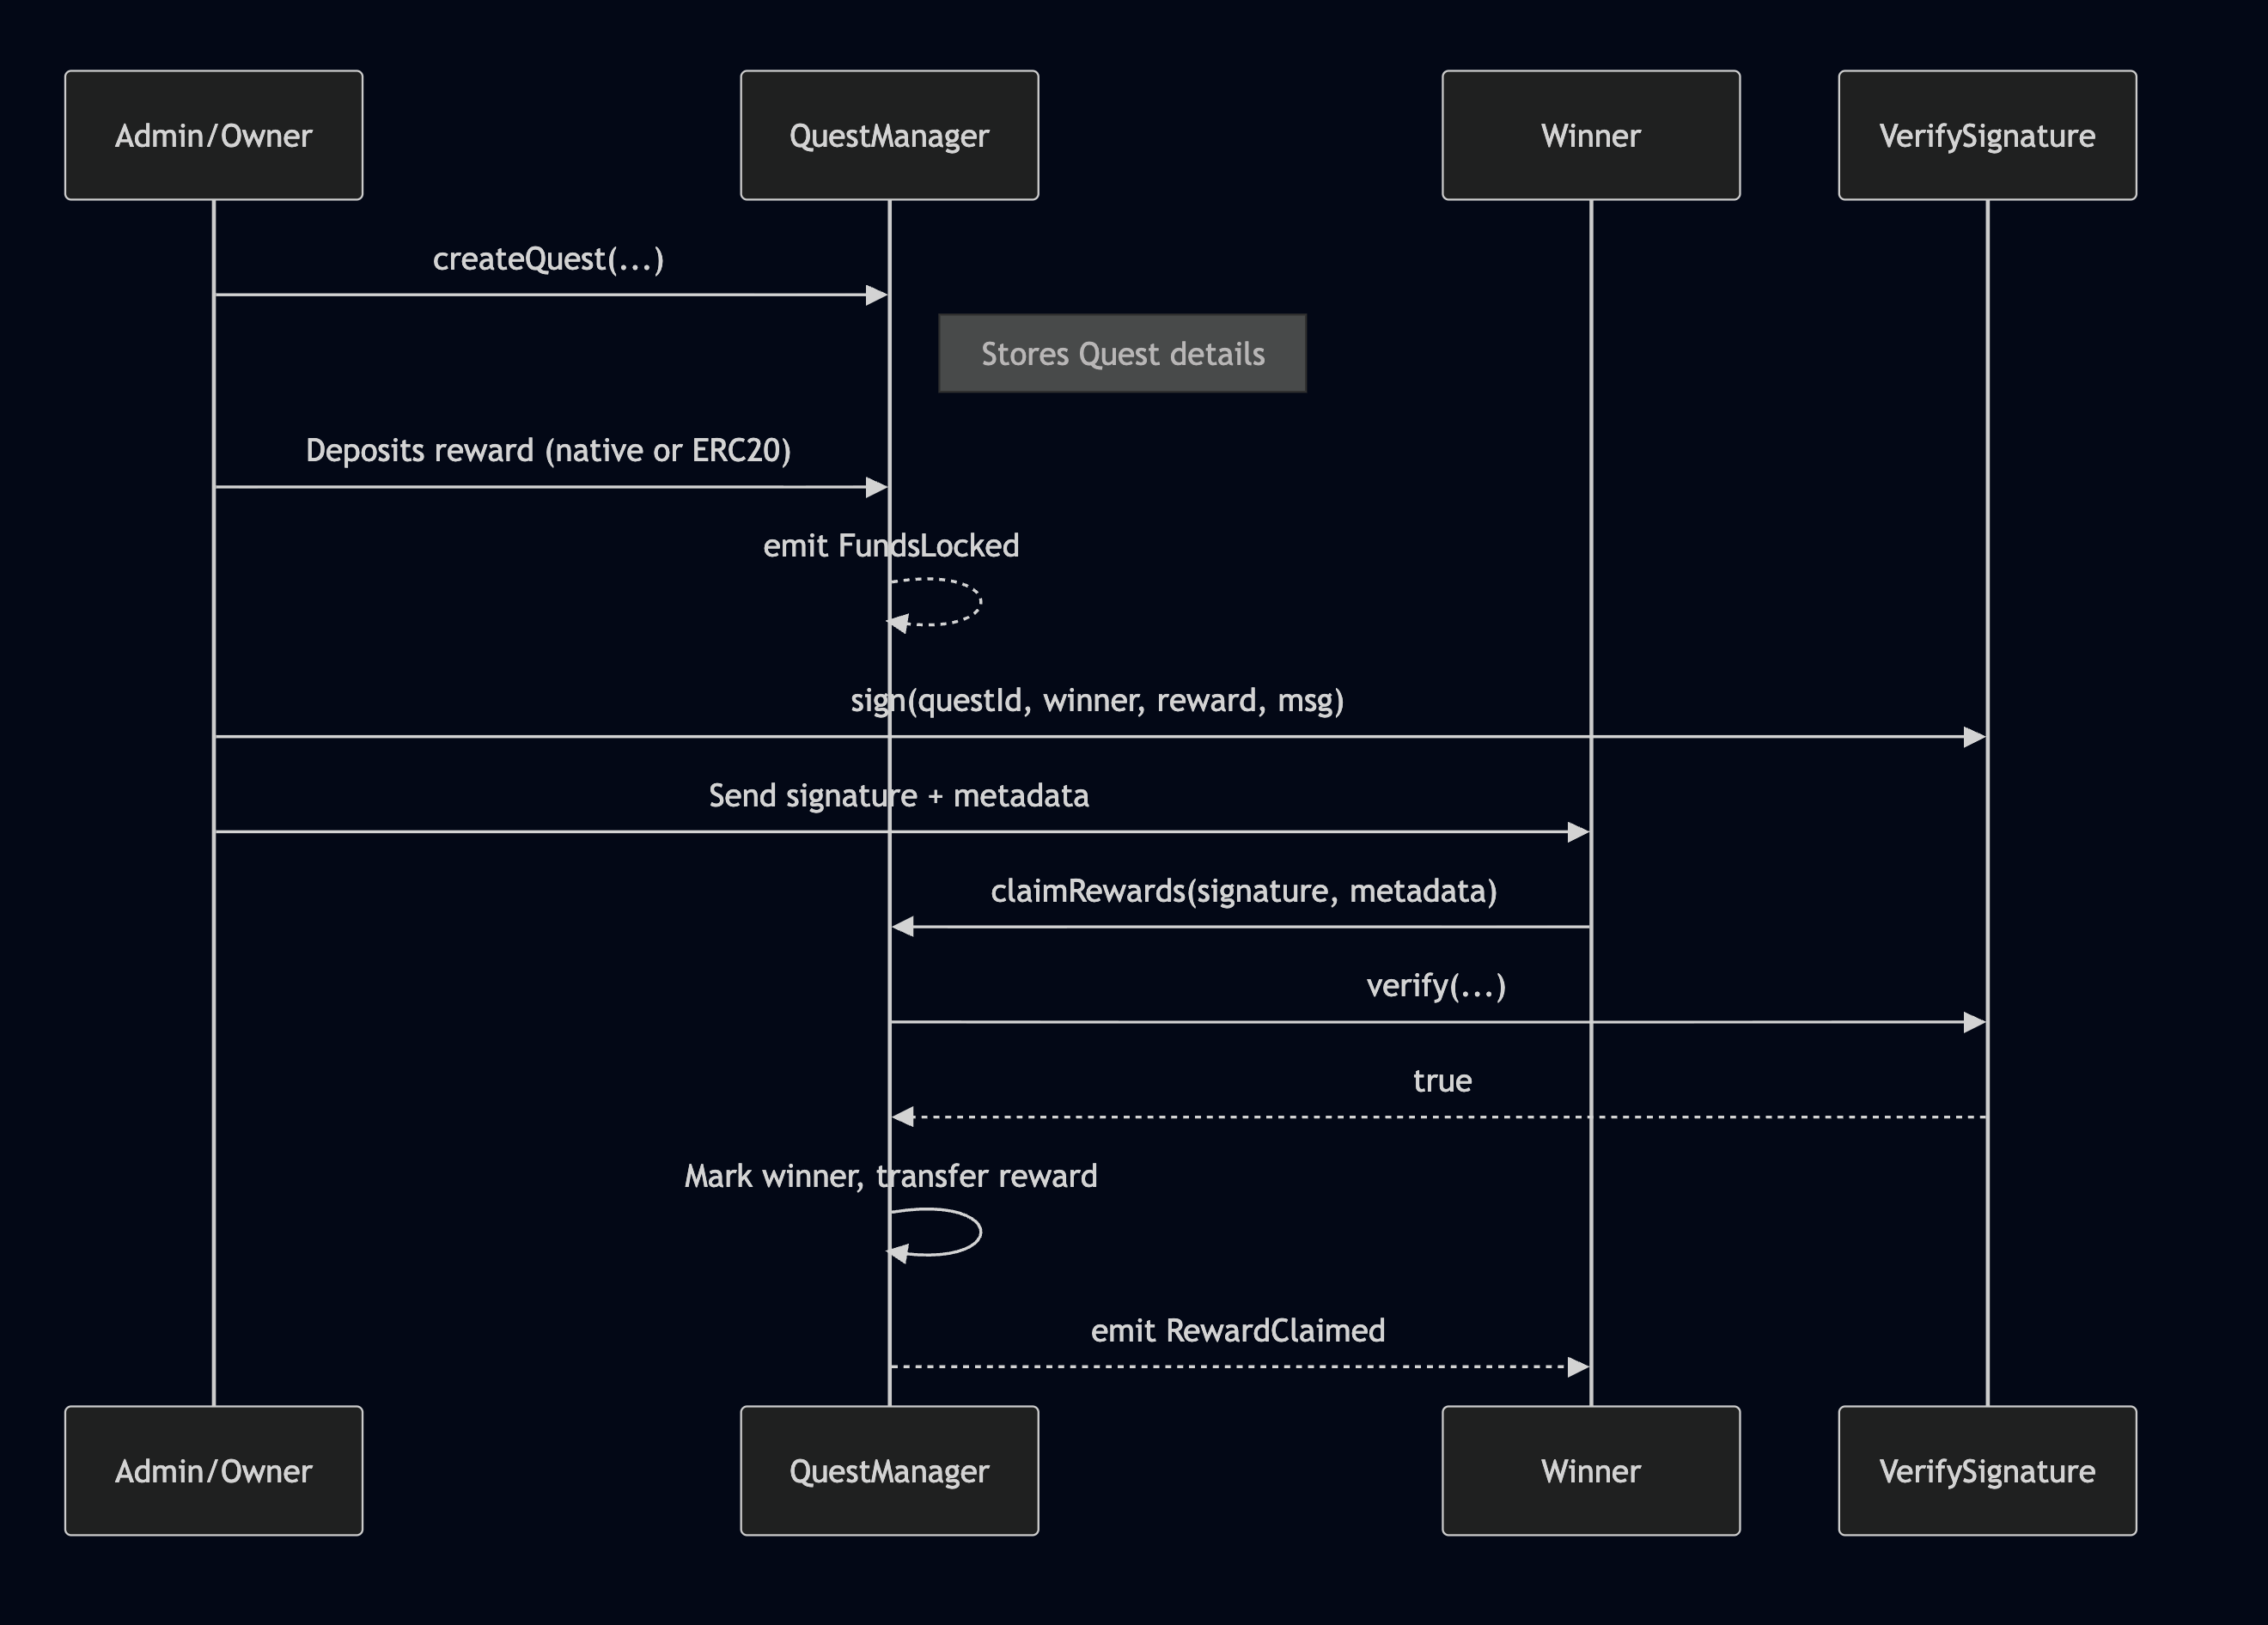
- The quest owner/admin creates a new quest on the QuestManager contract.
- Owner deposits rewards (either native token like ETH or ERC-20s) into the contract.
- QuestManager emits a
FundsLockedevent. - After the lock period, the owner signs a message off-chain declaring the winner and reward amount.
- The signed message is sent to the winner.
- Winner submits the signature and metadata to
claimRewards()on QuestManager. - QuestManager verifies the signature, ensures reward is unclaimed and valid.
- Rewards are transferred to the winner, and
RewardClaimedis emitted.
Contract Call Flow Diagram
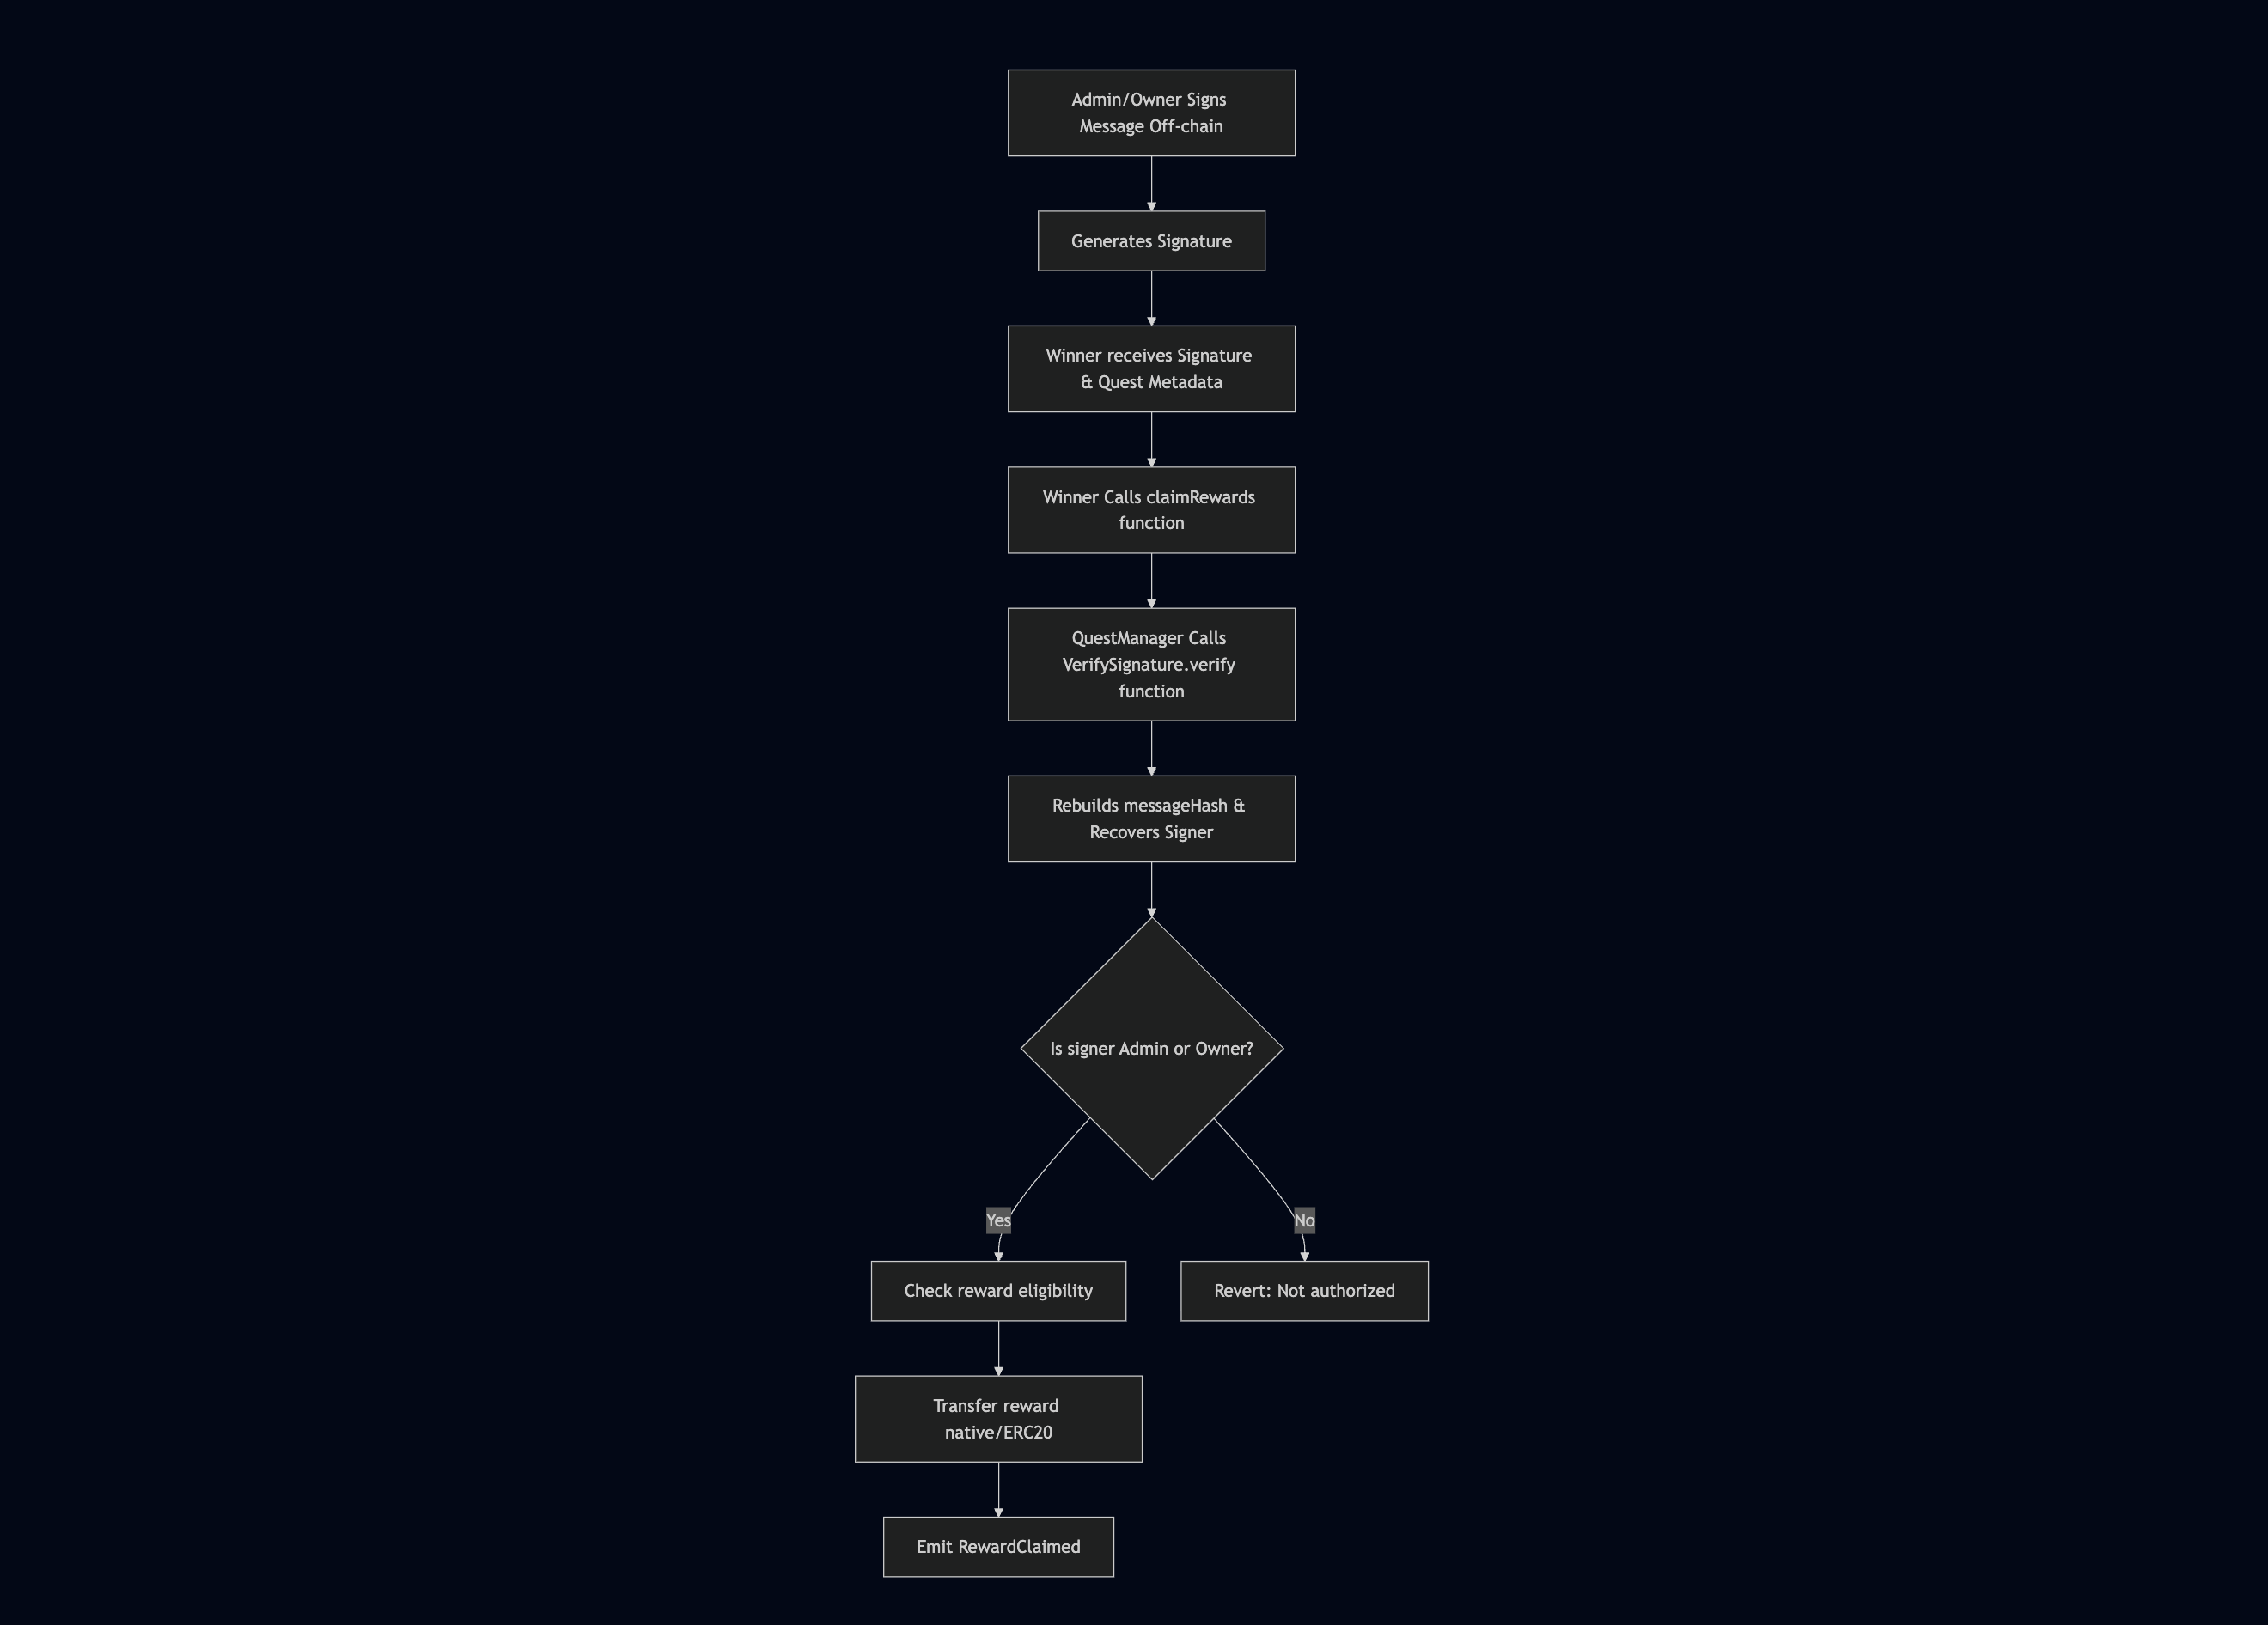
- Admin/owner signs a message off-chain declaring the winner and reward metadata (questId, address, amount, etc.).
- The winner receives the signature + metadata and calls
claimRewards()on the QuestManager. - QuestManager passes inputs to the VerifySignature contract, which:
- Rebuilds the hashed message
- Recovers the signer address
- If the signer is verified to be the admin/owner:
- QuestManager transfers the reward (native or ERC-20) to the winner.
- Emits
RewardClaimed.
- If the signer is not authorized:
- The transaction reverts with an error.
- This ensures replay protection and authentic reward distribution.
Step 1: Create Sandbox & Install Plugins
-
Create a Sandbox on BuildBear on a network of your choice (Ethereum or Polygon, etc) in BuildBear.
-
Time Advancement Plugin is pre-installed in all Sandboxes.
-
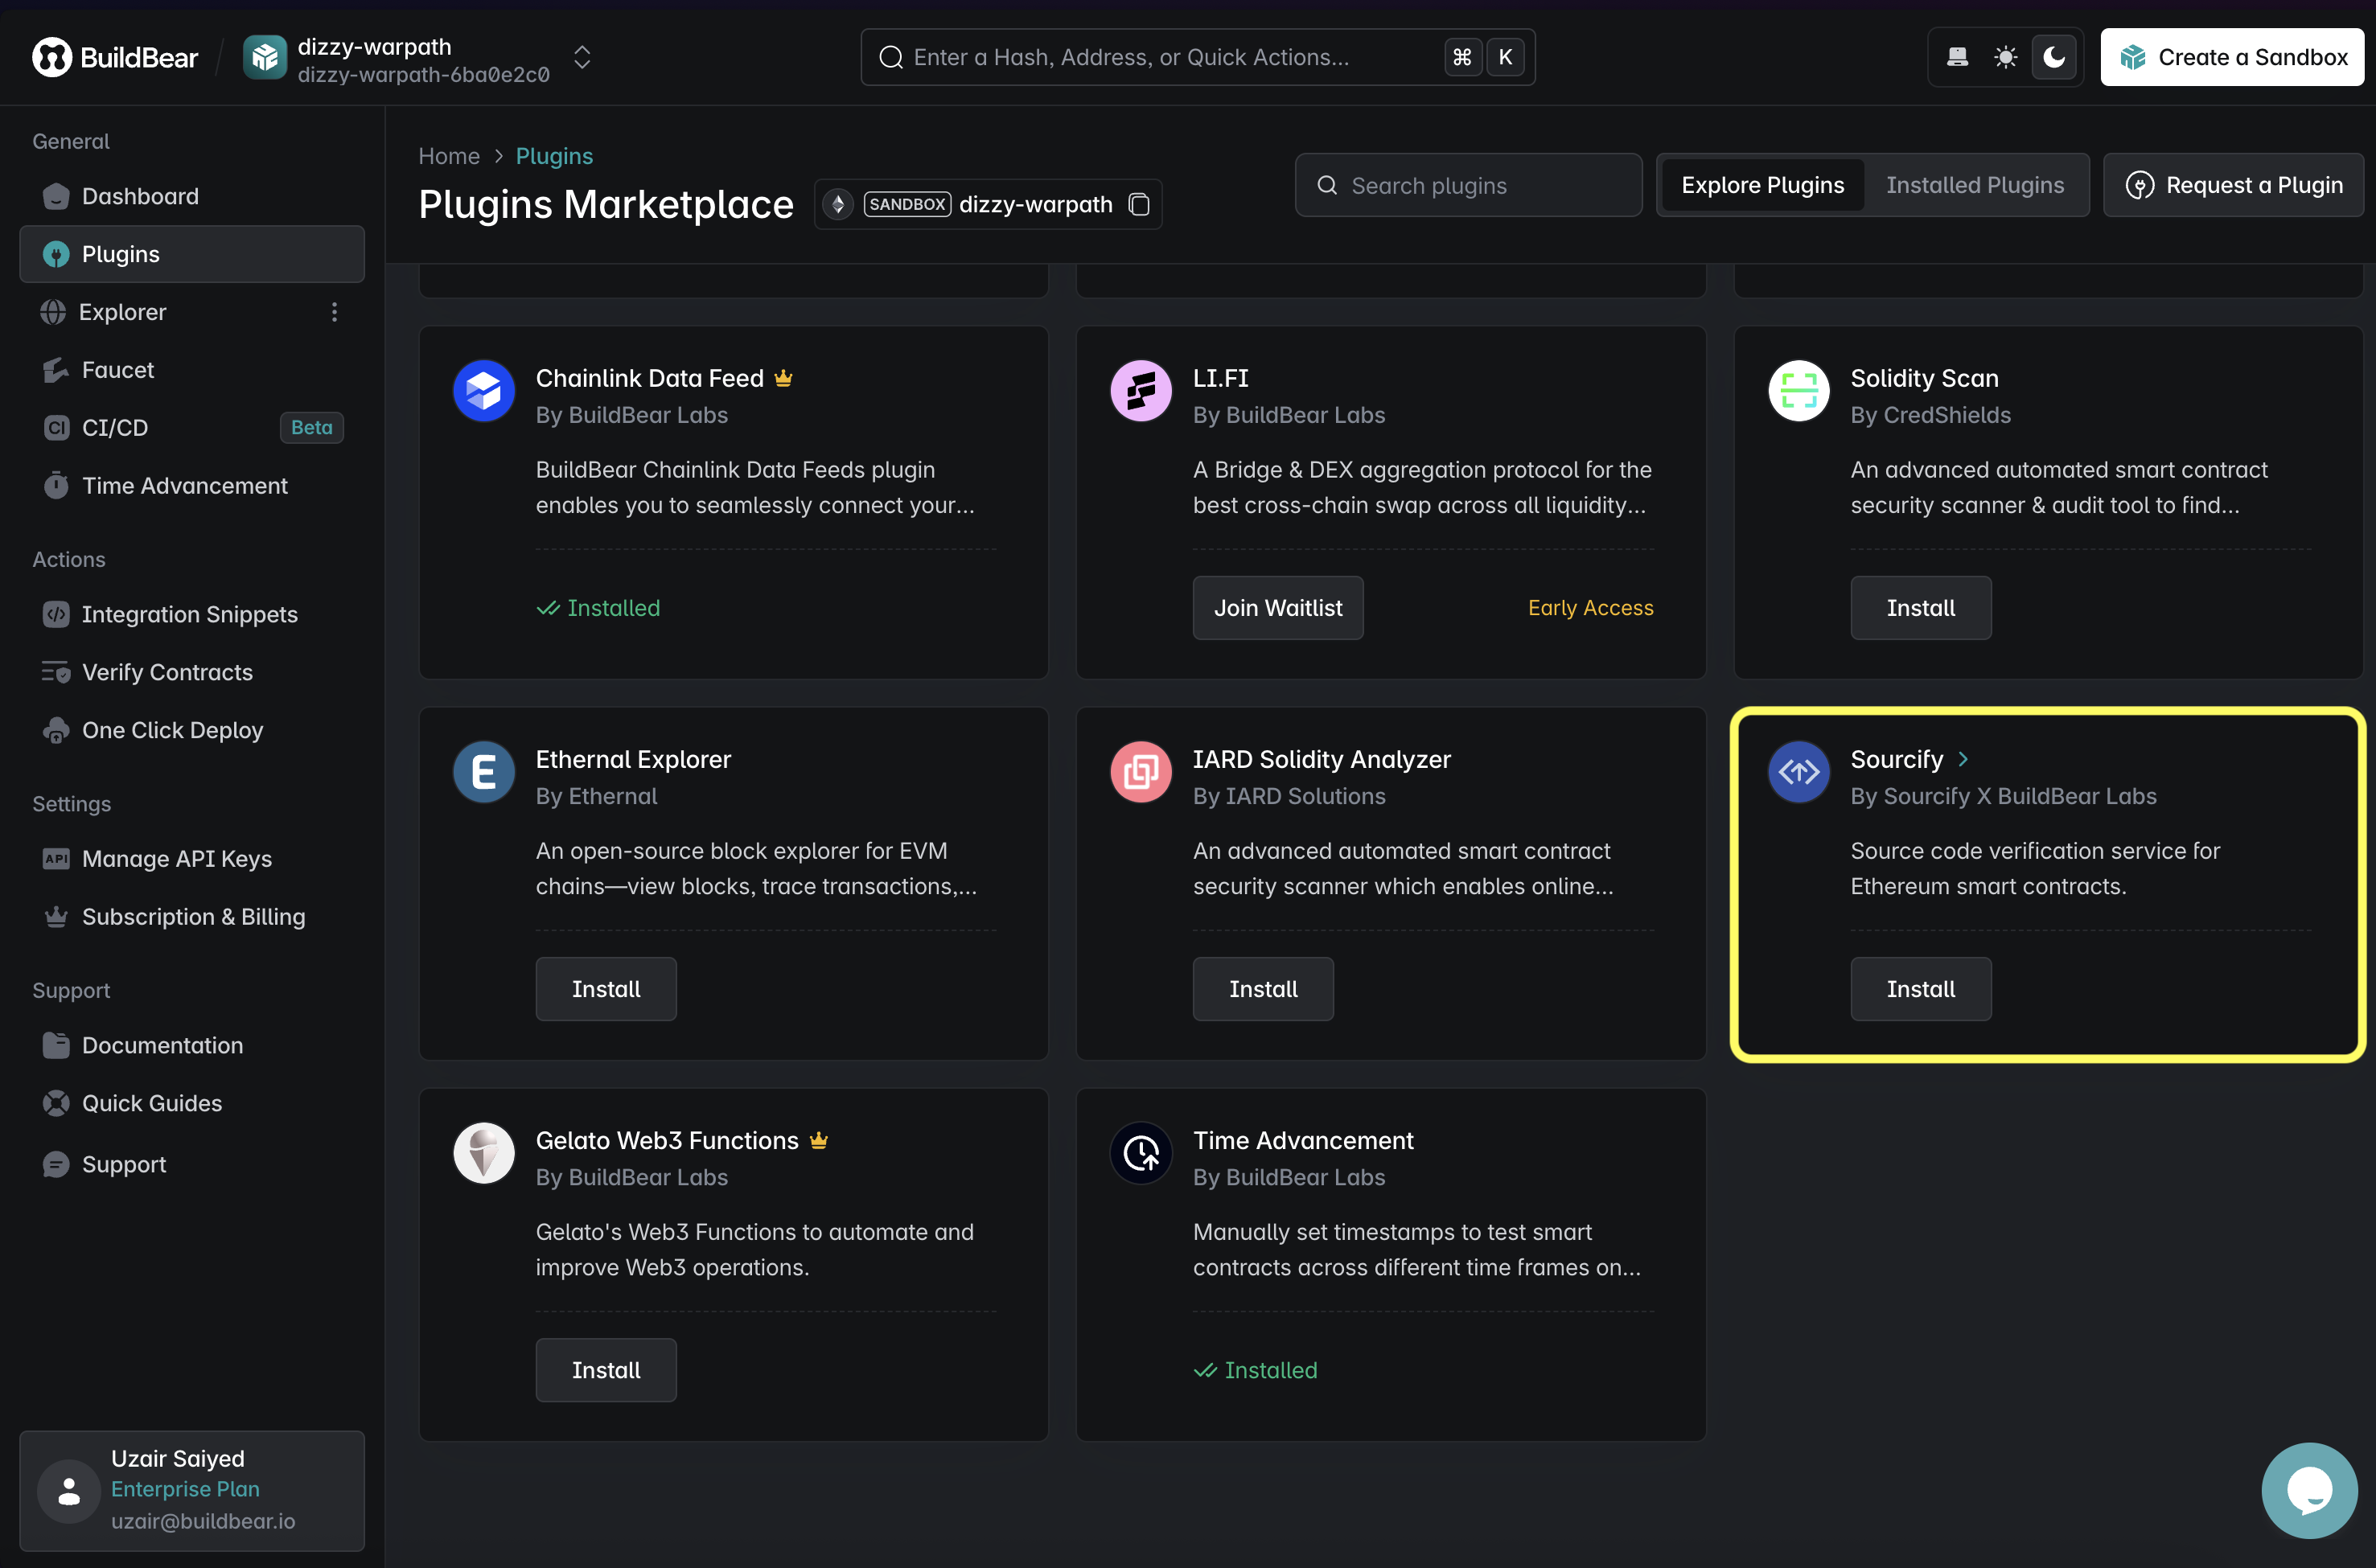
Installing the Sourcify Plugin
-
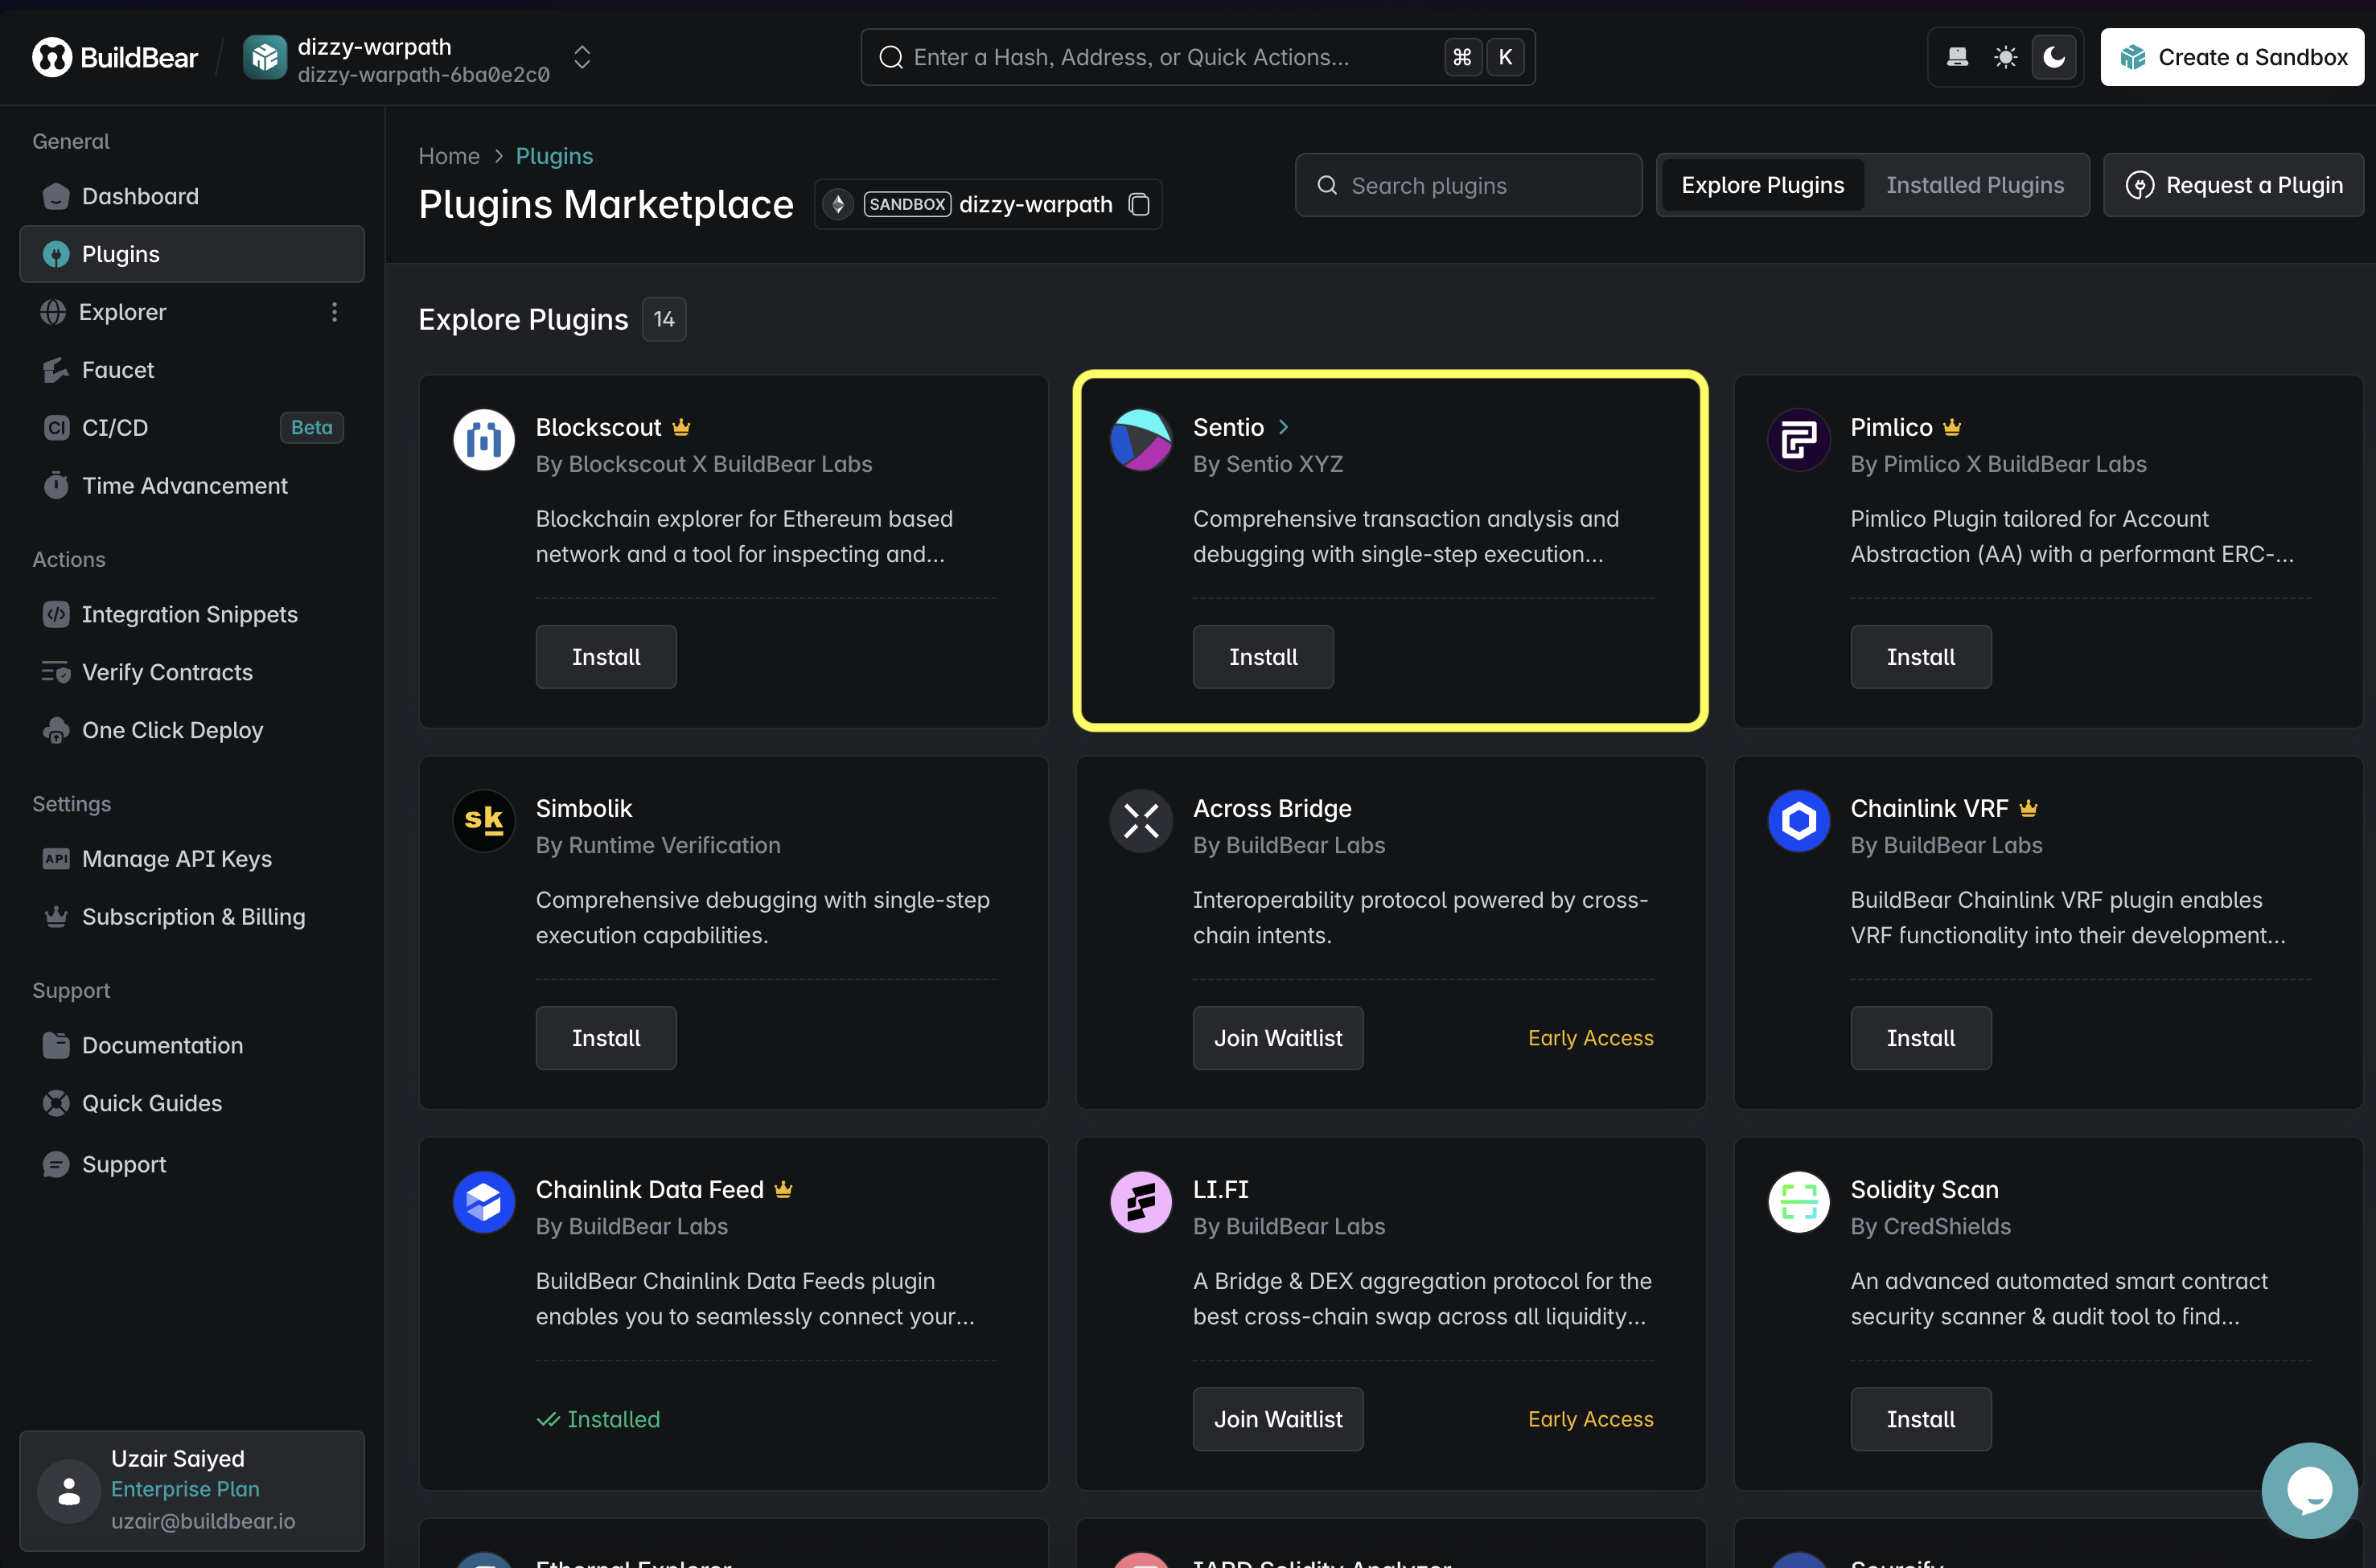
Optionally, Install Sentio Plugin for Debugging and Tx Tracing
Step 2: Environment Variables
Copy .env.example to .env and fill in:
Need a new wallet keypair? Create one with cast
Once you have configured your wallets, you will need to fund your wallets with enough funds to:
- Cover deployment and interaction gas costs.
- Fund the wallet to lock tokens in the contract from the quest creator wallet address.
Why do we need to pre-fund wallet-addresses?
The creators of tasks and events need to lock some native/erc20 tokens to distribute to the winners, thus needs to be funded with either whitelisted ERC20s or Native tokens, whichever may be used for creating a task/event.
In foundry.toml we set up a buildbear RPC endpoint to point at our Sandbox.
We can also create a Makefile to simplify commands for building, deploying, and interacting with our contract:
Replace SANDBOX_ID with your actual BuildBear Sandbox ID
Lastly, we will also need a helper config script to manage network configurations in HelperConfig.s.sol. We have multiple network configs for various testnets and mainnets, but we only ever need Ethereum Mainnet Sandbox for this tutorial.
Step 3: The QuestManager Contract
The QuestManager contract is the heart of this tutorial.
-
Quests: Each quest has an ID, title, start and end time, reward token, reward pool, reward method (FCFS, LuckyDraw), reward type (ERC20 or Native), and number of winners.
-
Storage: It tracks all quests, user-created quests, allowed tokens, admins, winners, and current winners count.
-
createQuest(): Called by an owner/admin to create a new quest. It checks parameters, pushes quest data to storage, then calls
_lockFundsto deposit tokens into the contract. -
_lockFunds(): Handles actually locking either native ETH/POL or ERC20 tokens into the contract.
-
claimRewards(): This is where winners claim. It:
- Checks that the quest exists.
- Checks quest end timestamp (must have ended).
- Checks the signature was produced by an admin/owner.
- Calculates the per-winner reward and transfers it.
- Marks the winner as claimed and emits an event.
Why Signature Verification?
We don’t want anyone claiming arbitrarily. Admin/owner signs an off-chain message with (questId, winner, reward, message) and passes the signature to the contract. The contract uses VerifySignature to recover the signer and verify it matches an admin or owner.
This pattern decouples the on-chain state from off-chain whitelisting, reducing gas and complexity.
QuestManager.sol
Step 4: Deploy Script and Deploying the QuestManager Contract
We can create a simple deploy script:
SignedQuestManager.Deploy.s.sol
Use the command from Makefile:
You can alternatively use deploy-etherscan to deploy and verify on Etherscan.
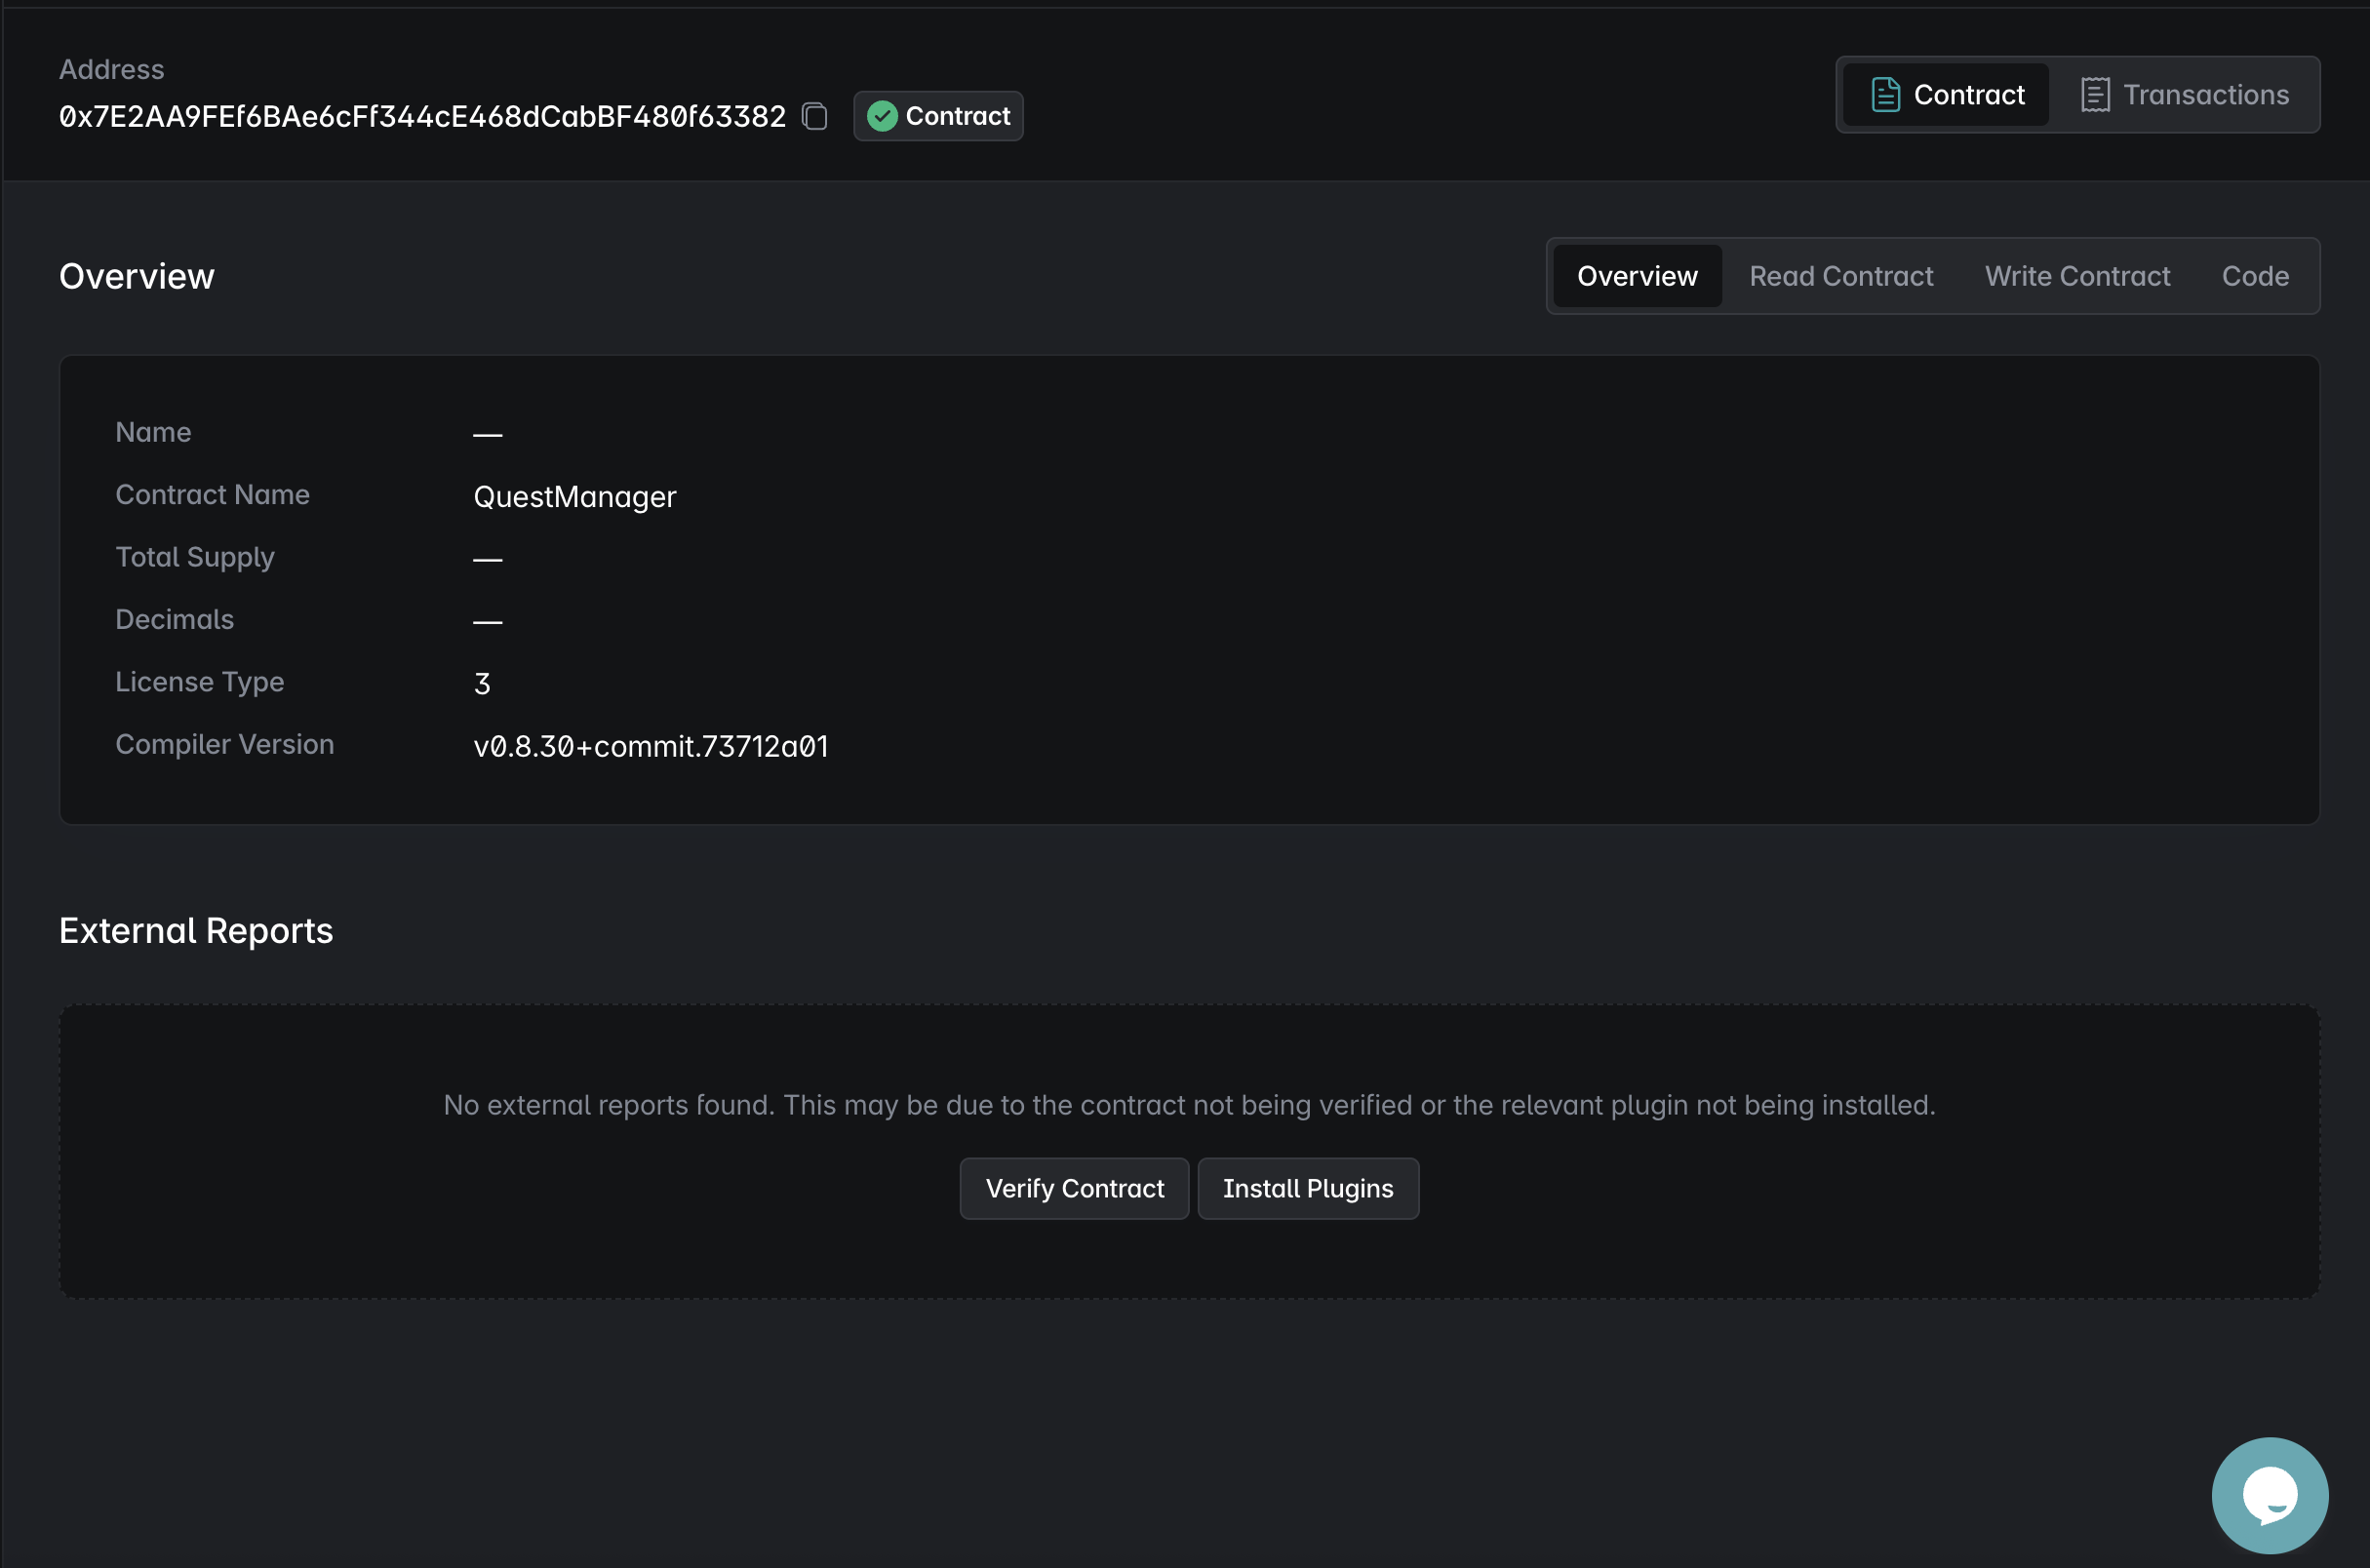
This will deploy QuestManager with whitelisted tokens to your Sandbox. Check the BuildBear Explorer for the deployment transaction.
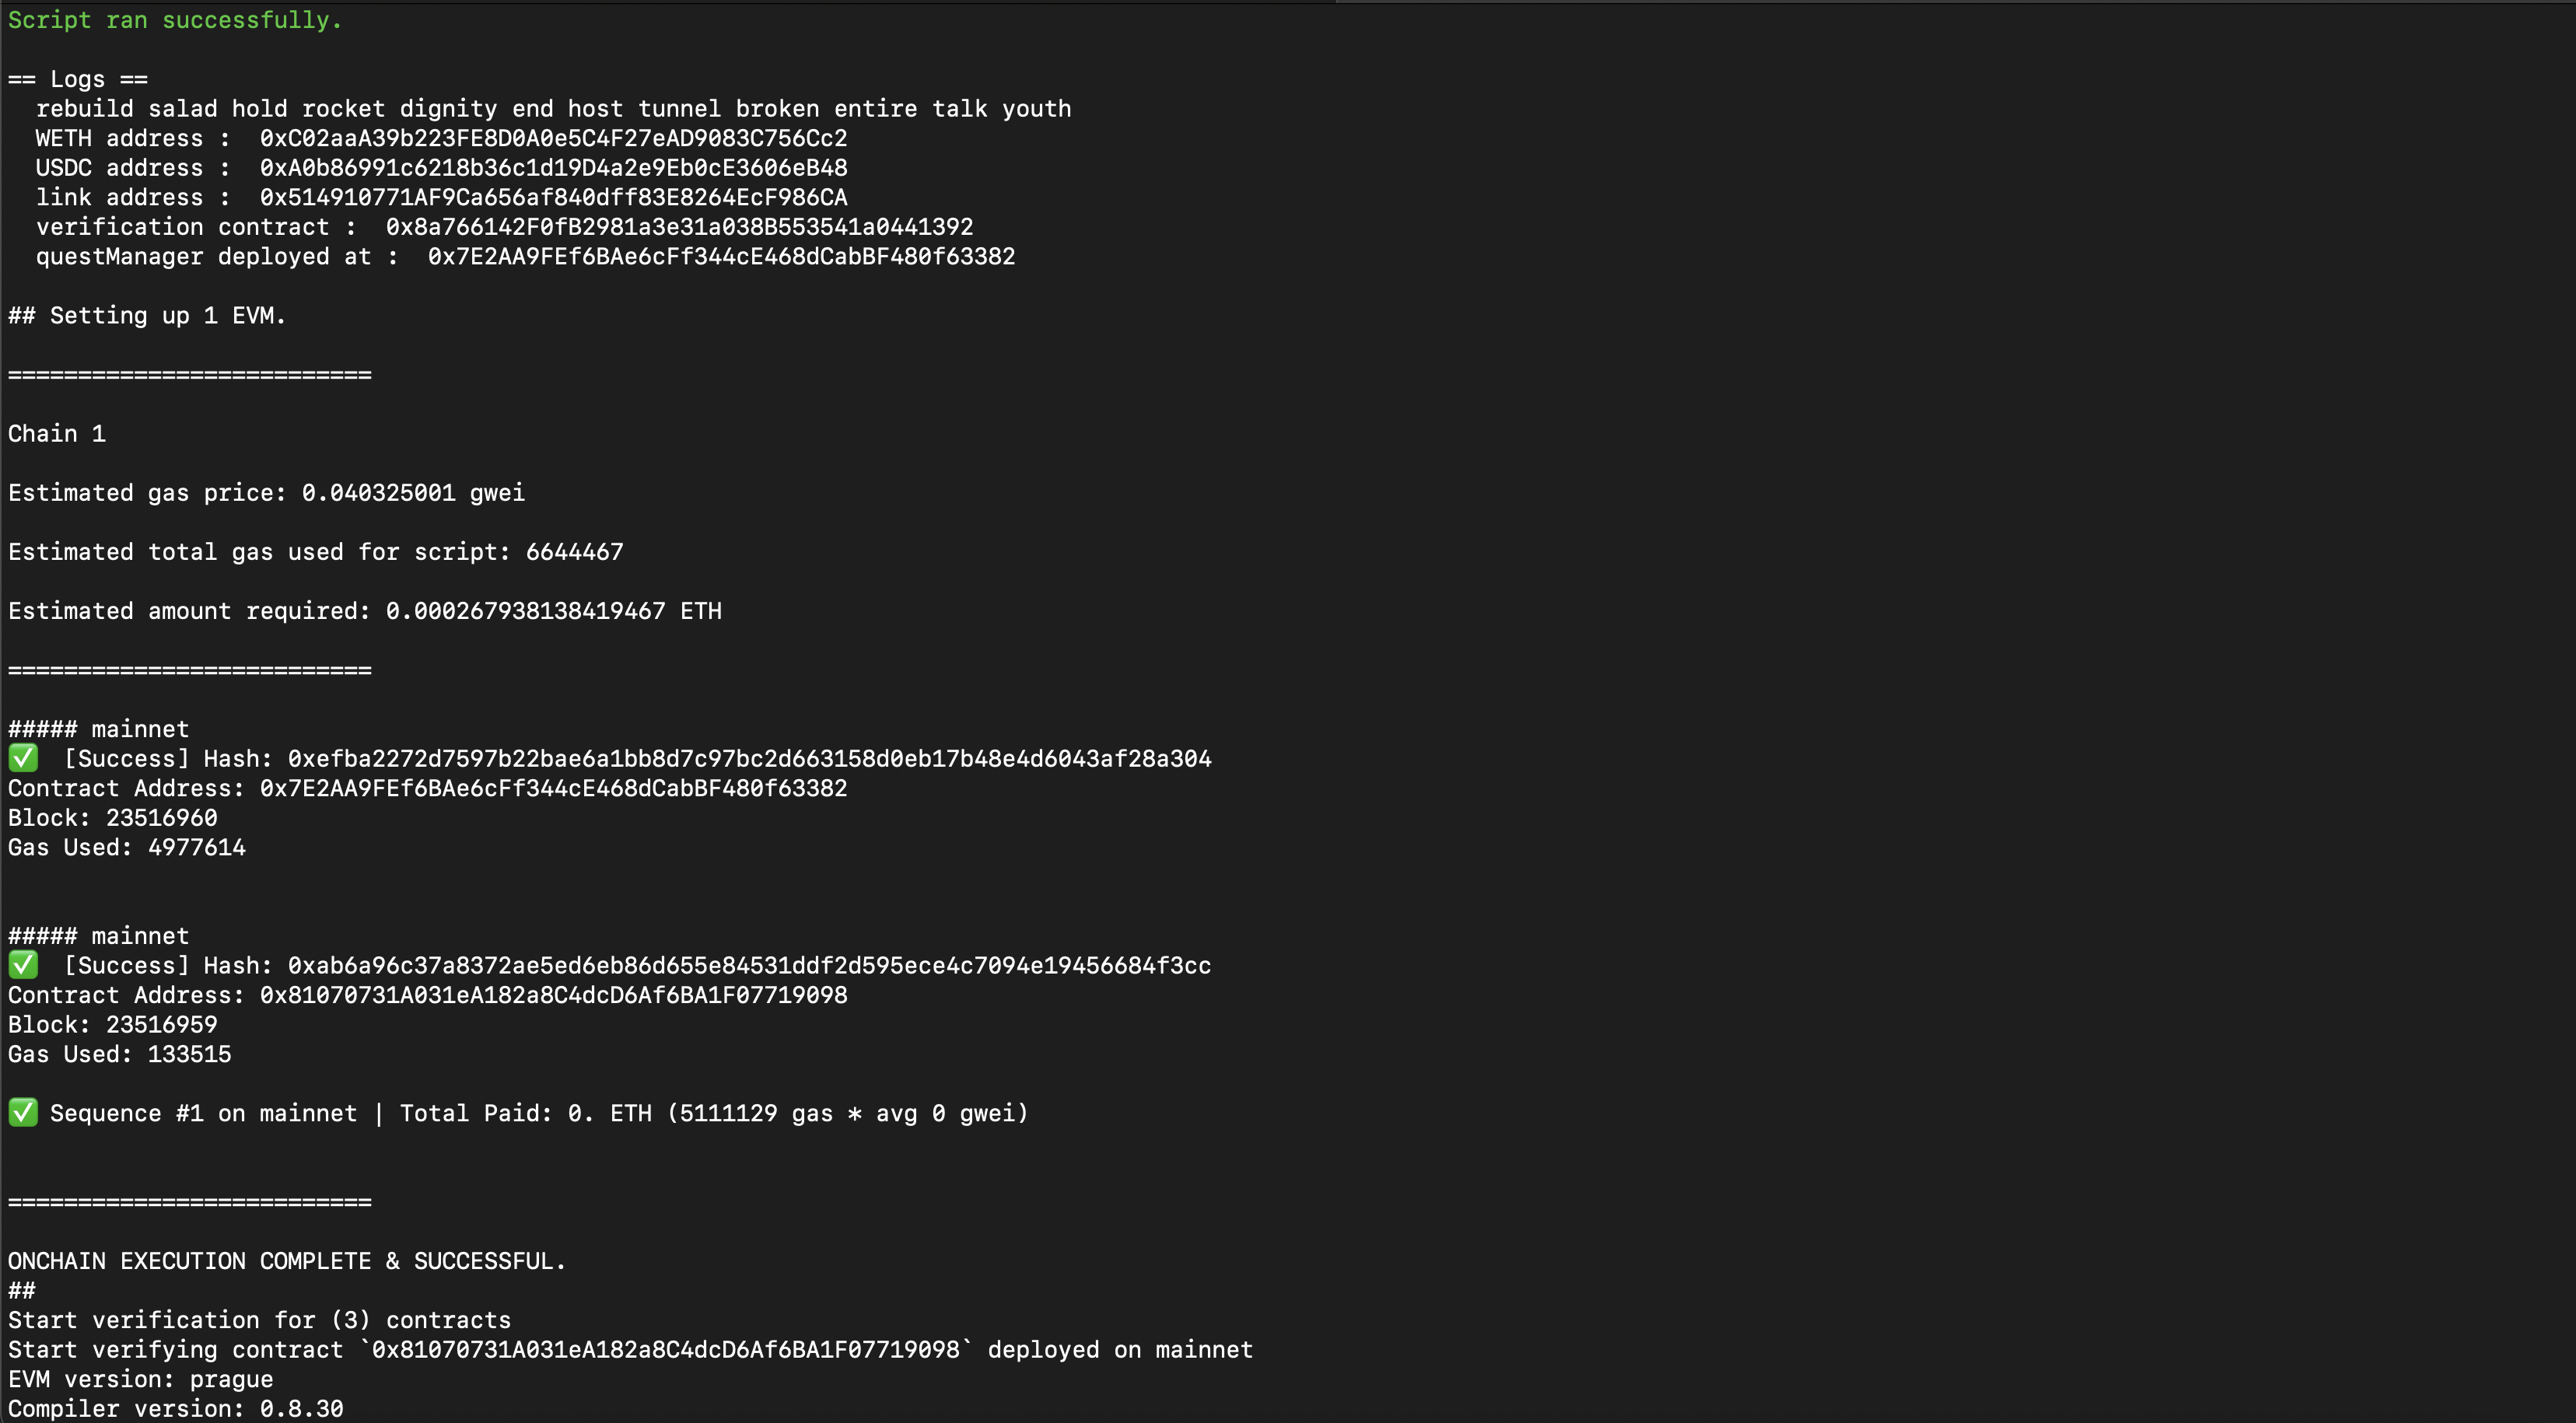
You can view the contract address in the BuildBear Explorer.
Step 5: Create a Quest
Similar to the deploy script, we can create a script to create a new quest.
It will refer to the latest contract deployment from run-latest.json in broadcast directory
CreateQuest.s.sol
Run the following command from Makefile:
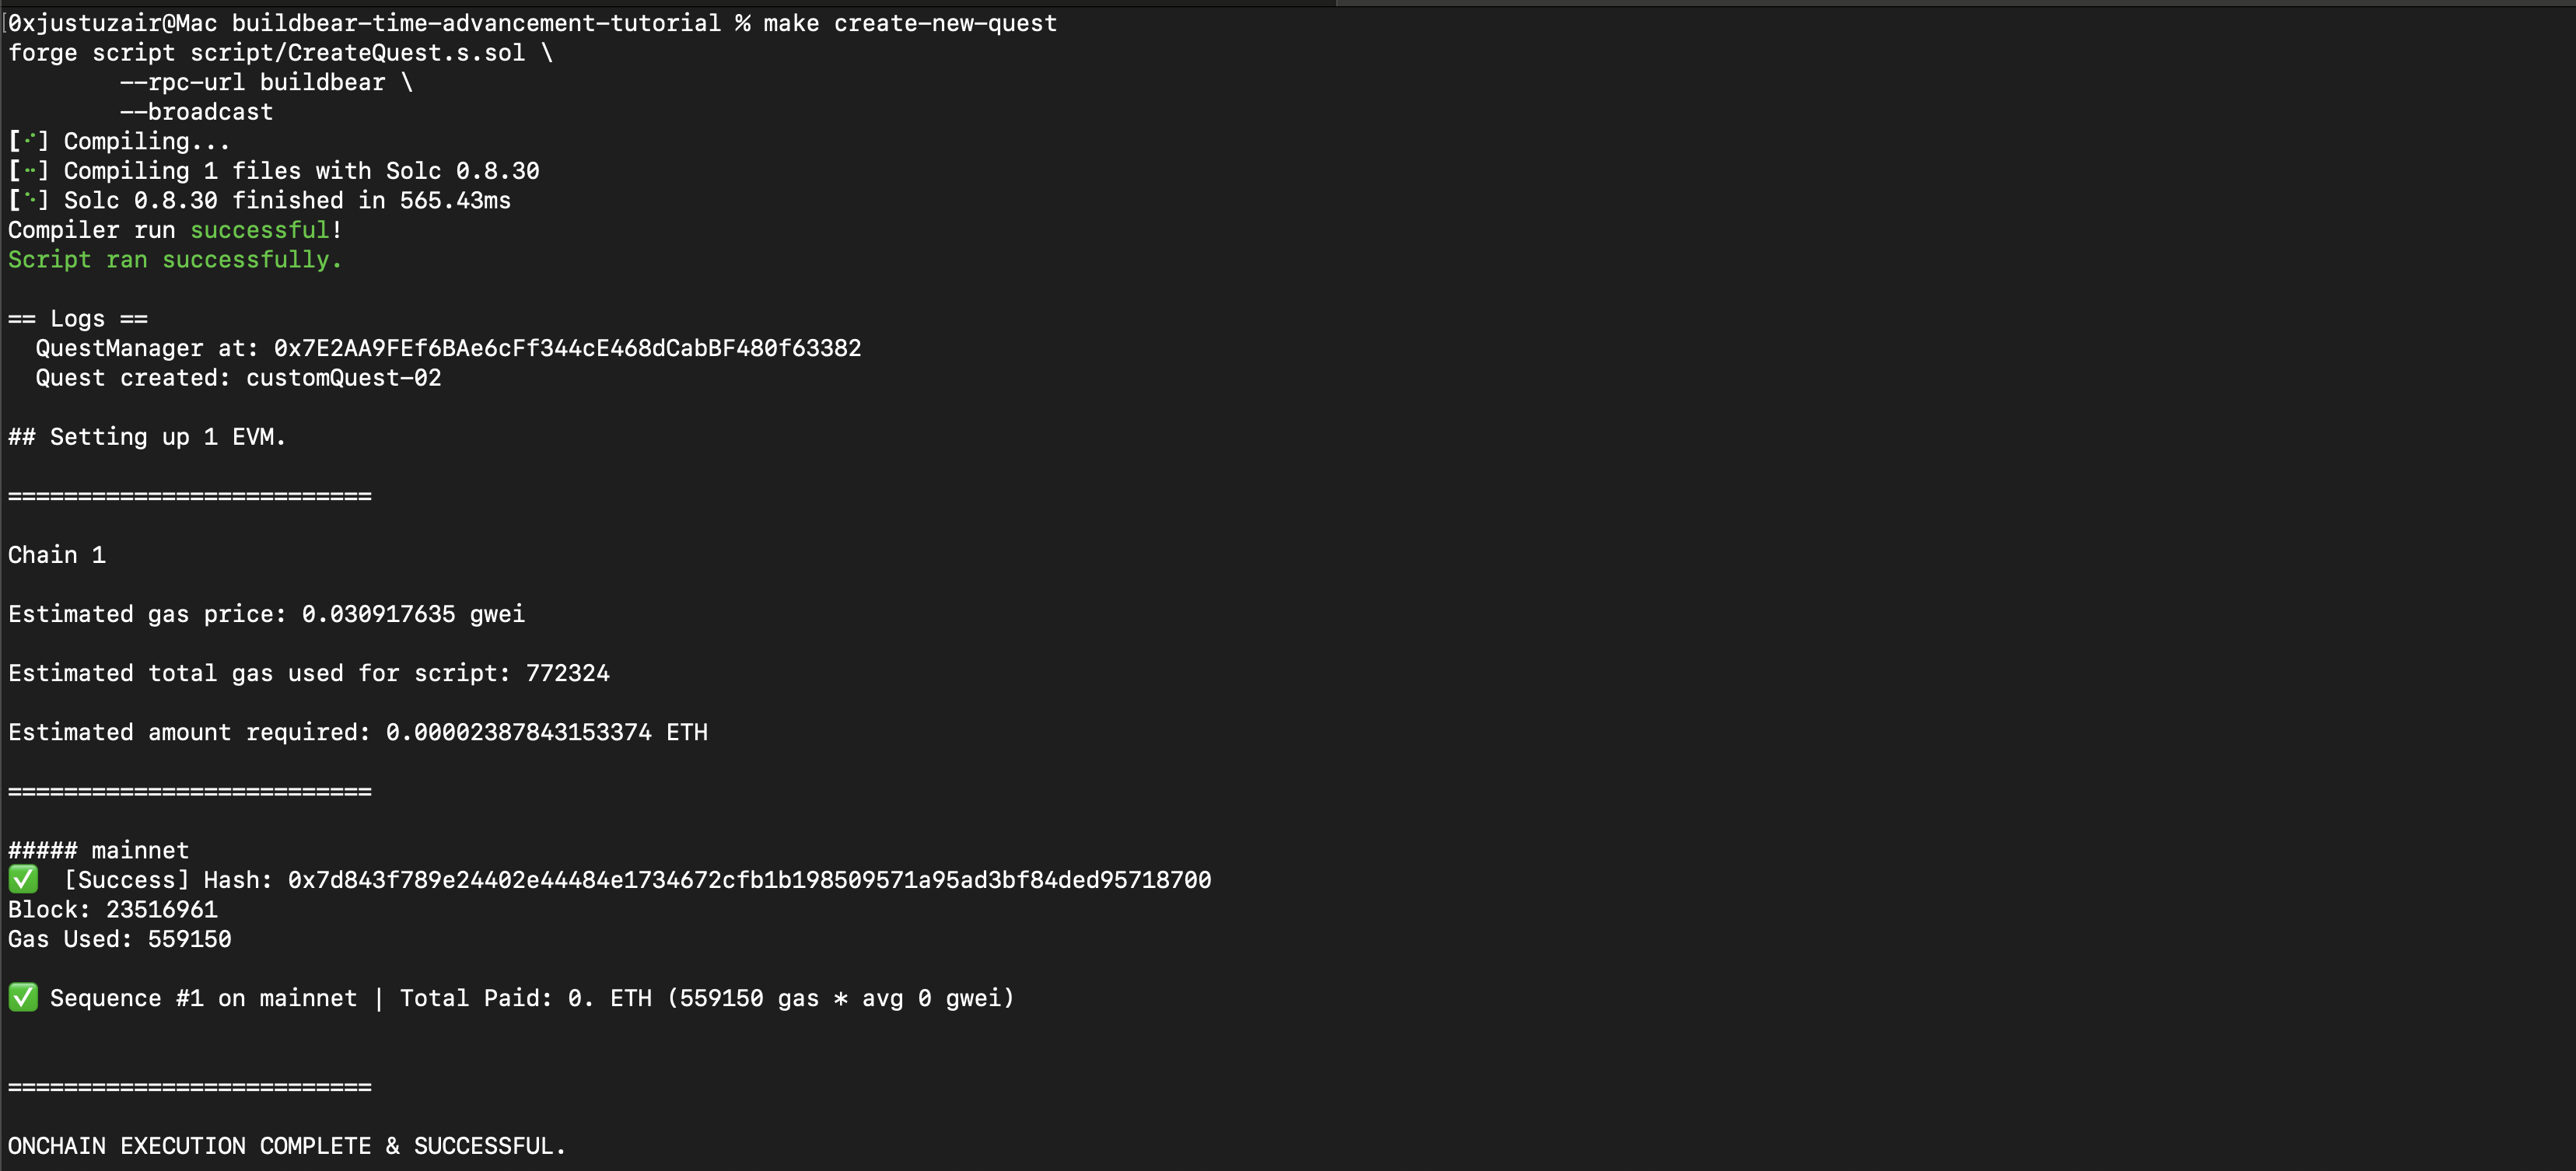
This calls CreateQuest.s.sol which:
- Reads the deployed
QuestManageraddress from broadcast JSON - Creates a quest with ID
"customQuest-01" - Locks
3 etheras reward pool for 3 winners - Start time = now, End time = now + 3 days
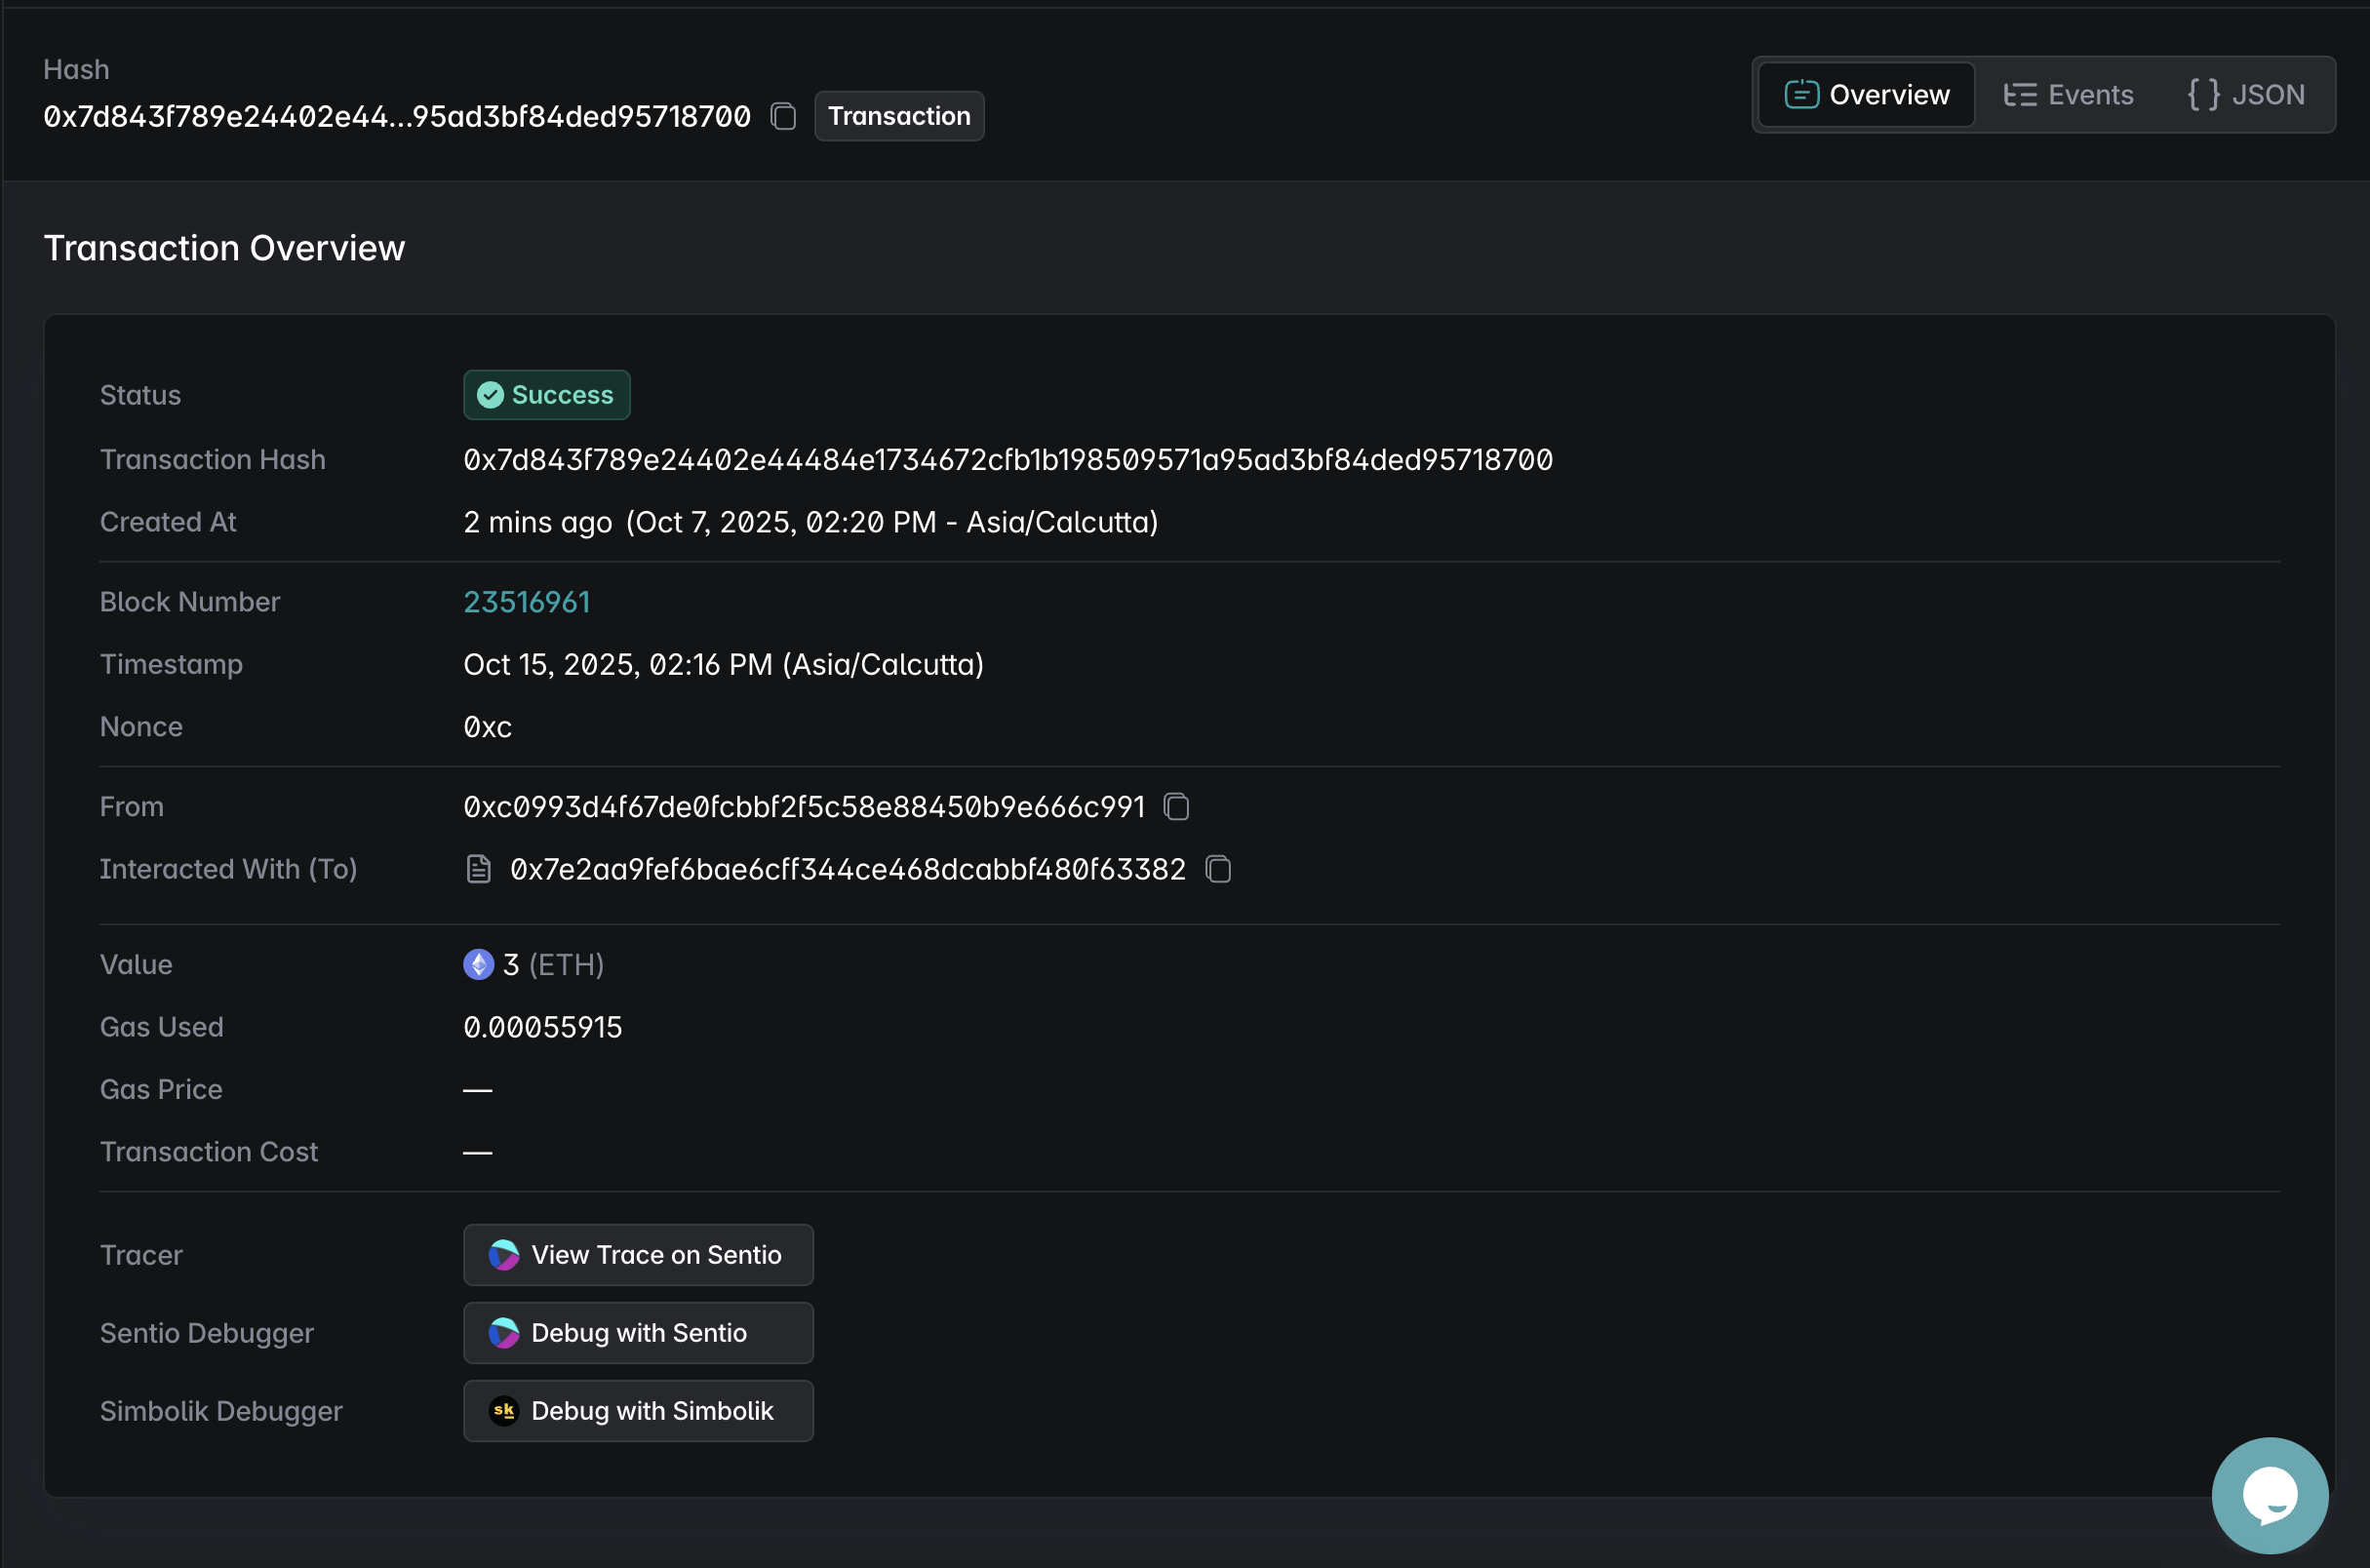
You’ll see the quest creation transaction in the BuildBear Explorer.
You can also observe 3 ether sent to the contract to lock. (Check rewardPool variable in the above script)
If you want you can also lock ERC20 tokens instead of native tokens. Just change the rewardToken address to a whitelisted ERC20 token address and ensure your deployer wallet has enough balance and has approved the contract to spend the tokens.
To modify the script to use ERC20 instead of native, refer to the following detailed test file
Example of ERC20 Quest Creation inside the SignedQuestManager.t.sol test file
Step 6: Claiming Rewards by the Winner(s)
Use the SignAndClaim.s.sol script. It:
- Reads quest info and calculates the per-winner reward
- Signs the claim off-chain using the admin/owner private key (
PRIVATE_KEY) - Broadcasts the claim transaction as the winner (
WINNER_PRIVATE_KEY)
SignAndClaim.s.sol
Run the following command:
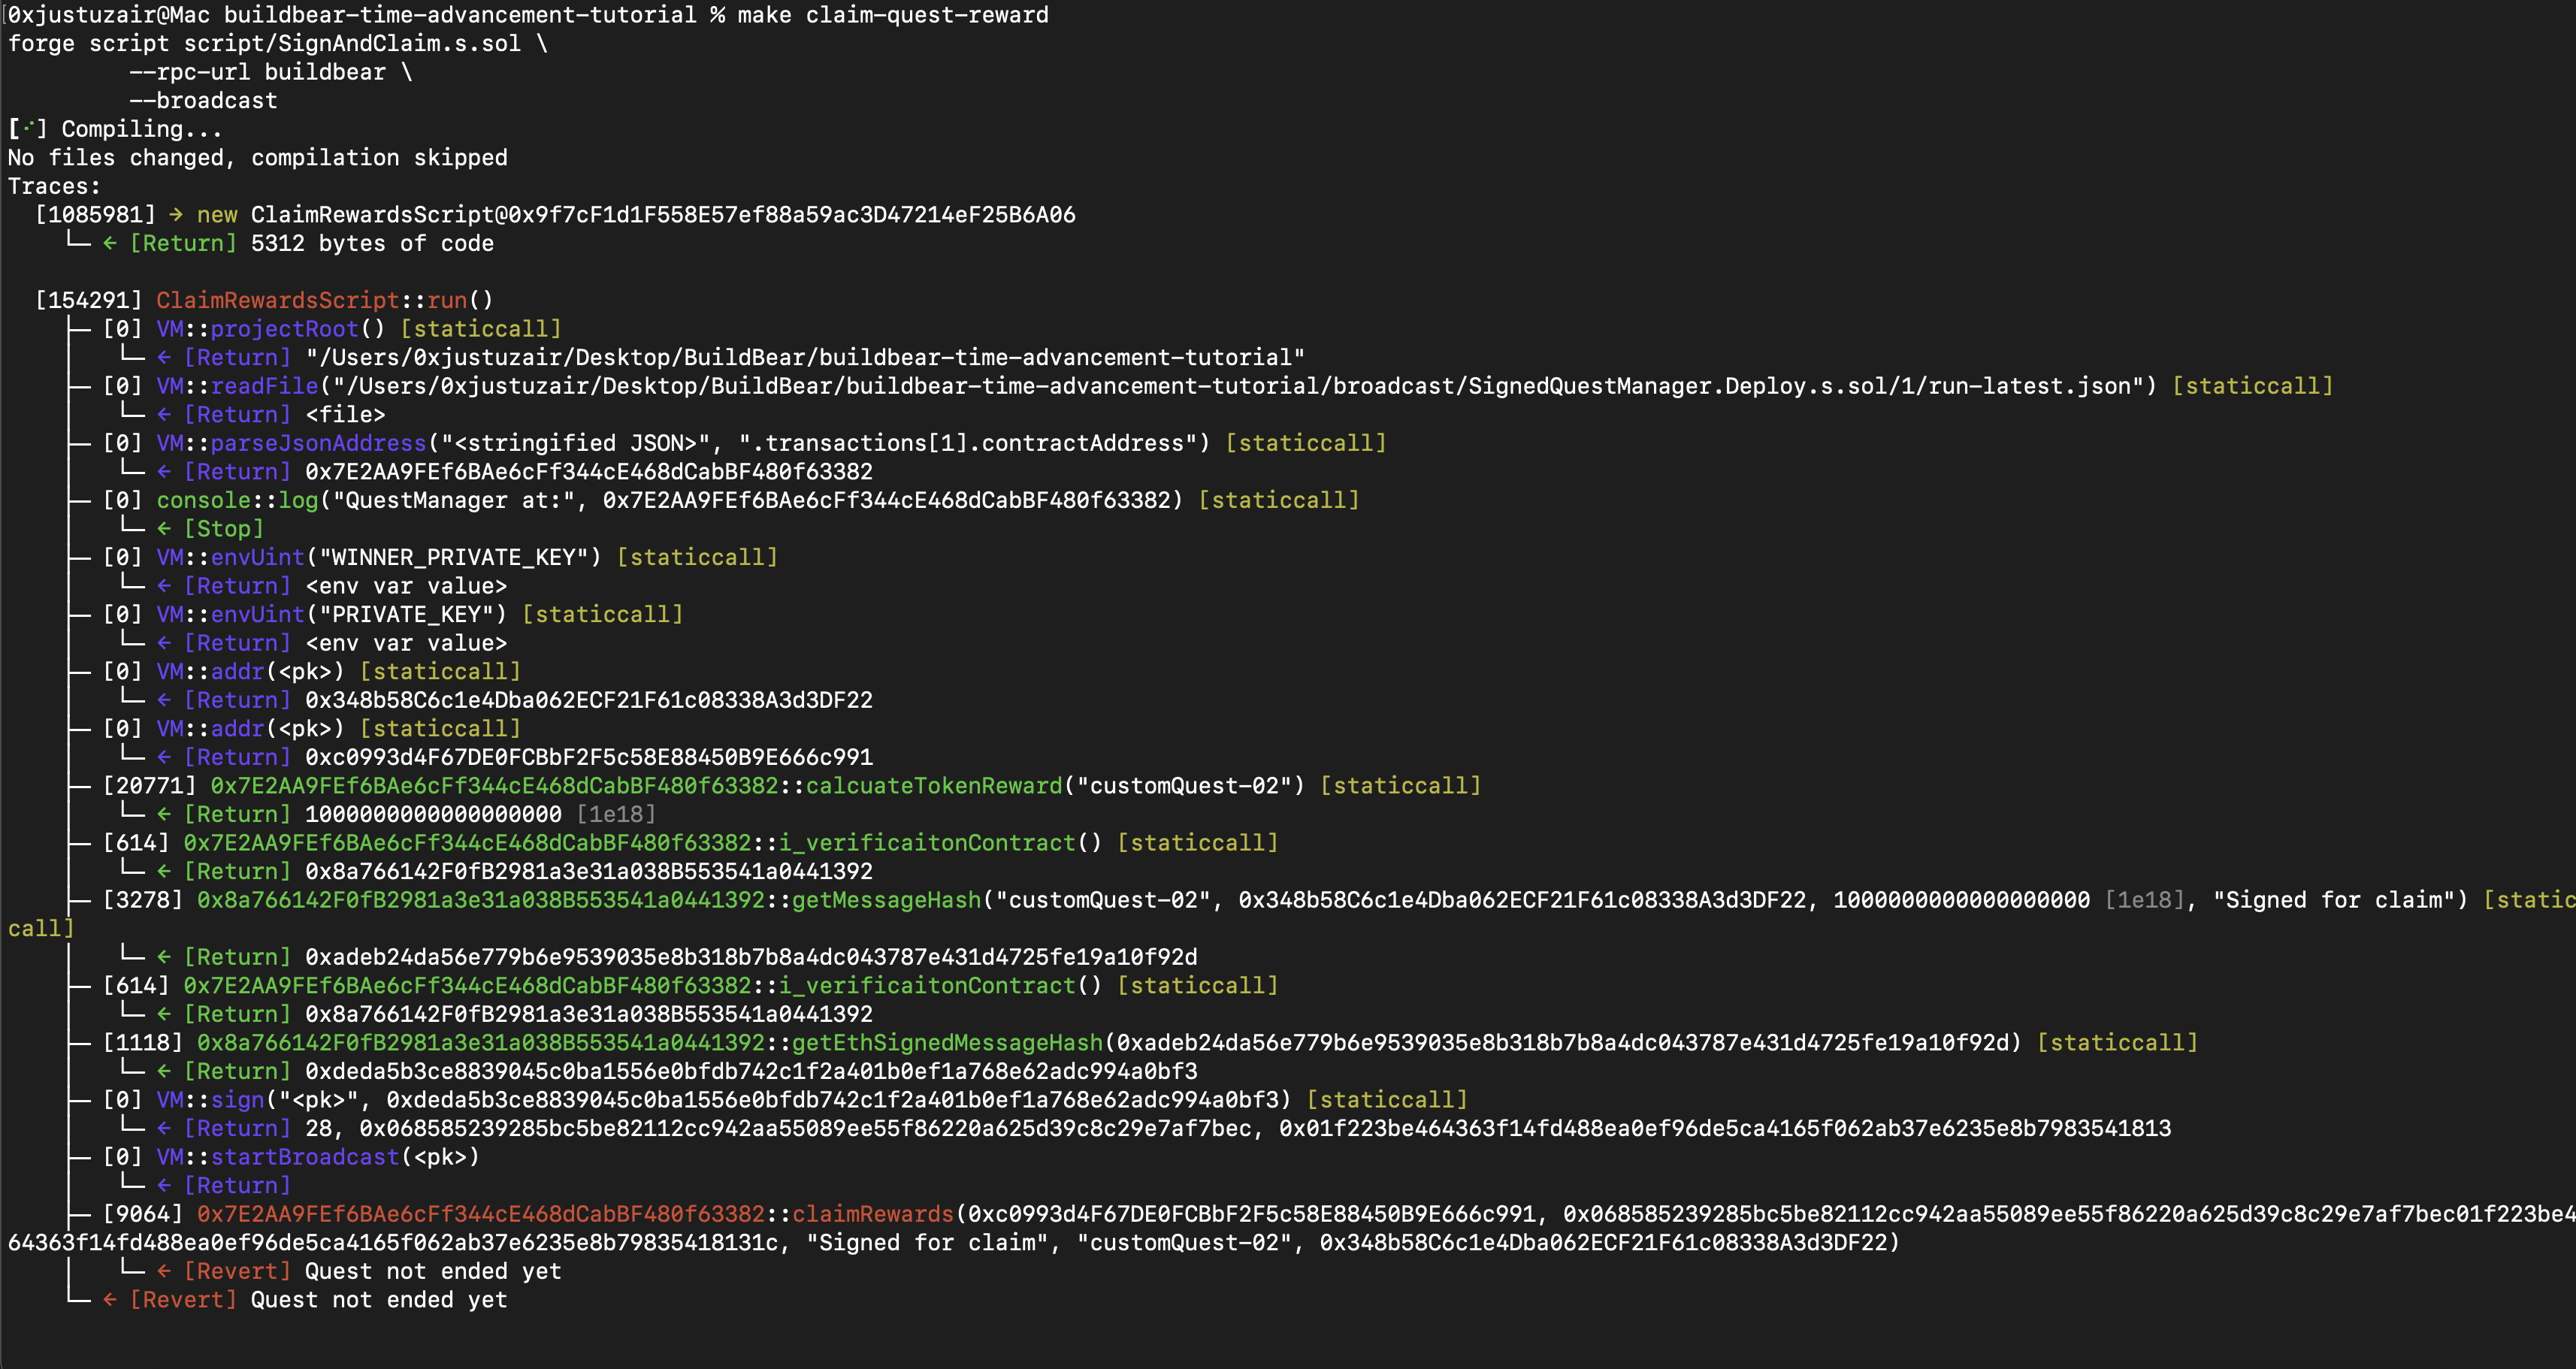
Reverted Call to Claim Quest Rewards (Before Time Advancement)
Before the quest end time, the claimRewards call will revert with "Quest not ended yet".
This is because the quest is still active (3 days from the time of creation) and cannot be claimed yet.
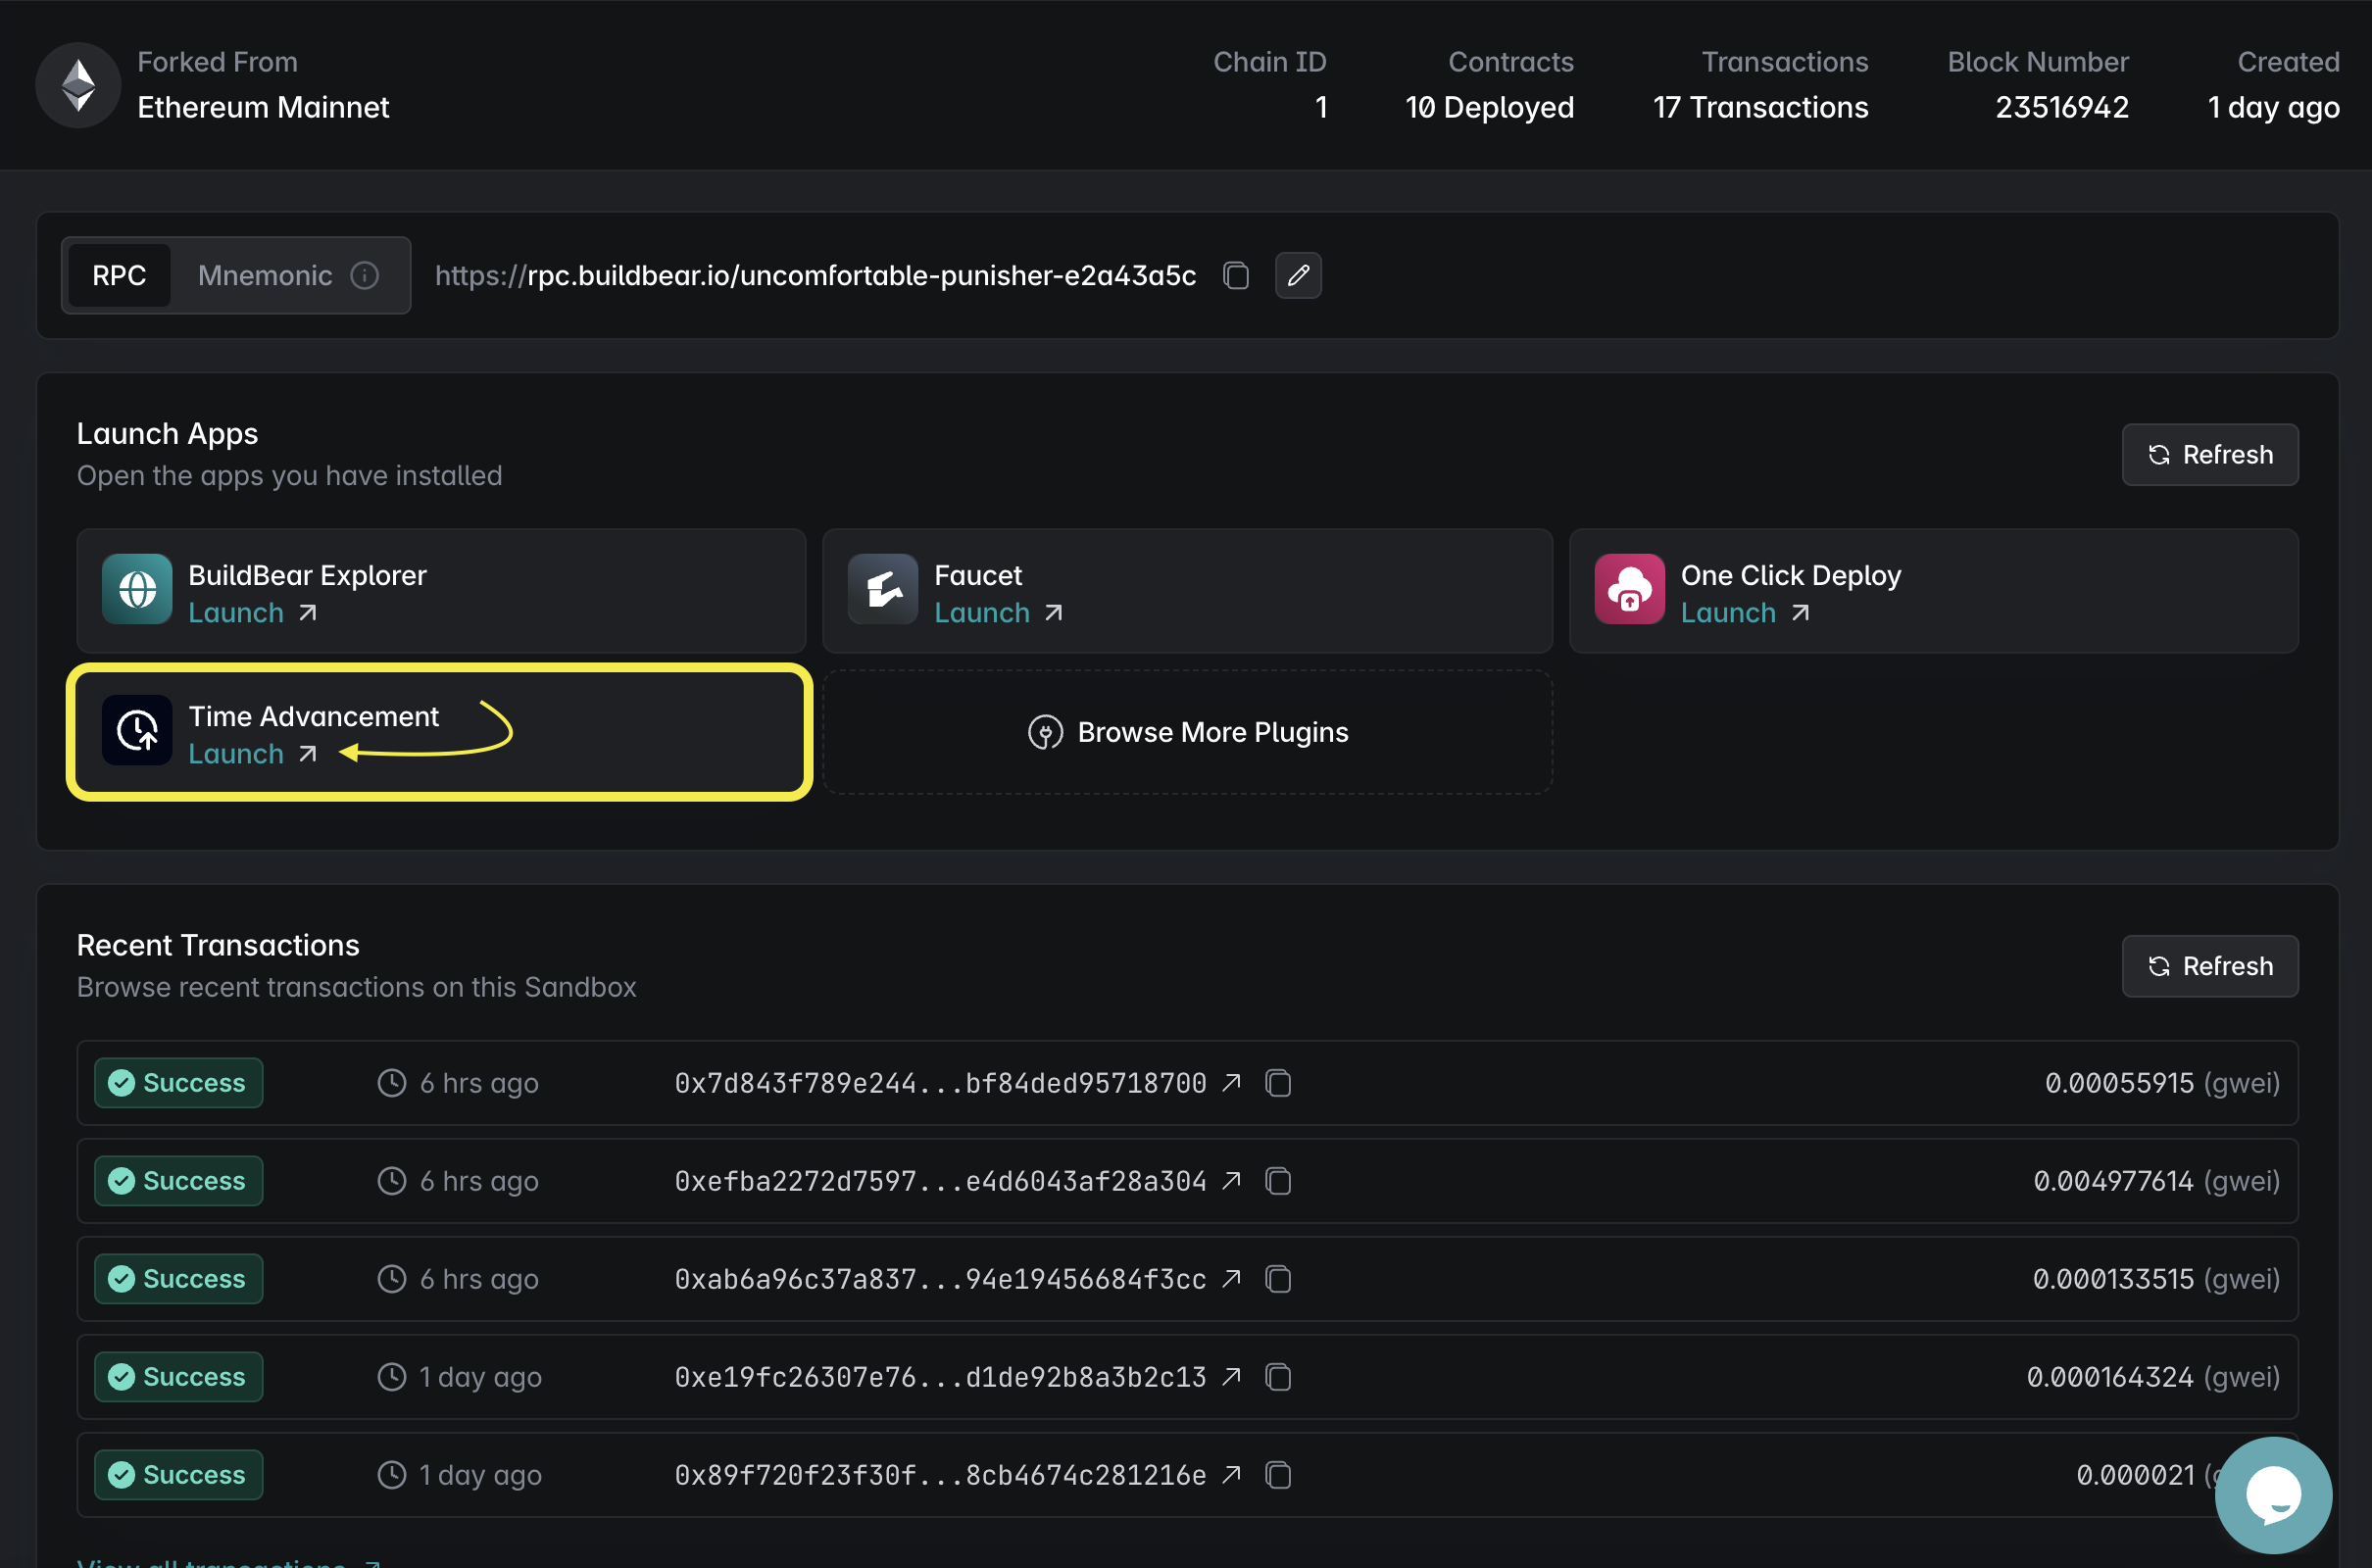
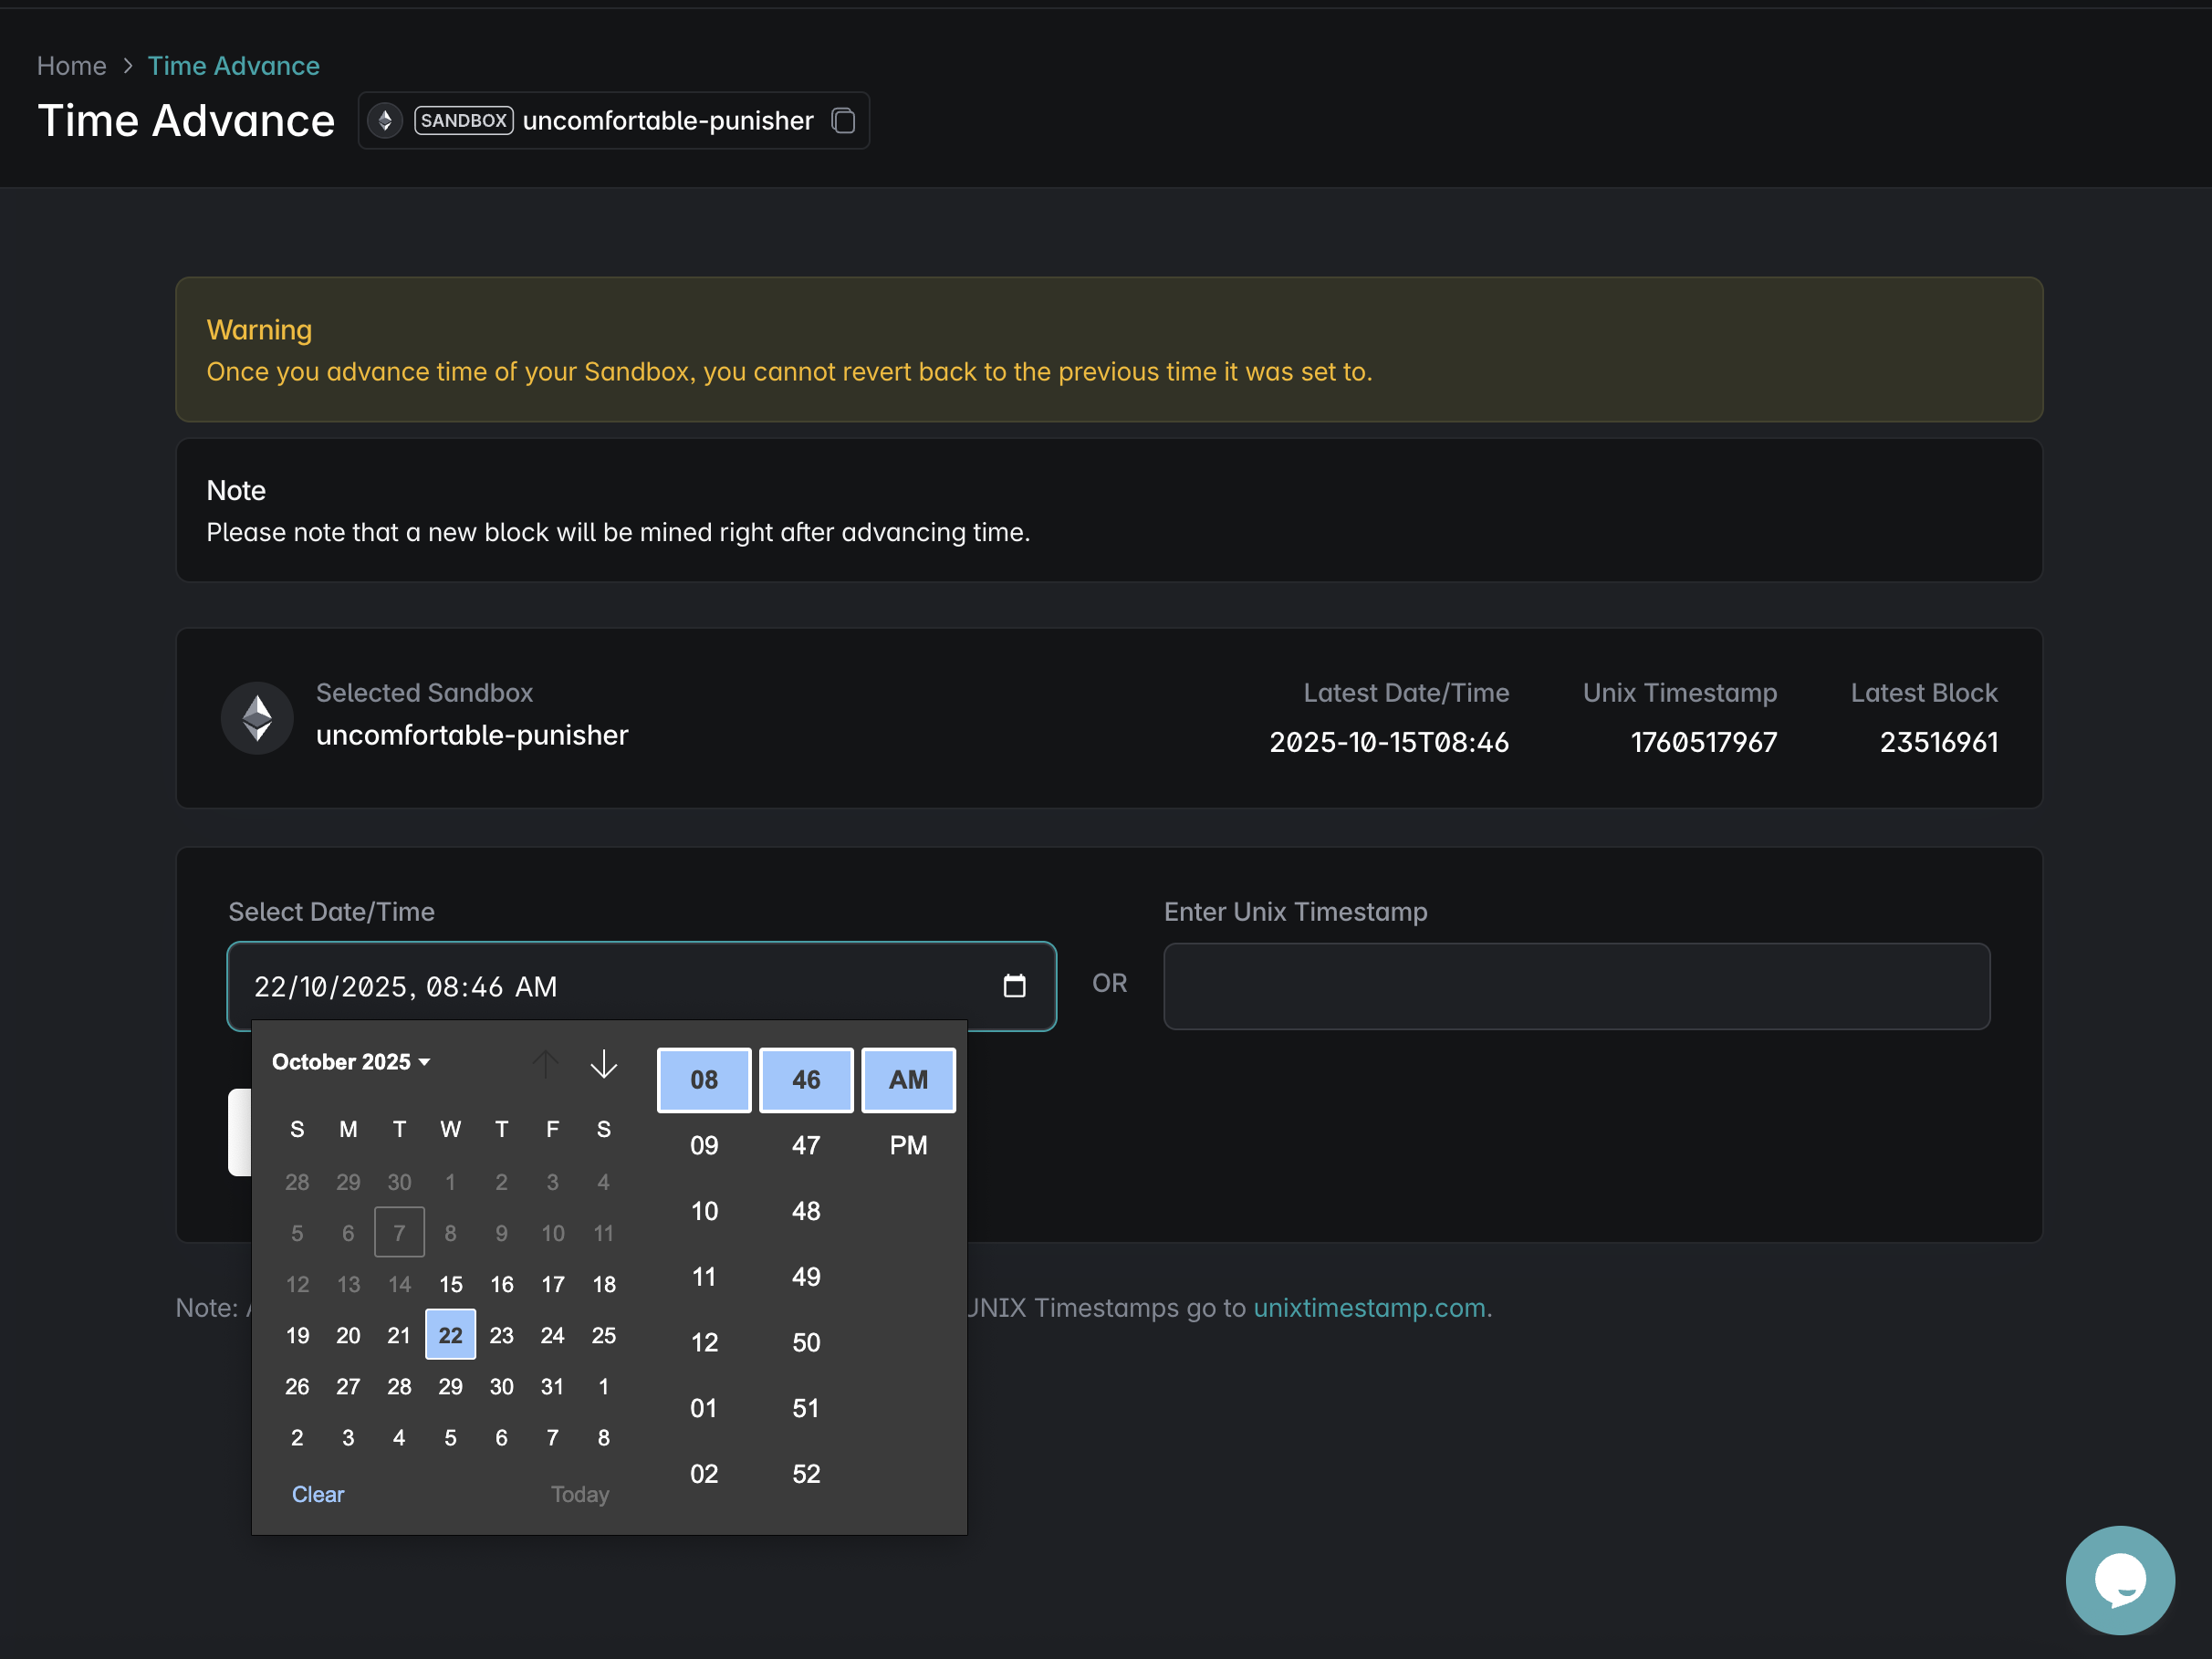
Step 7: Advance Time in BuildBear Dashboard
We’ll use the BuildBear Dashboard:
- Open your BuildBear dashboard and choose your Sandbox.
- Click on Launch under the Time Advancement app to open the time-advancement.
- A window will open, where you can interact with and allow to set your Sandbox to a future time.
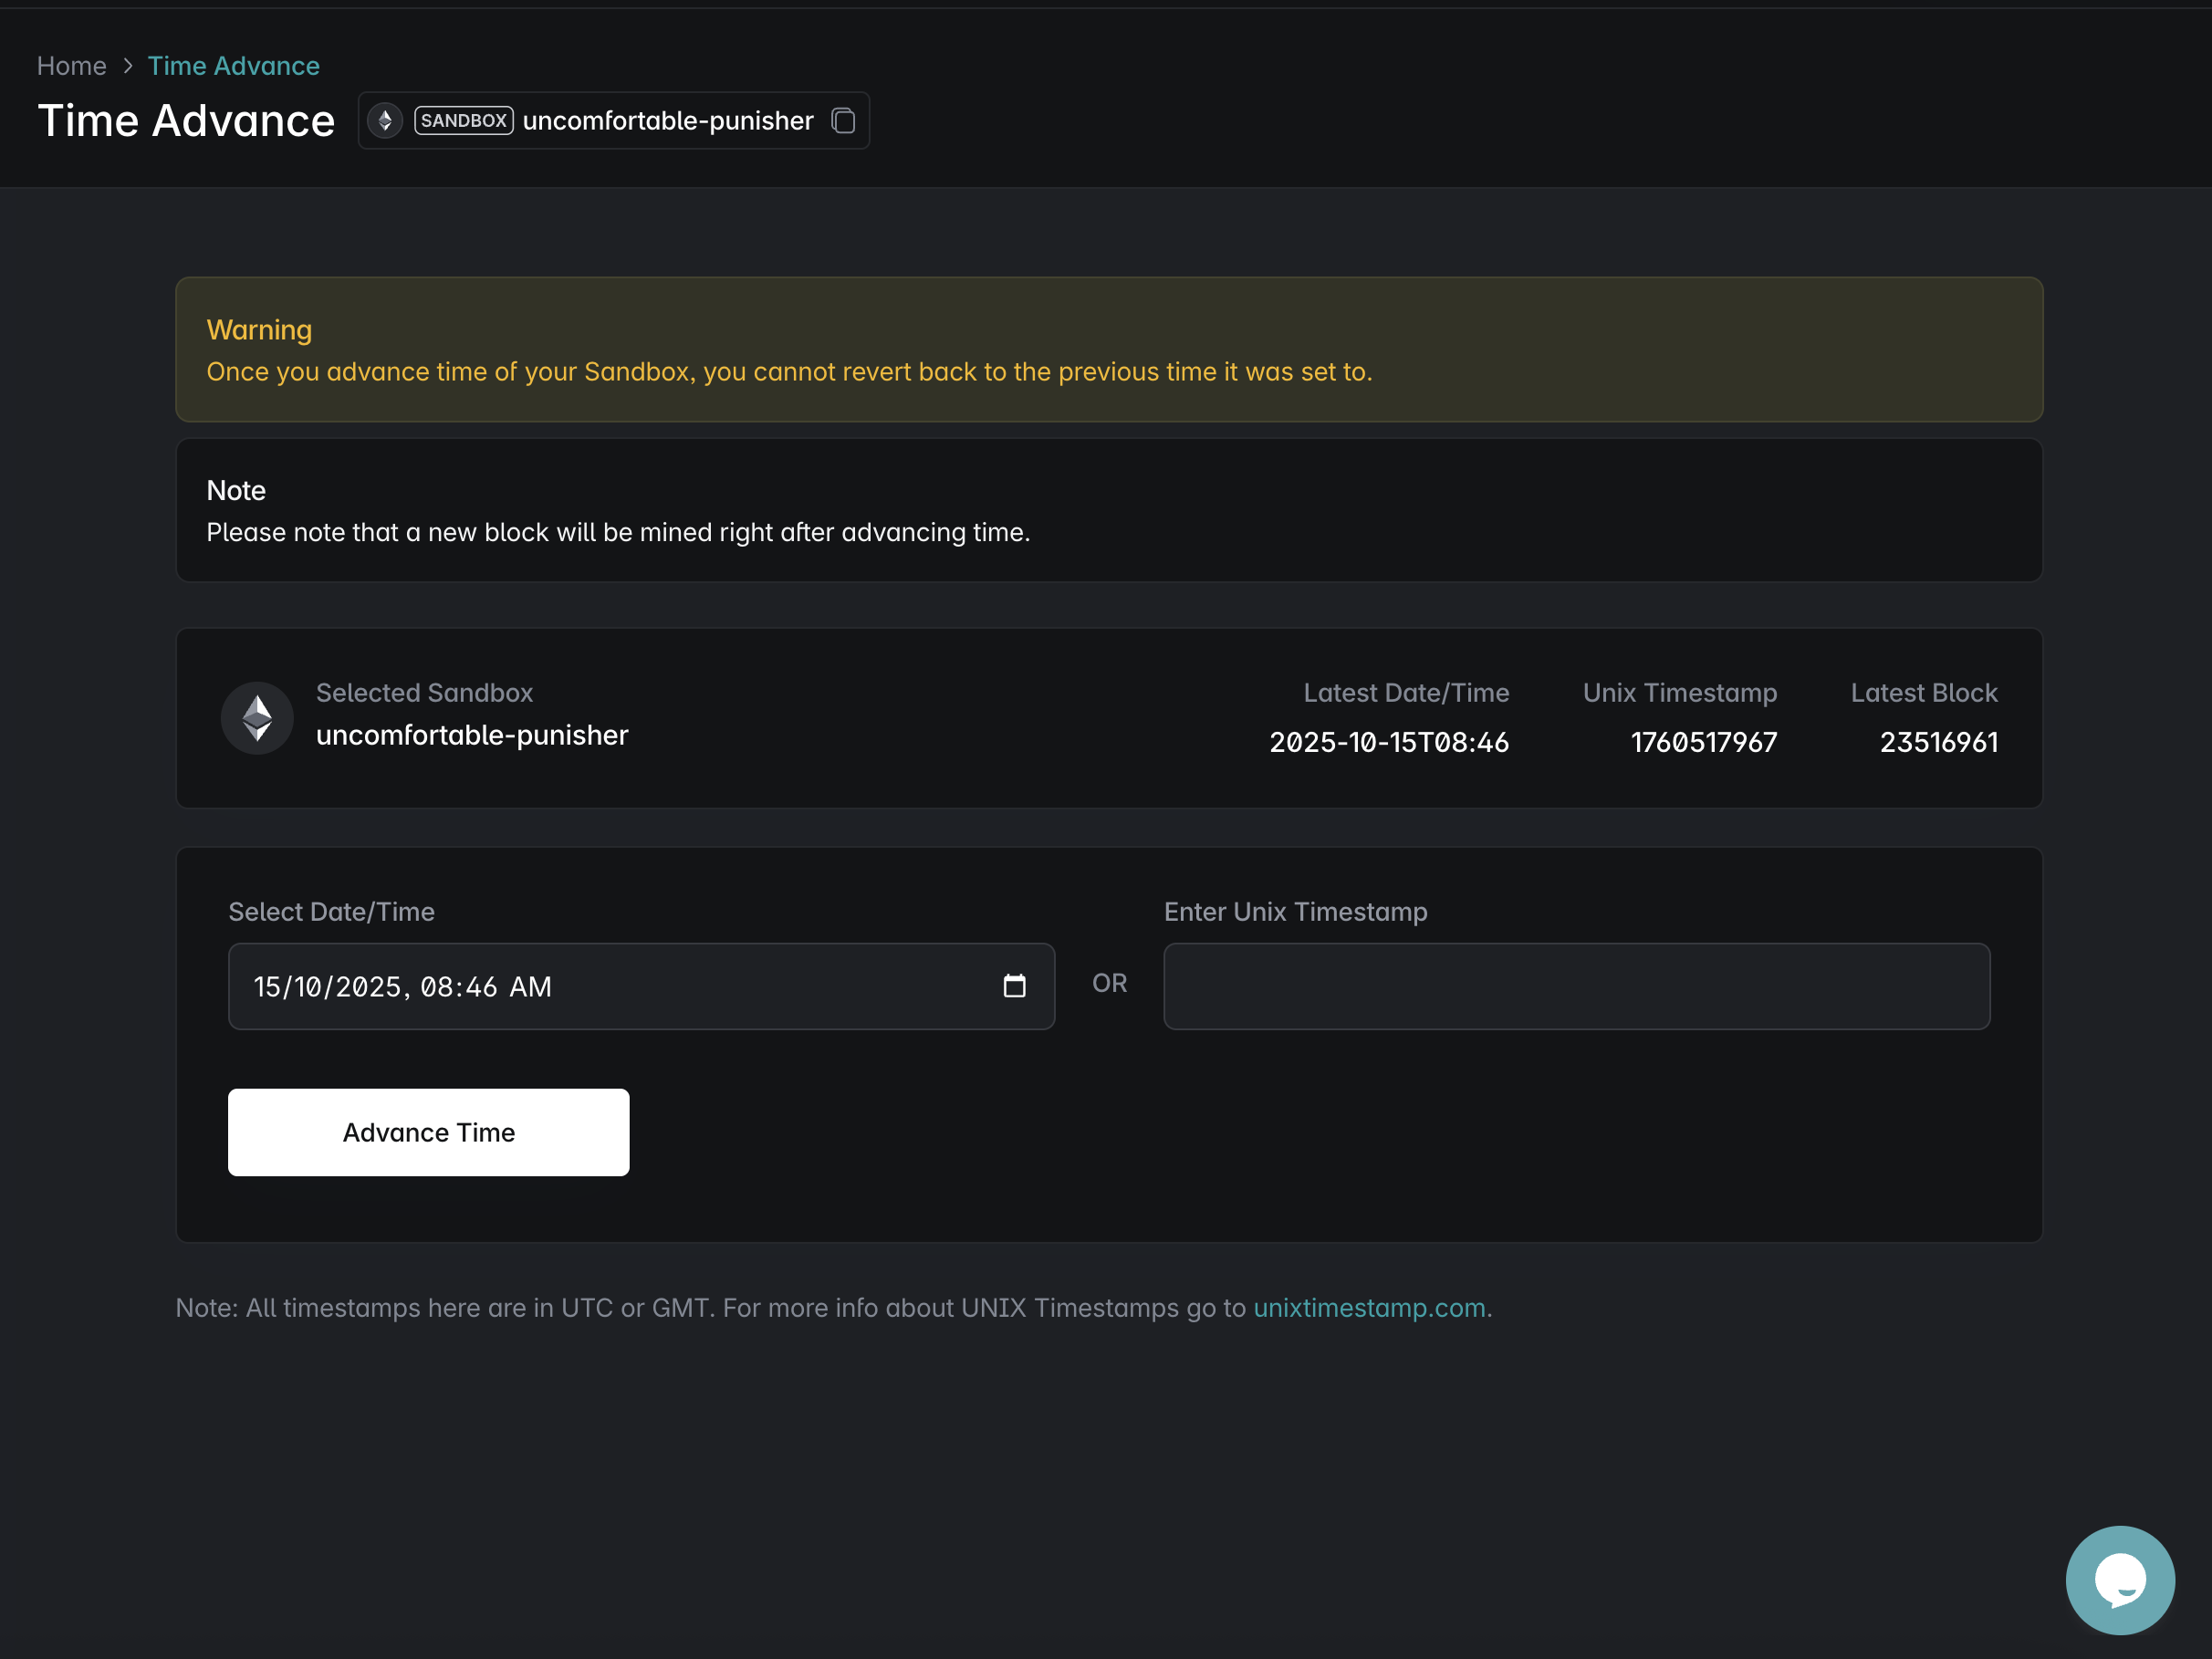
- Choose a time after the quest end time (3 days from quest creation) and click Advance Time.
Step 8: Successful Claim after Time Advancement
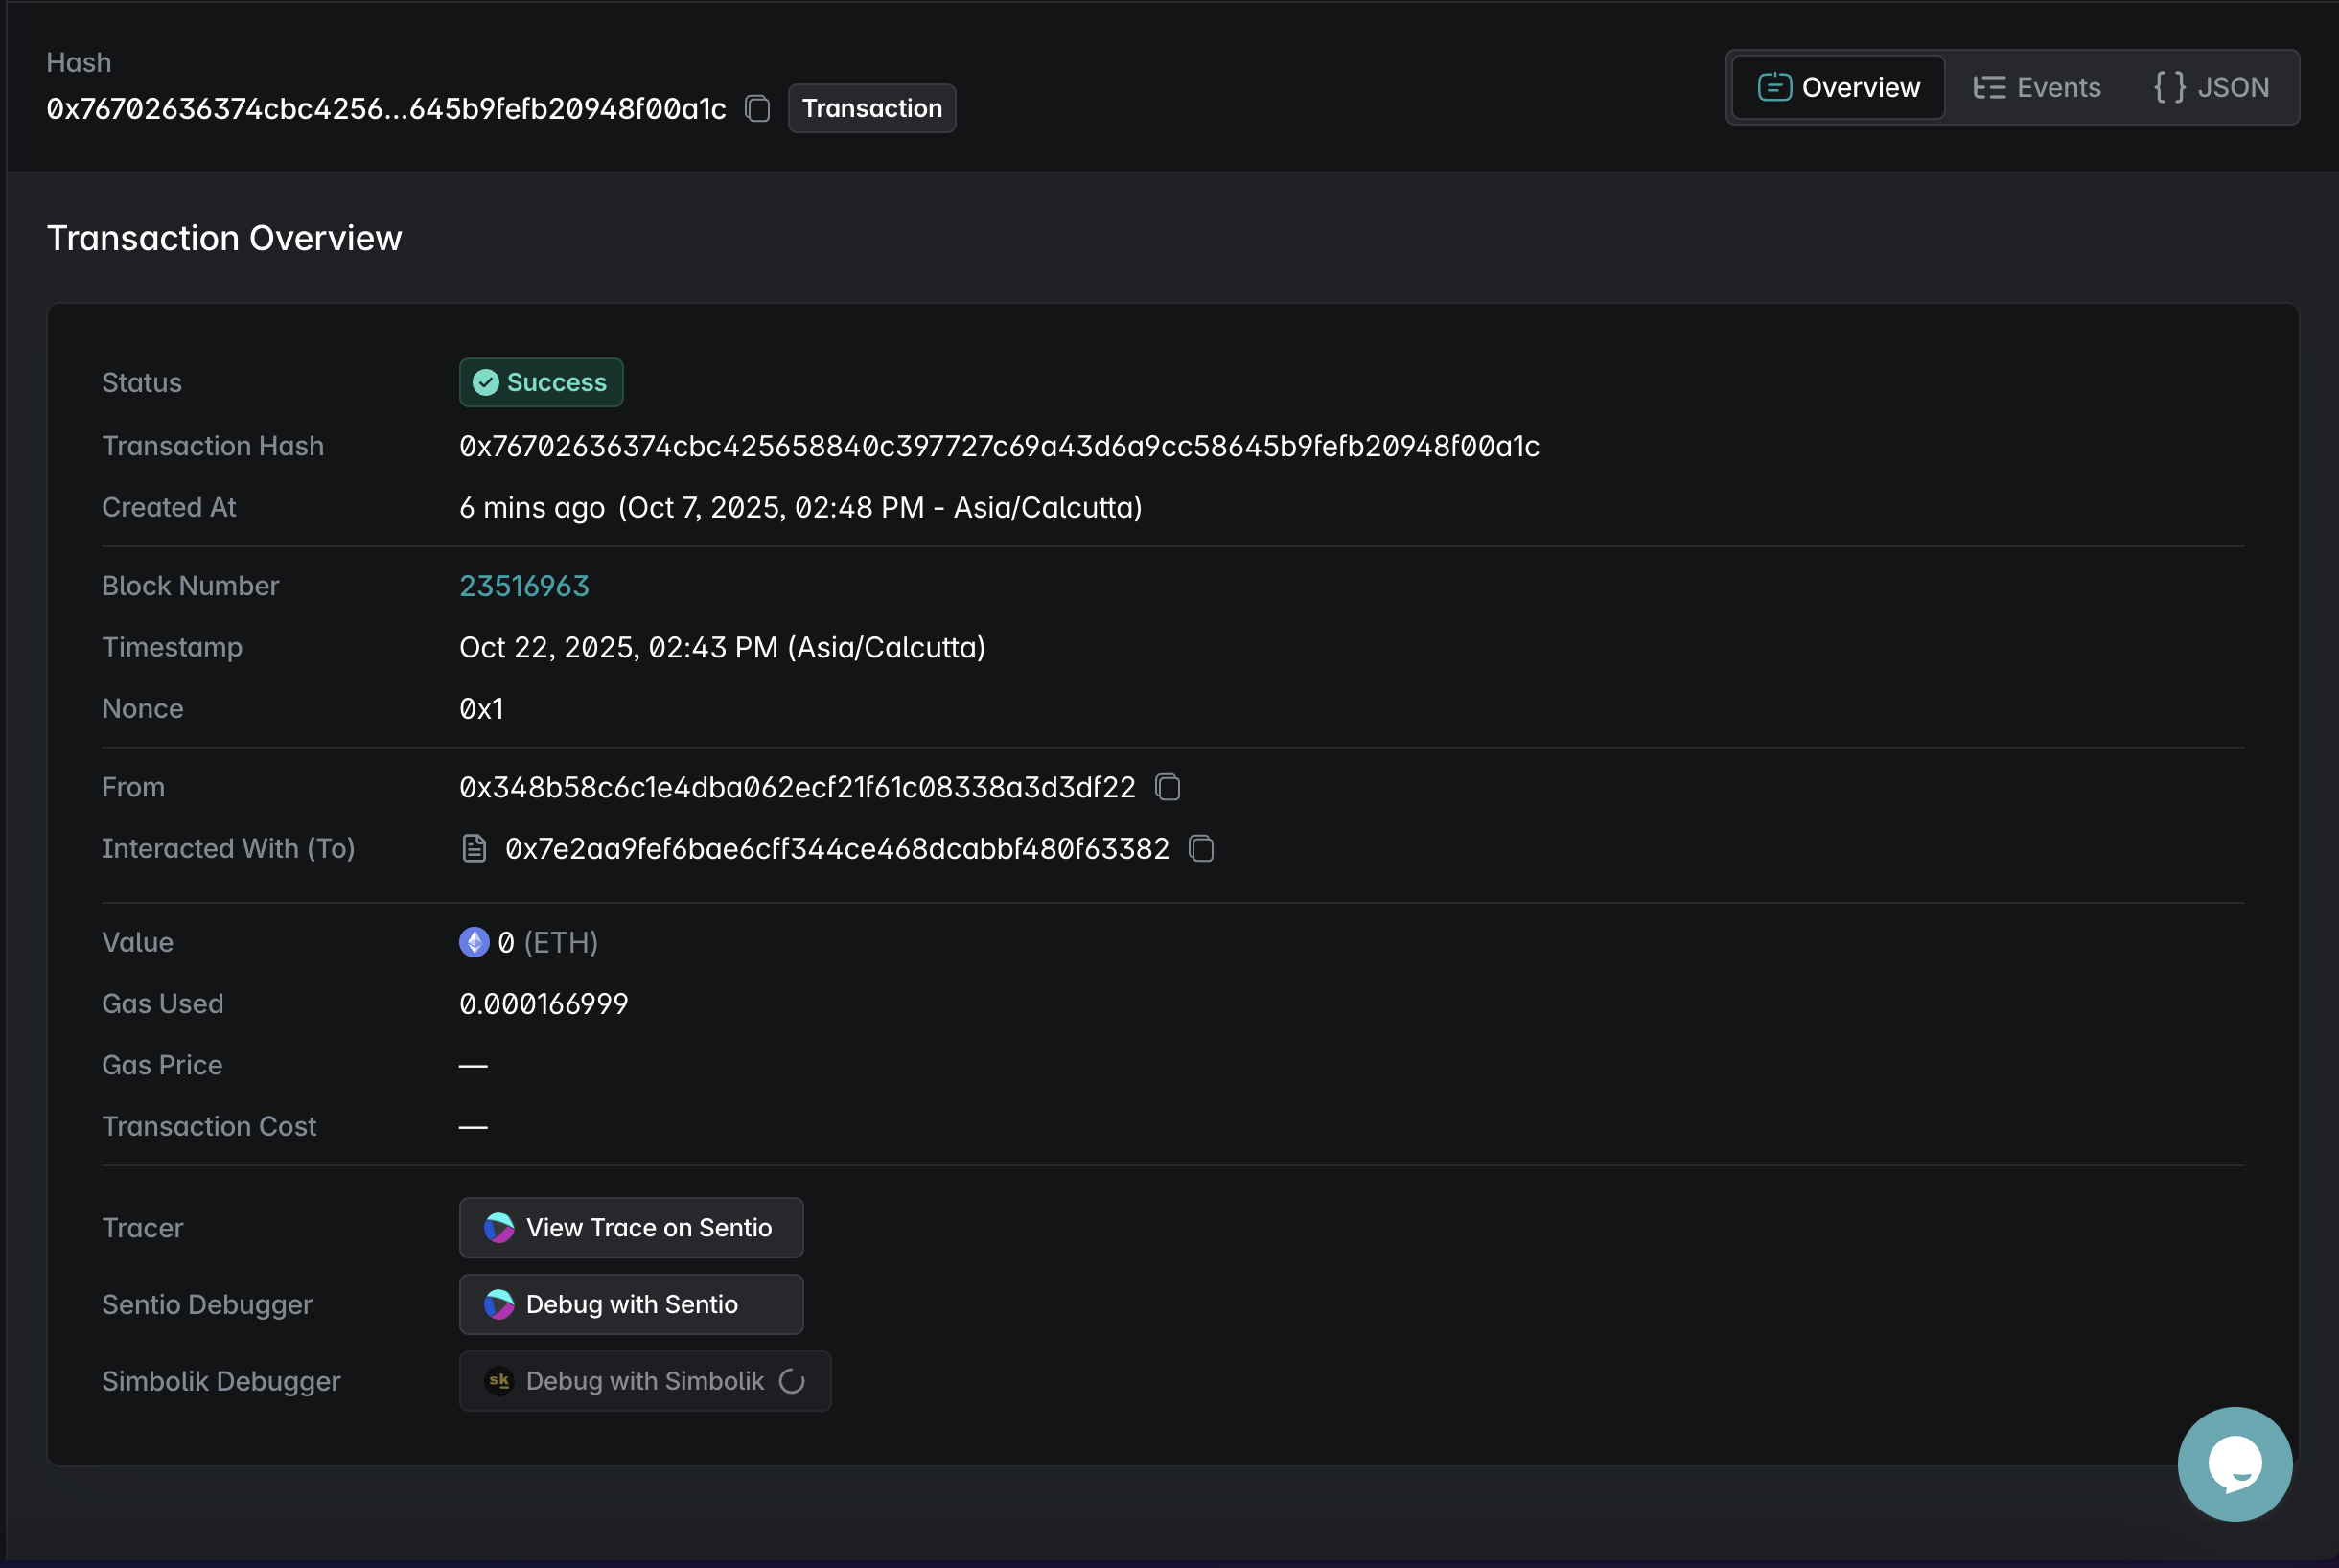
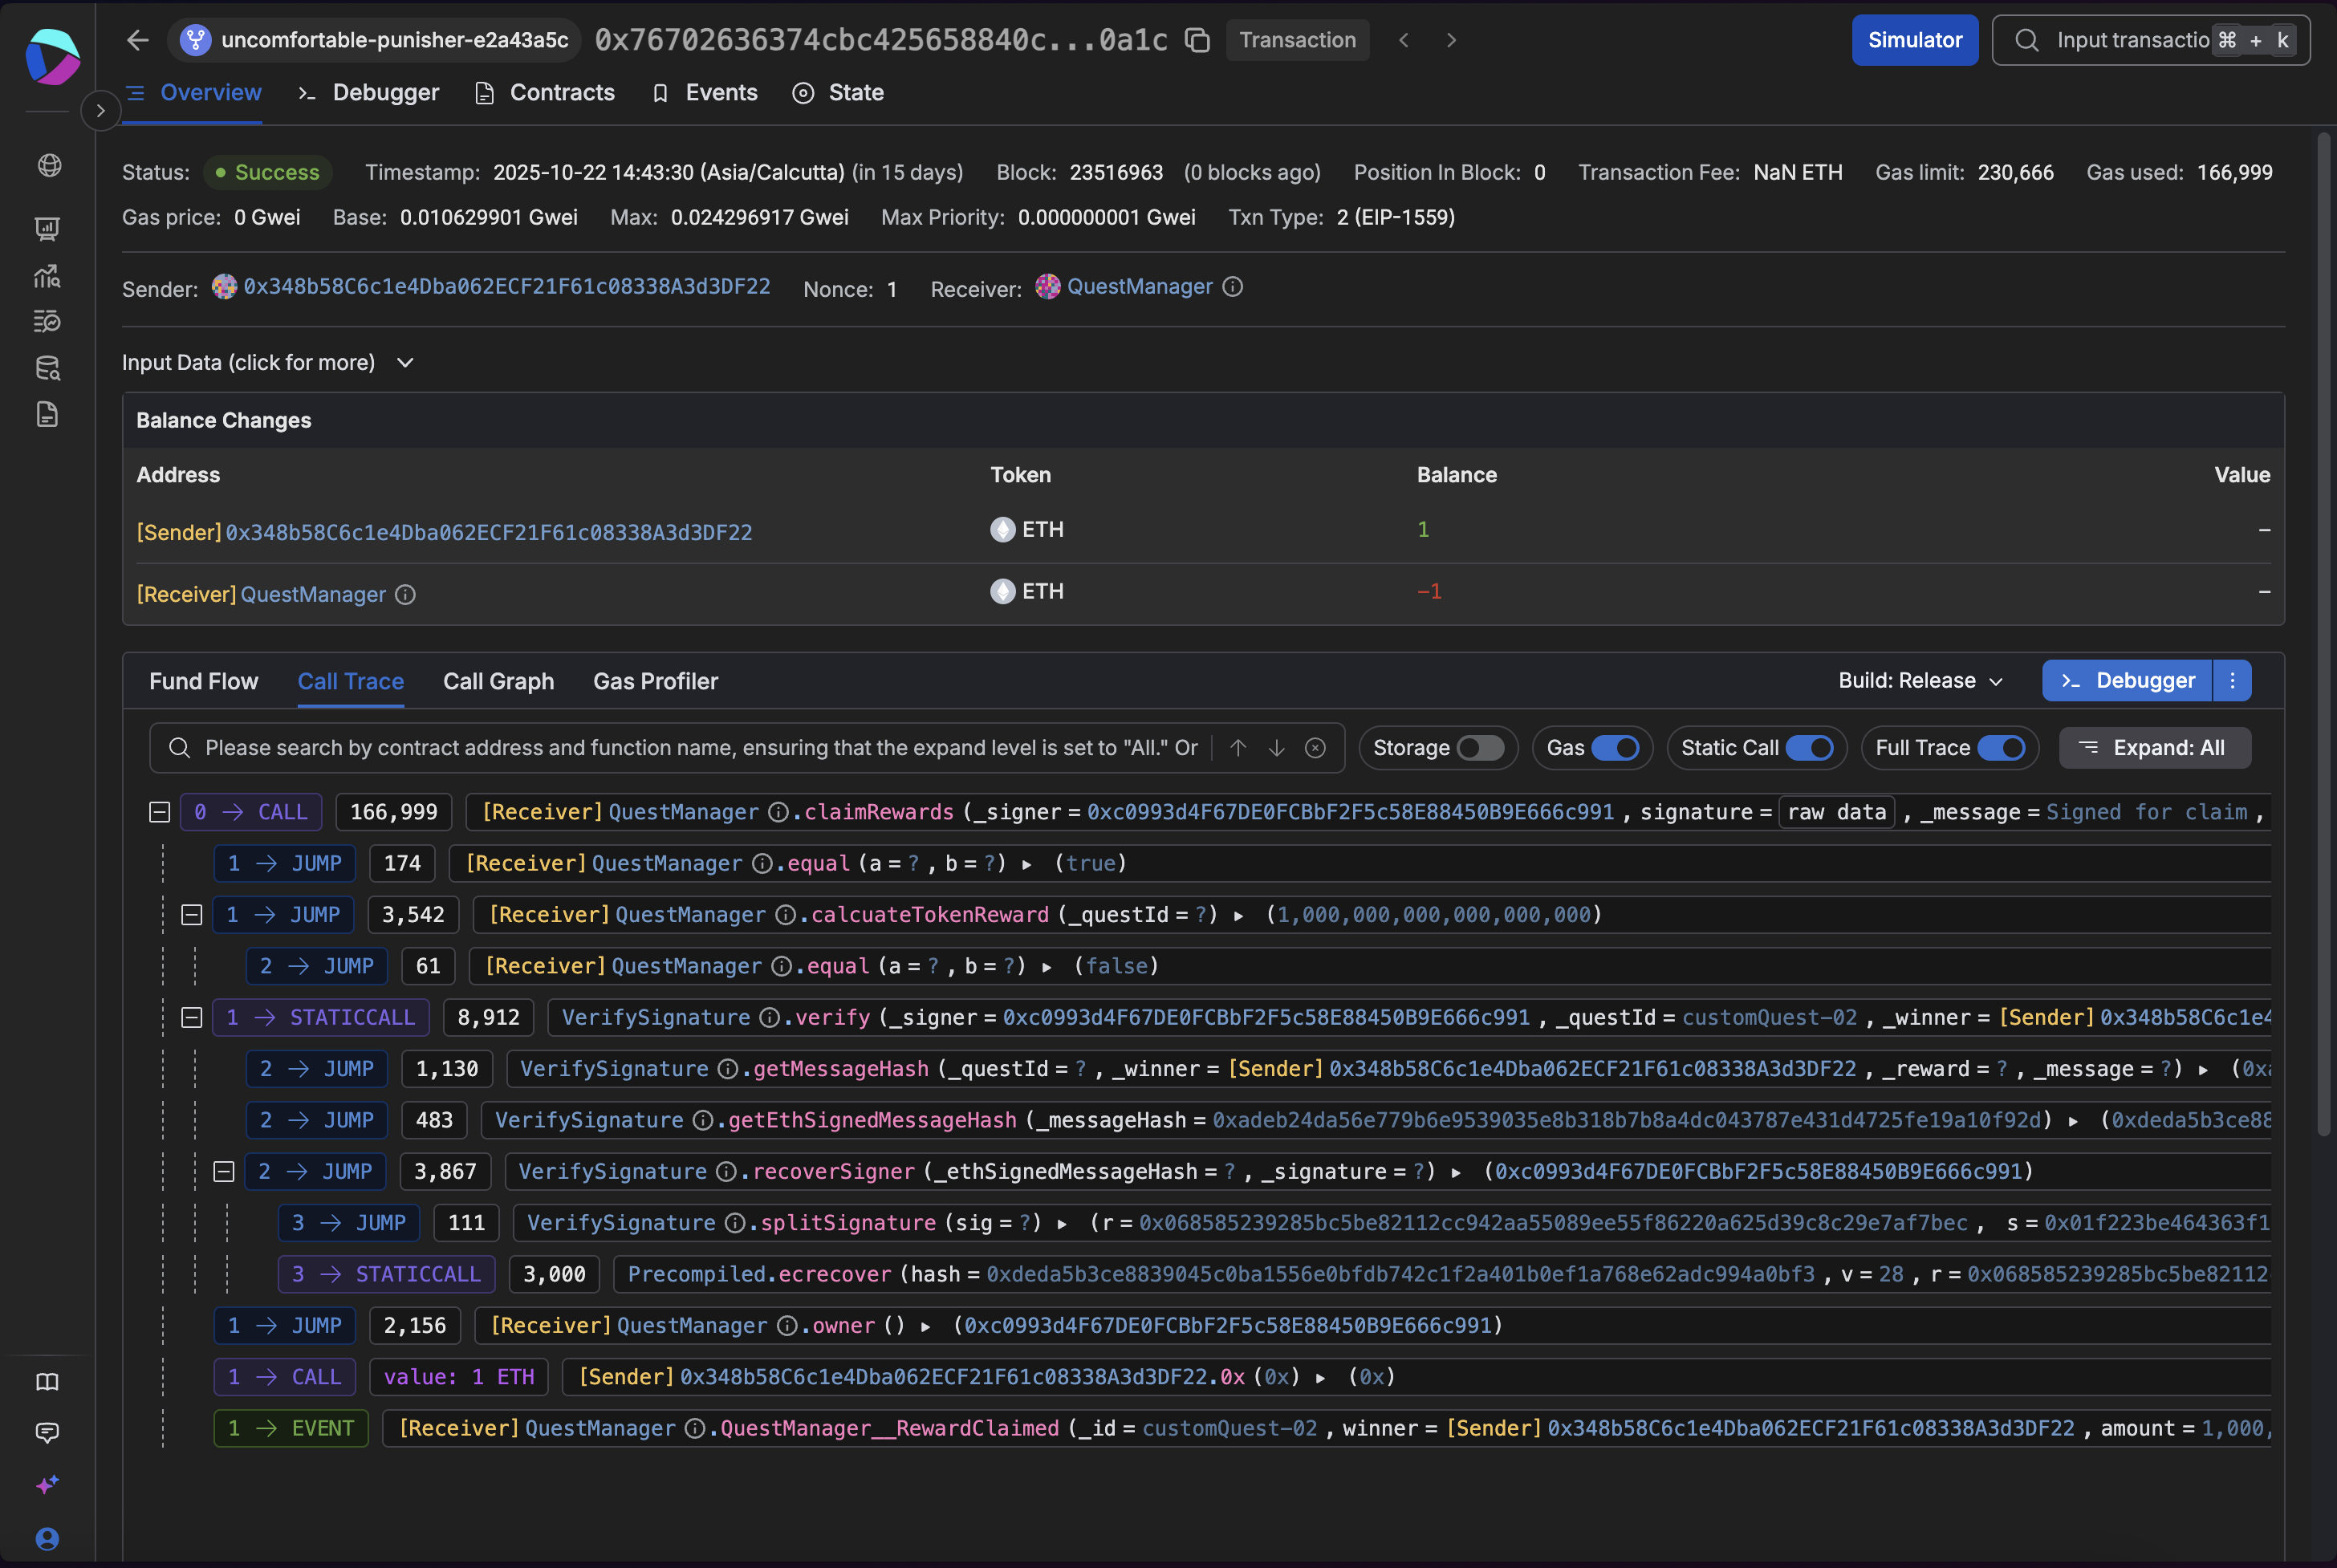
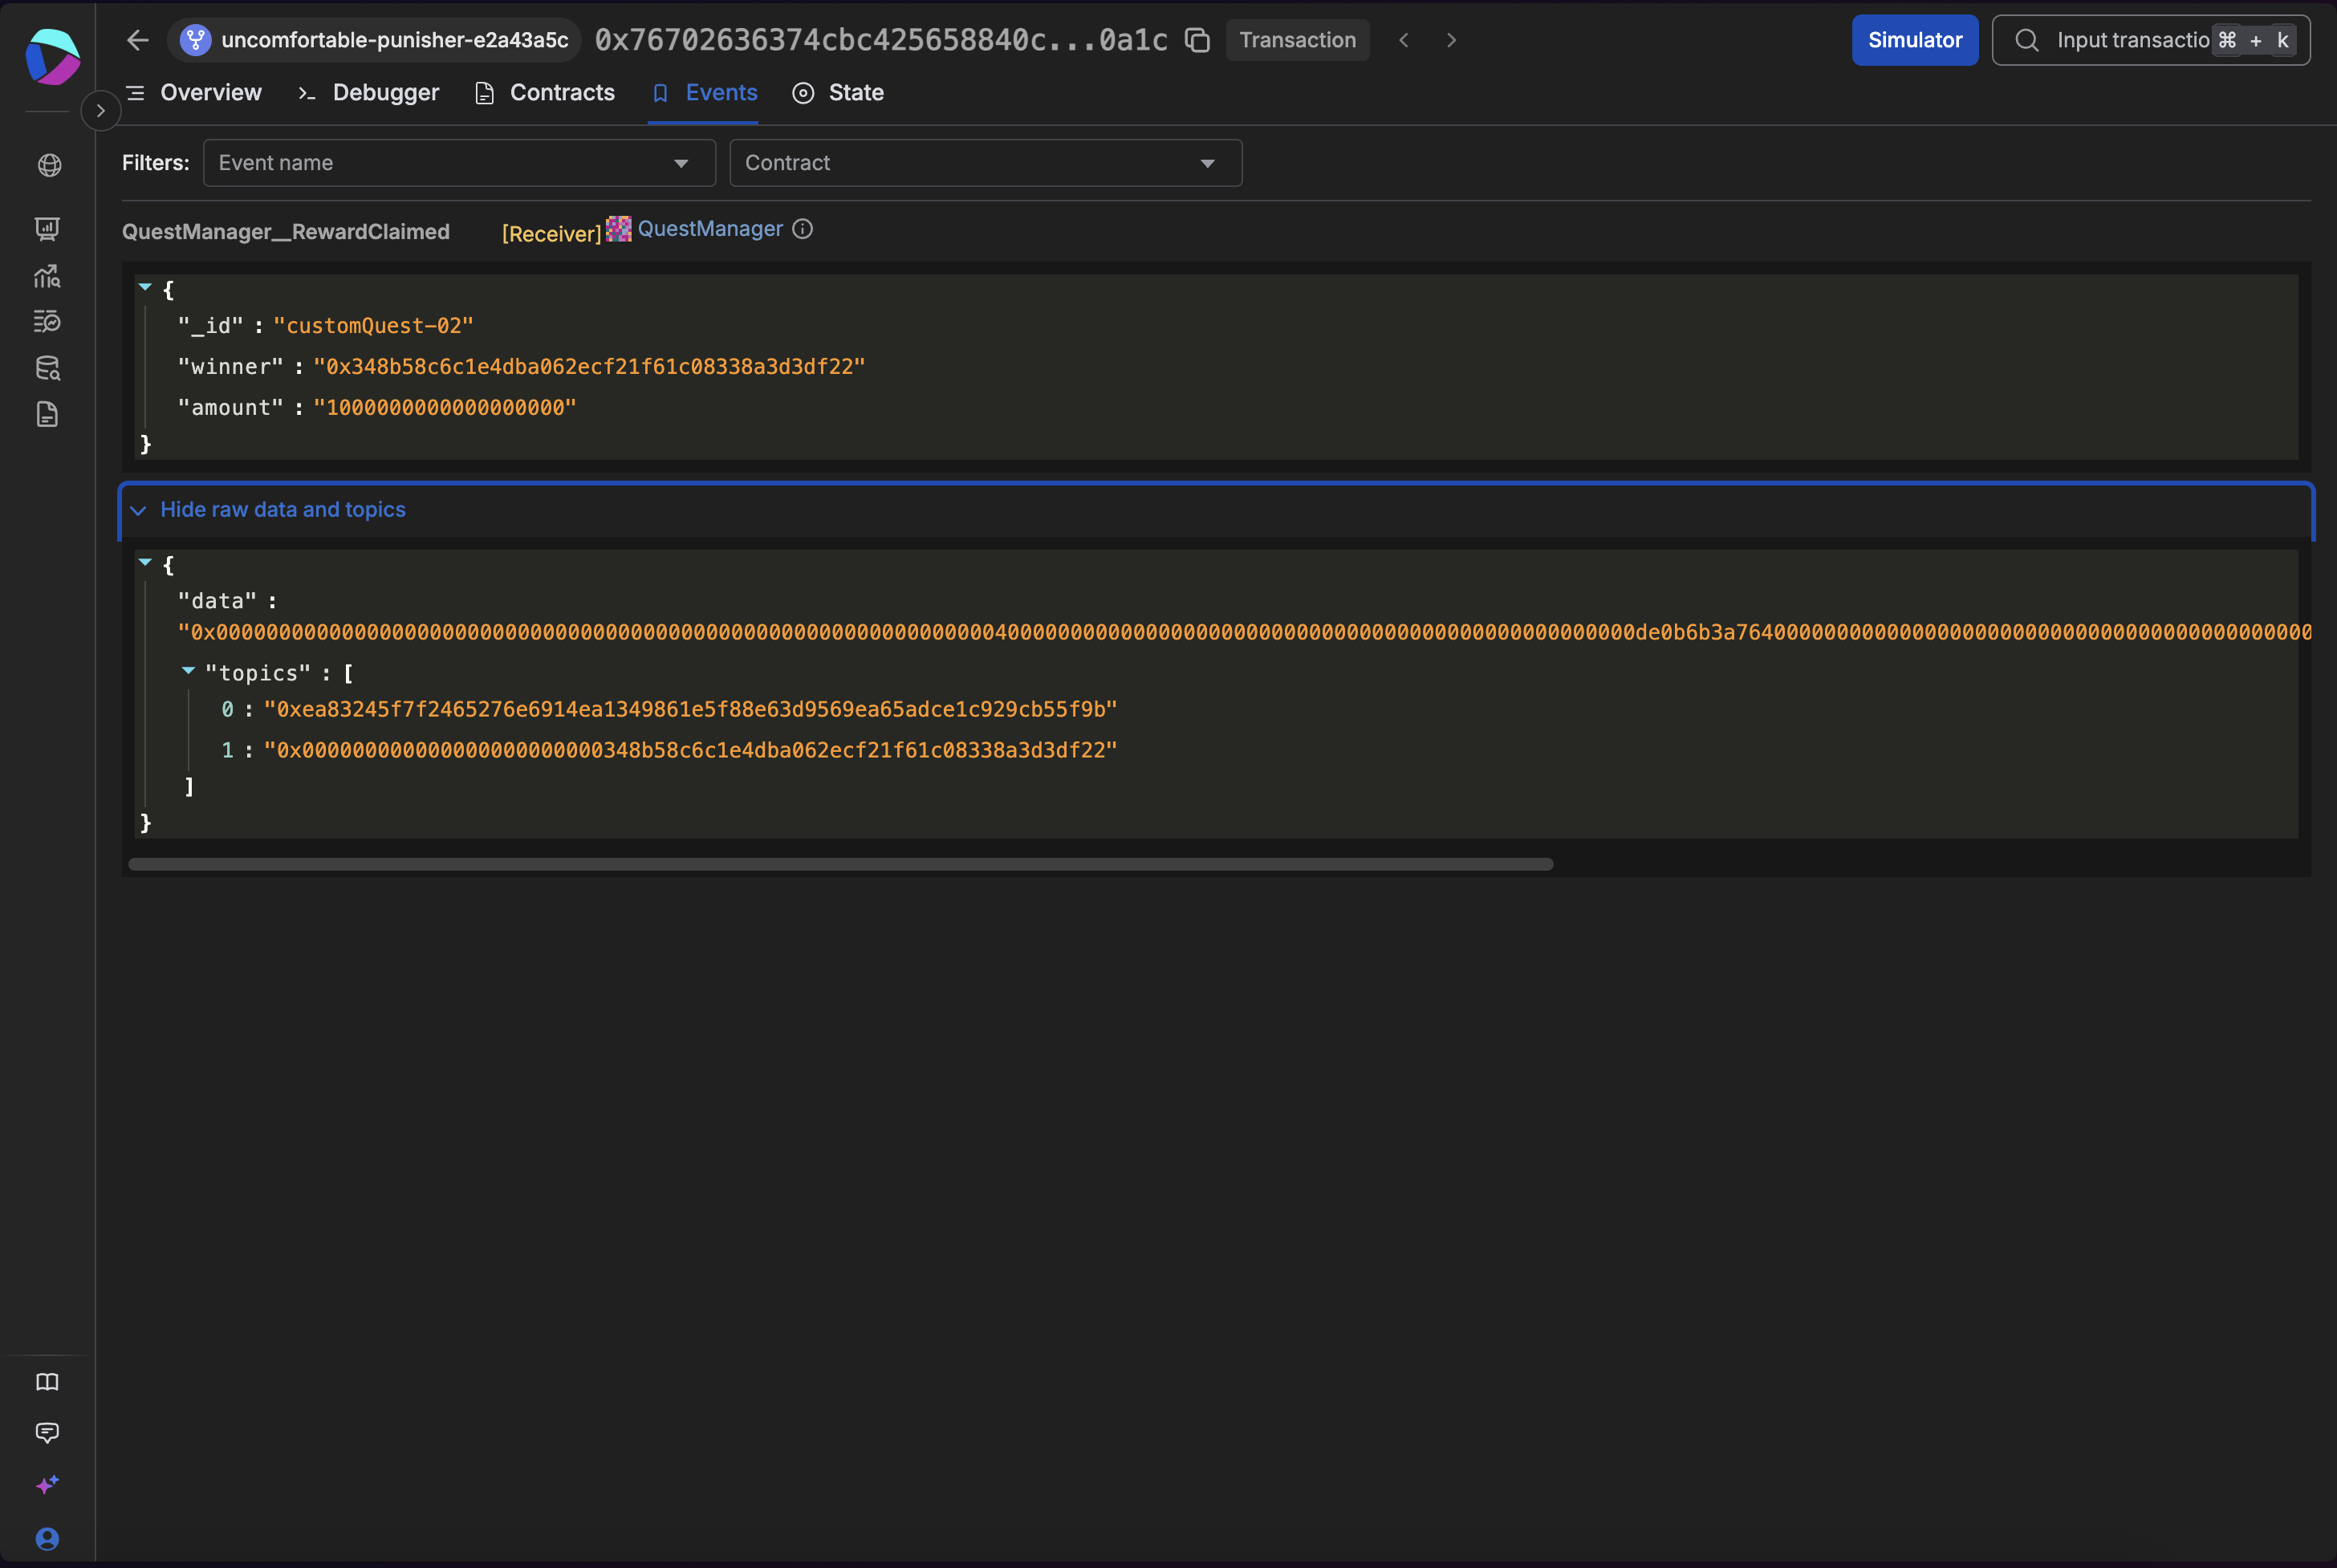
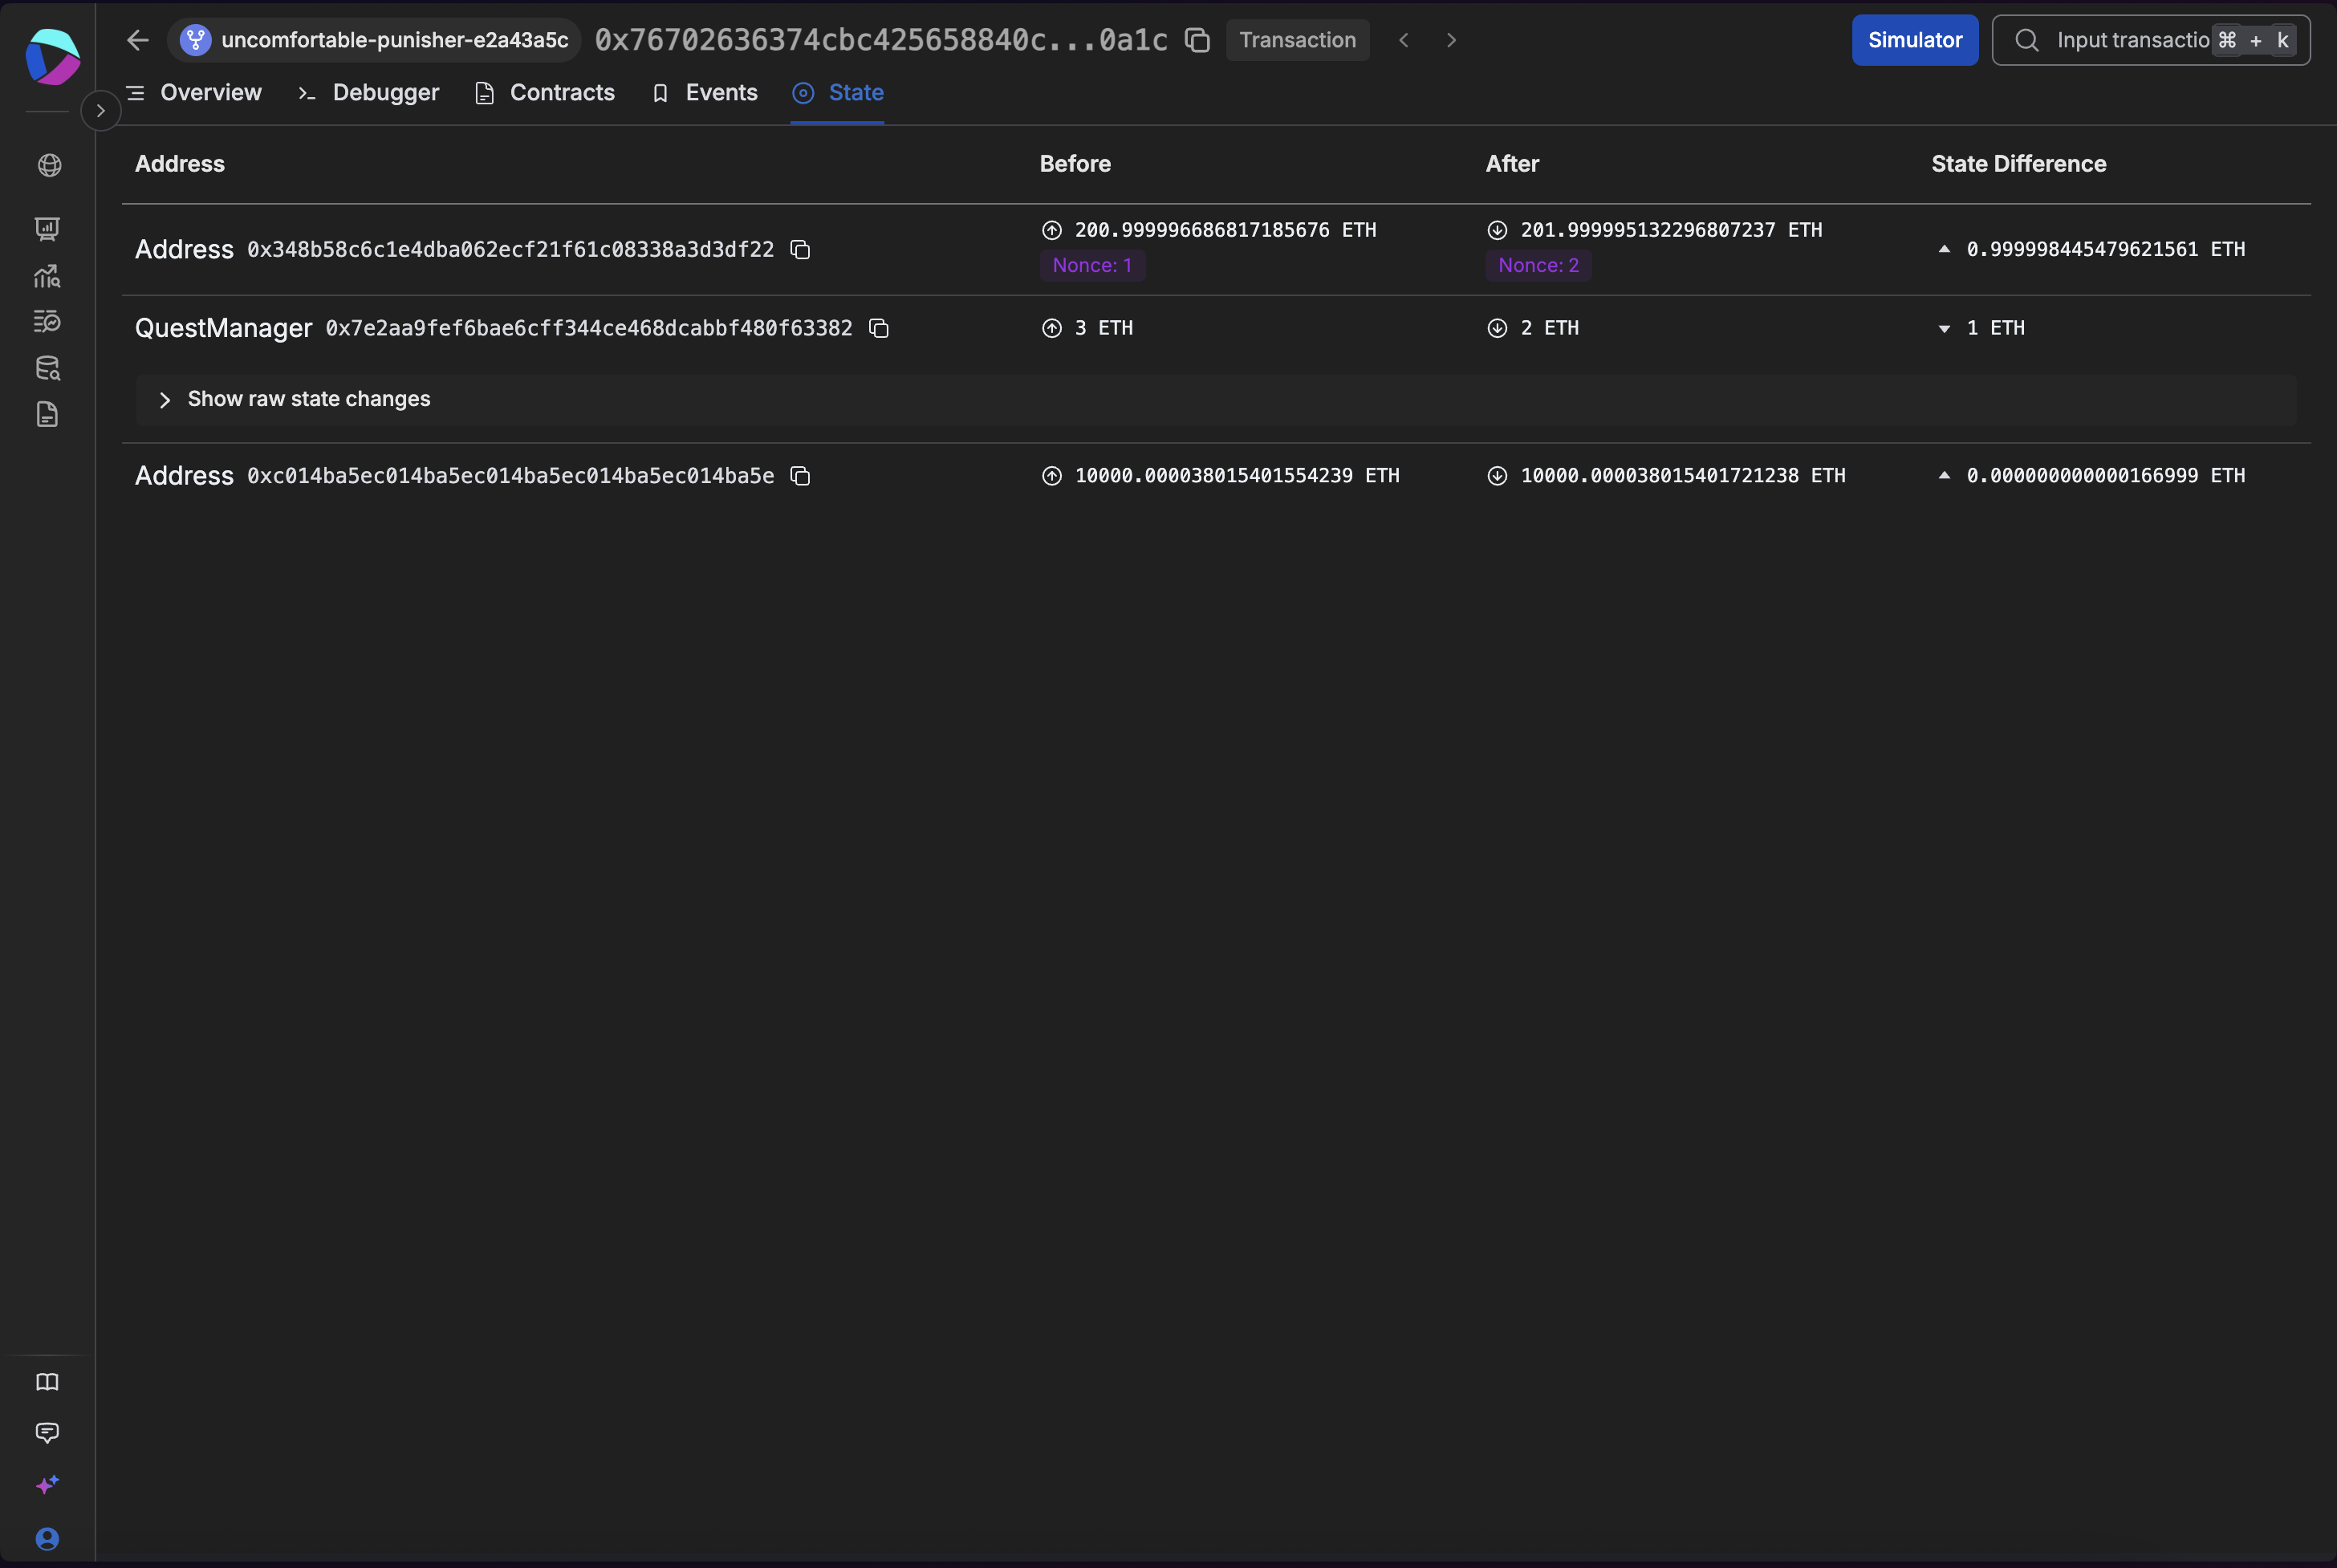
This time, the claim transaction succeeds. You’ll see QuestManager__RewardClaimed event and the winner’s balance updated in the BuildBear Explorer.
Run the command again:
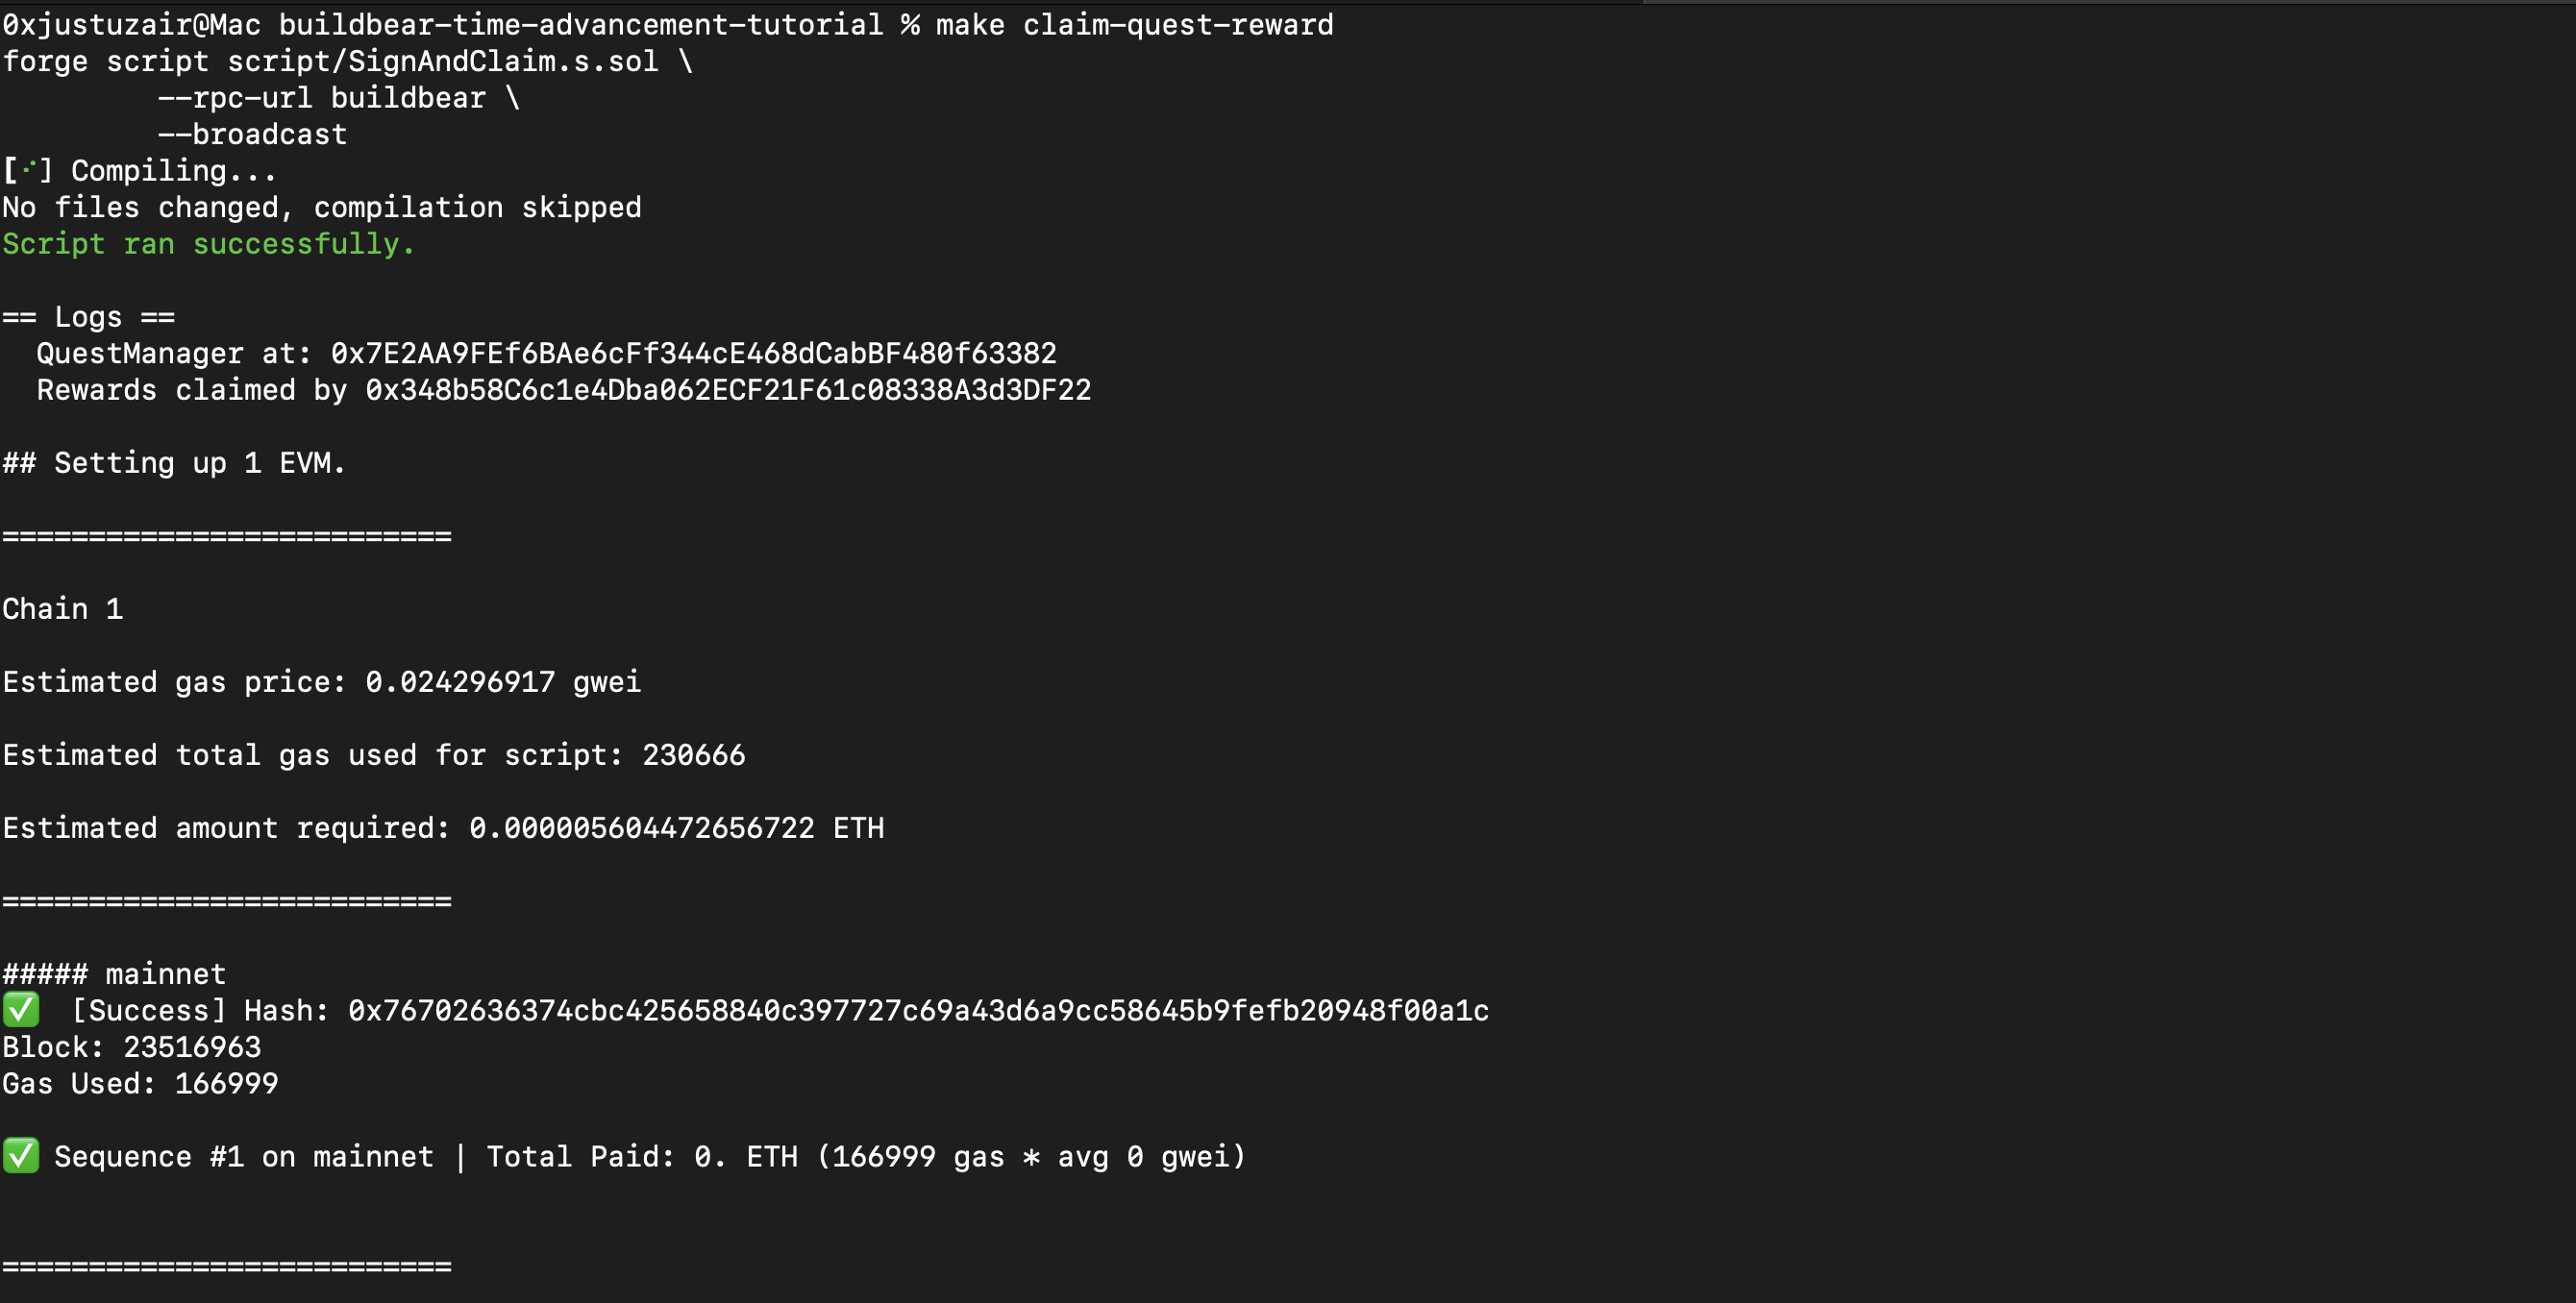
We can again view the claim transaction in the BuildBear Explorer.
Step 9: Debugging with Sentio (Optional)
If you installed the Sentio Plugin, you can view:
- Quest creation events
- Fund locking
- Successful claim trace and fund flow, etc
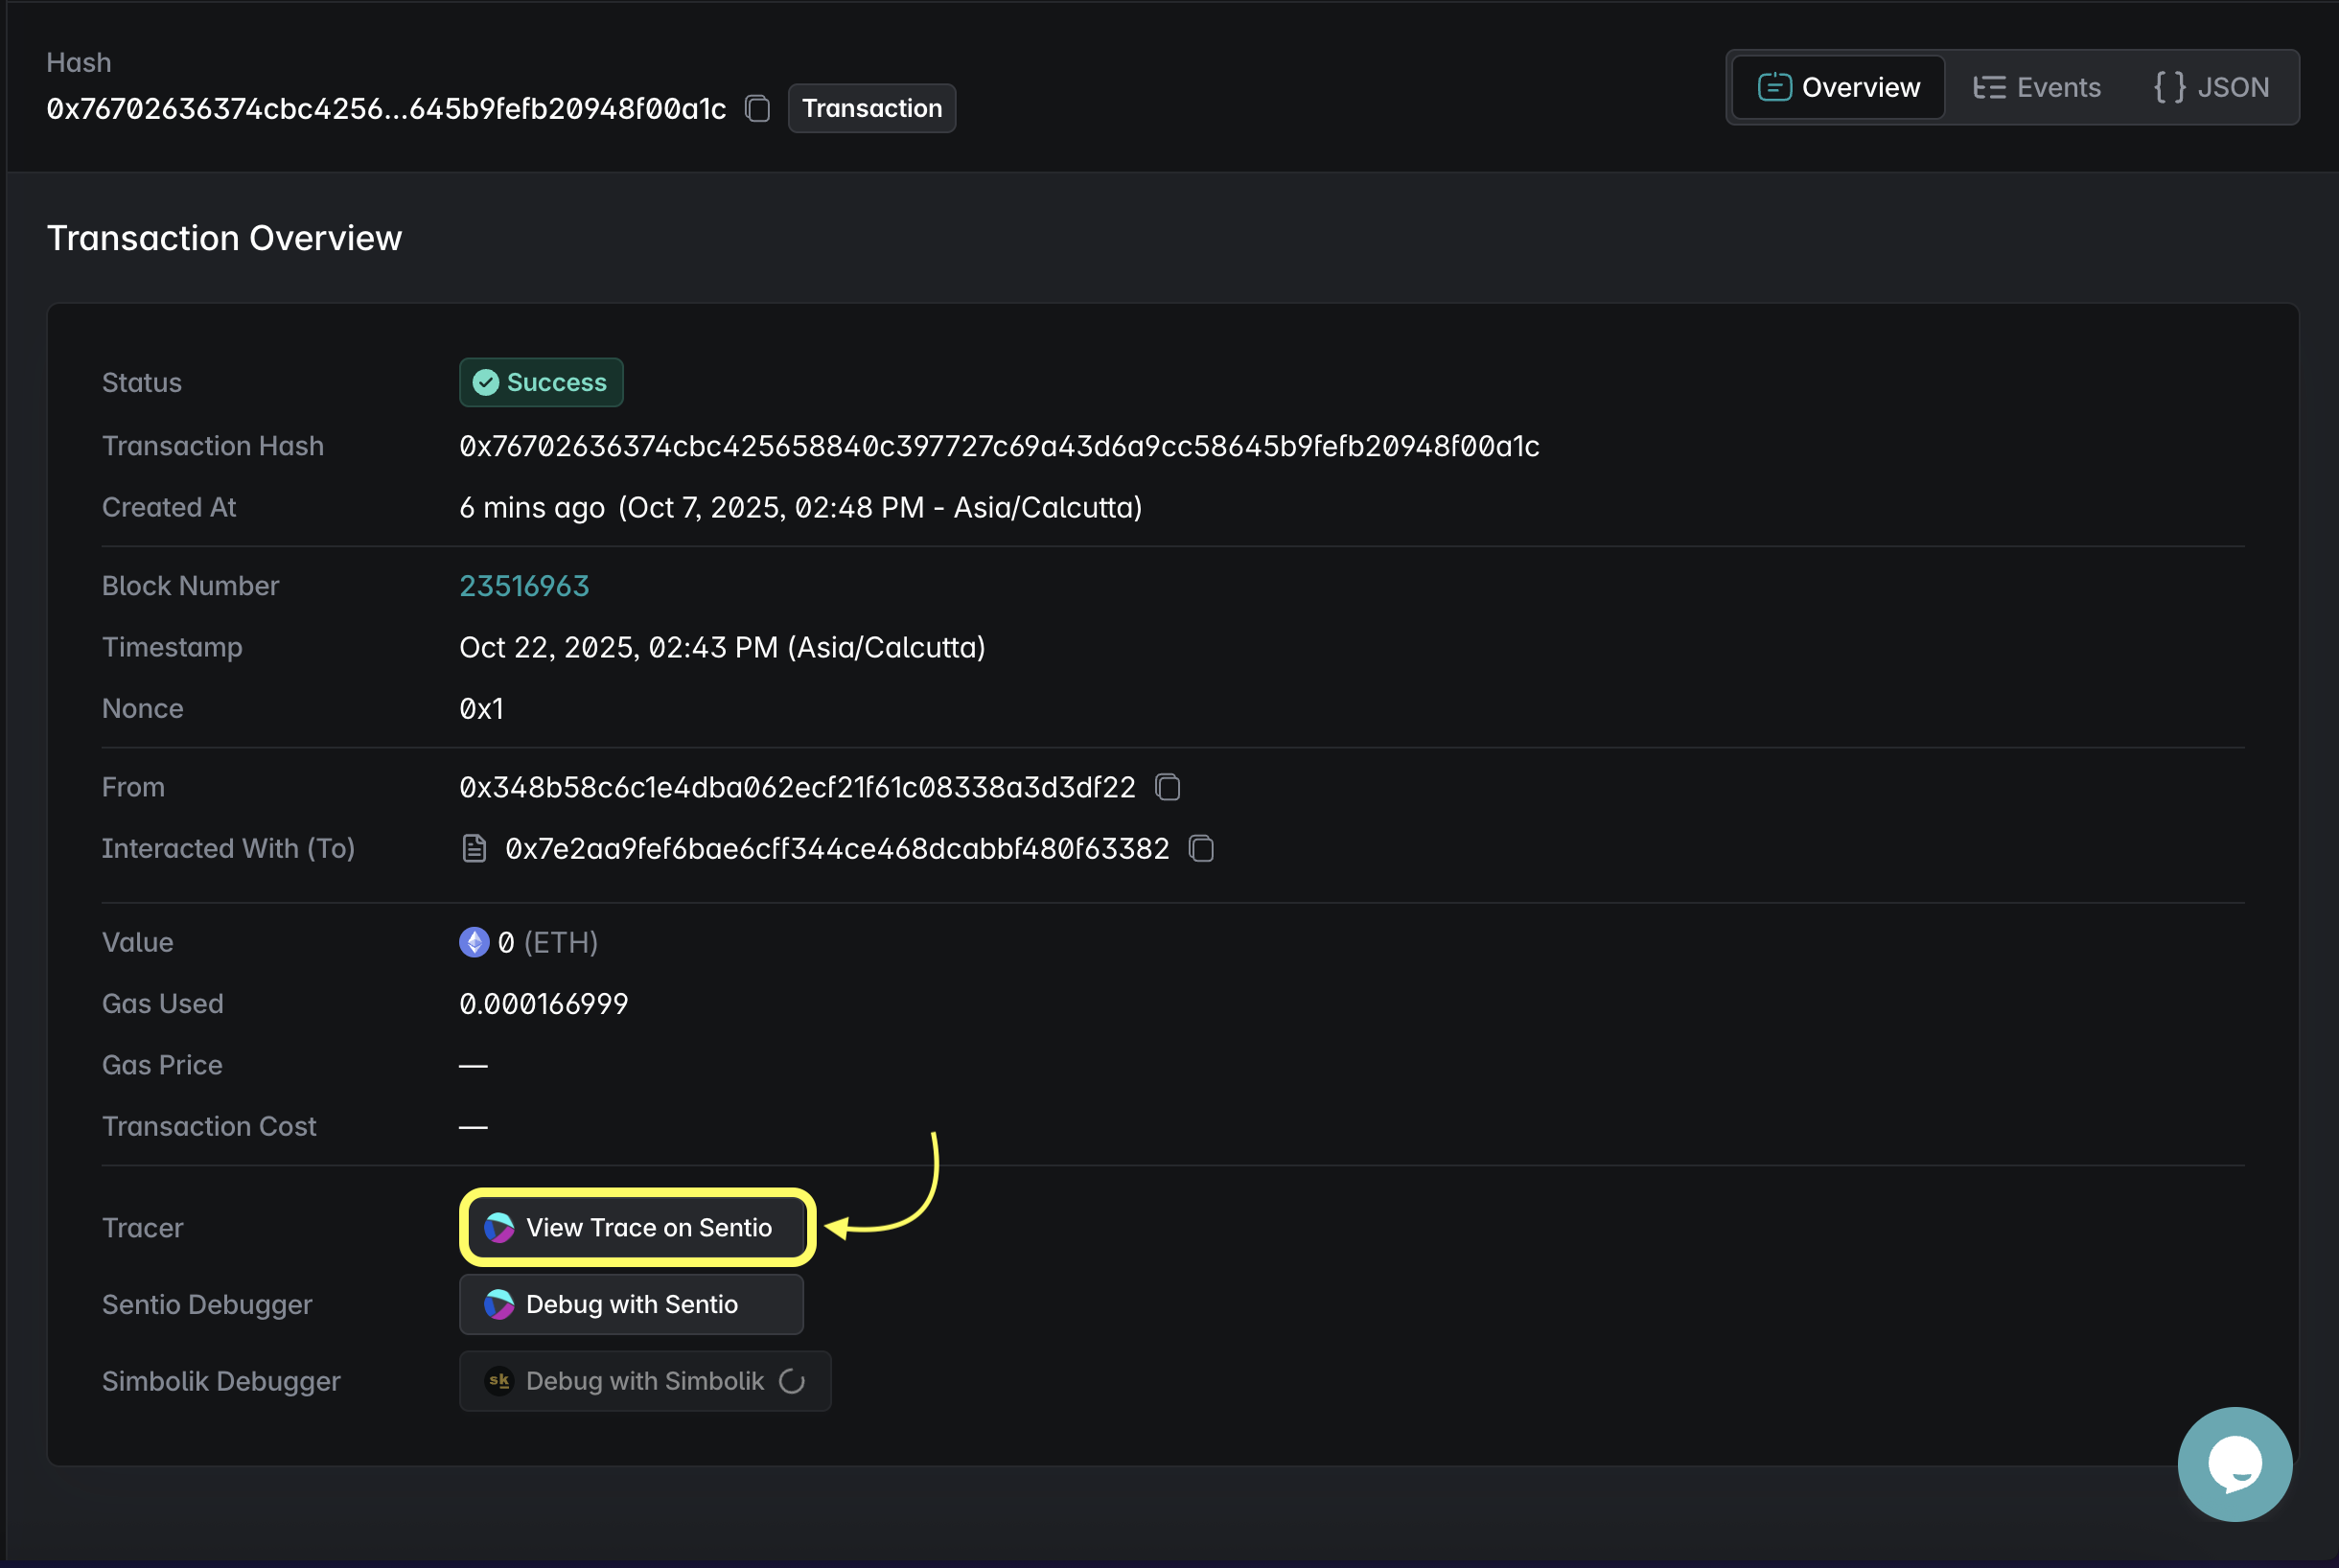
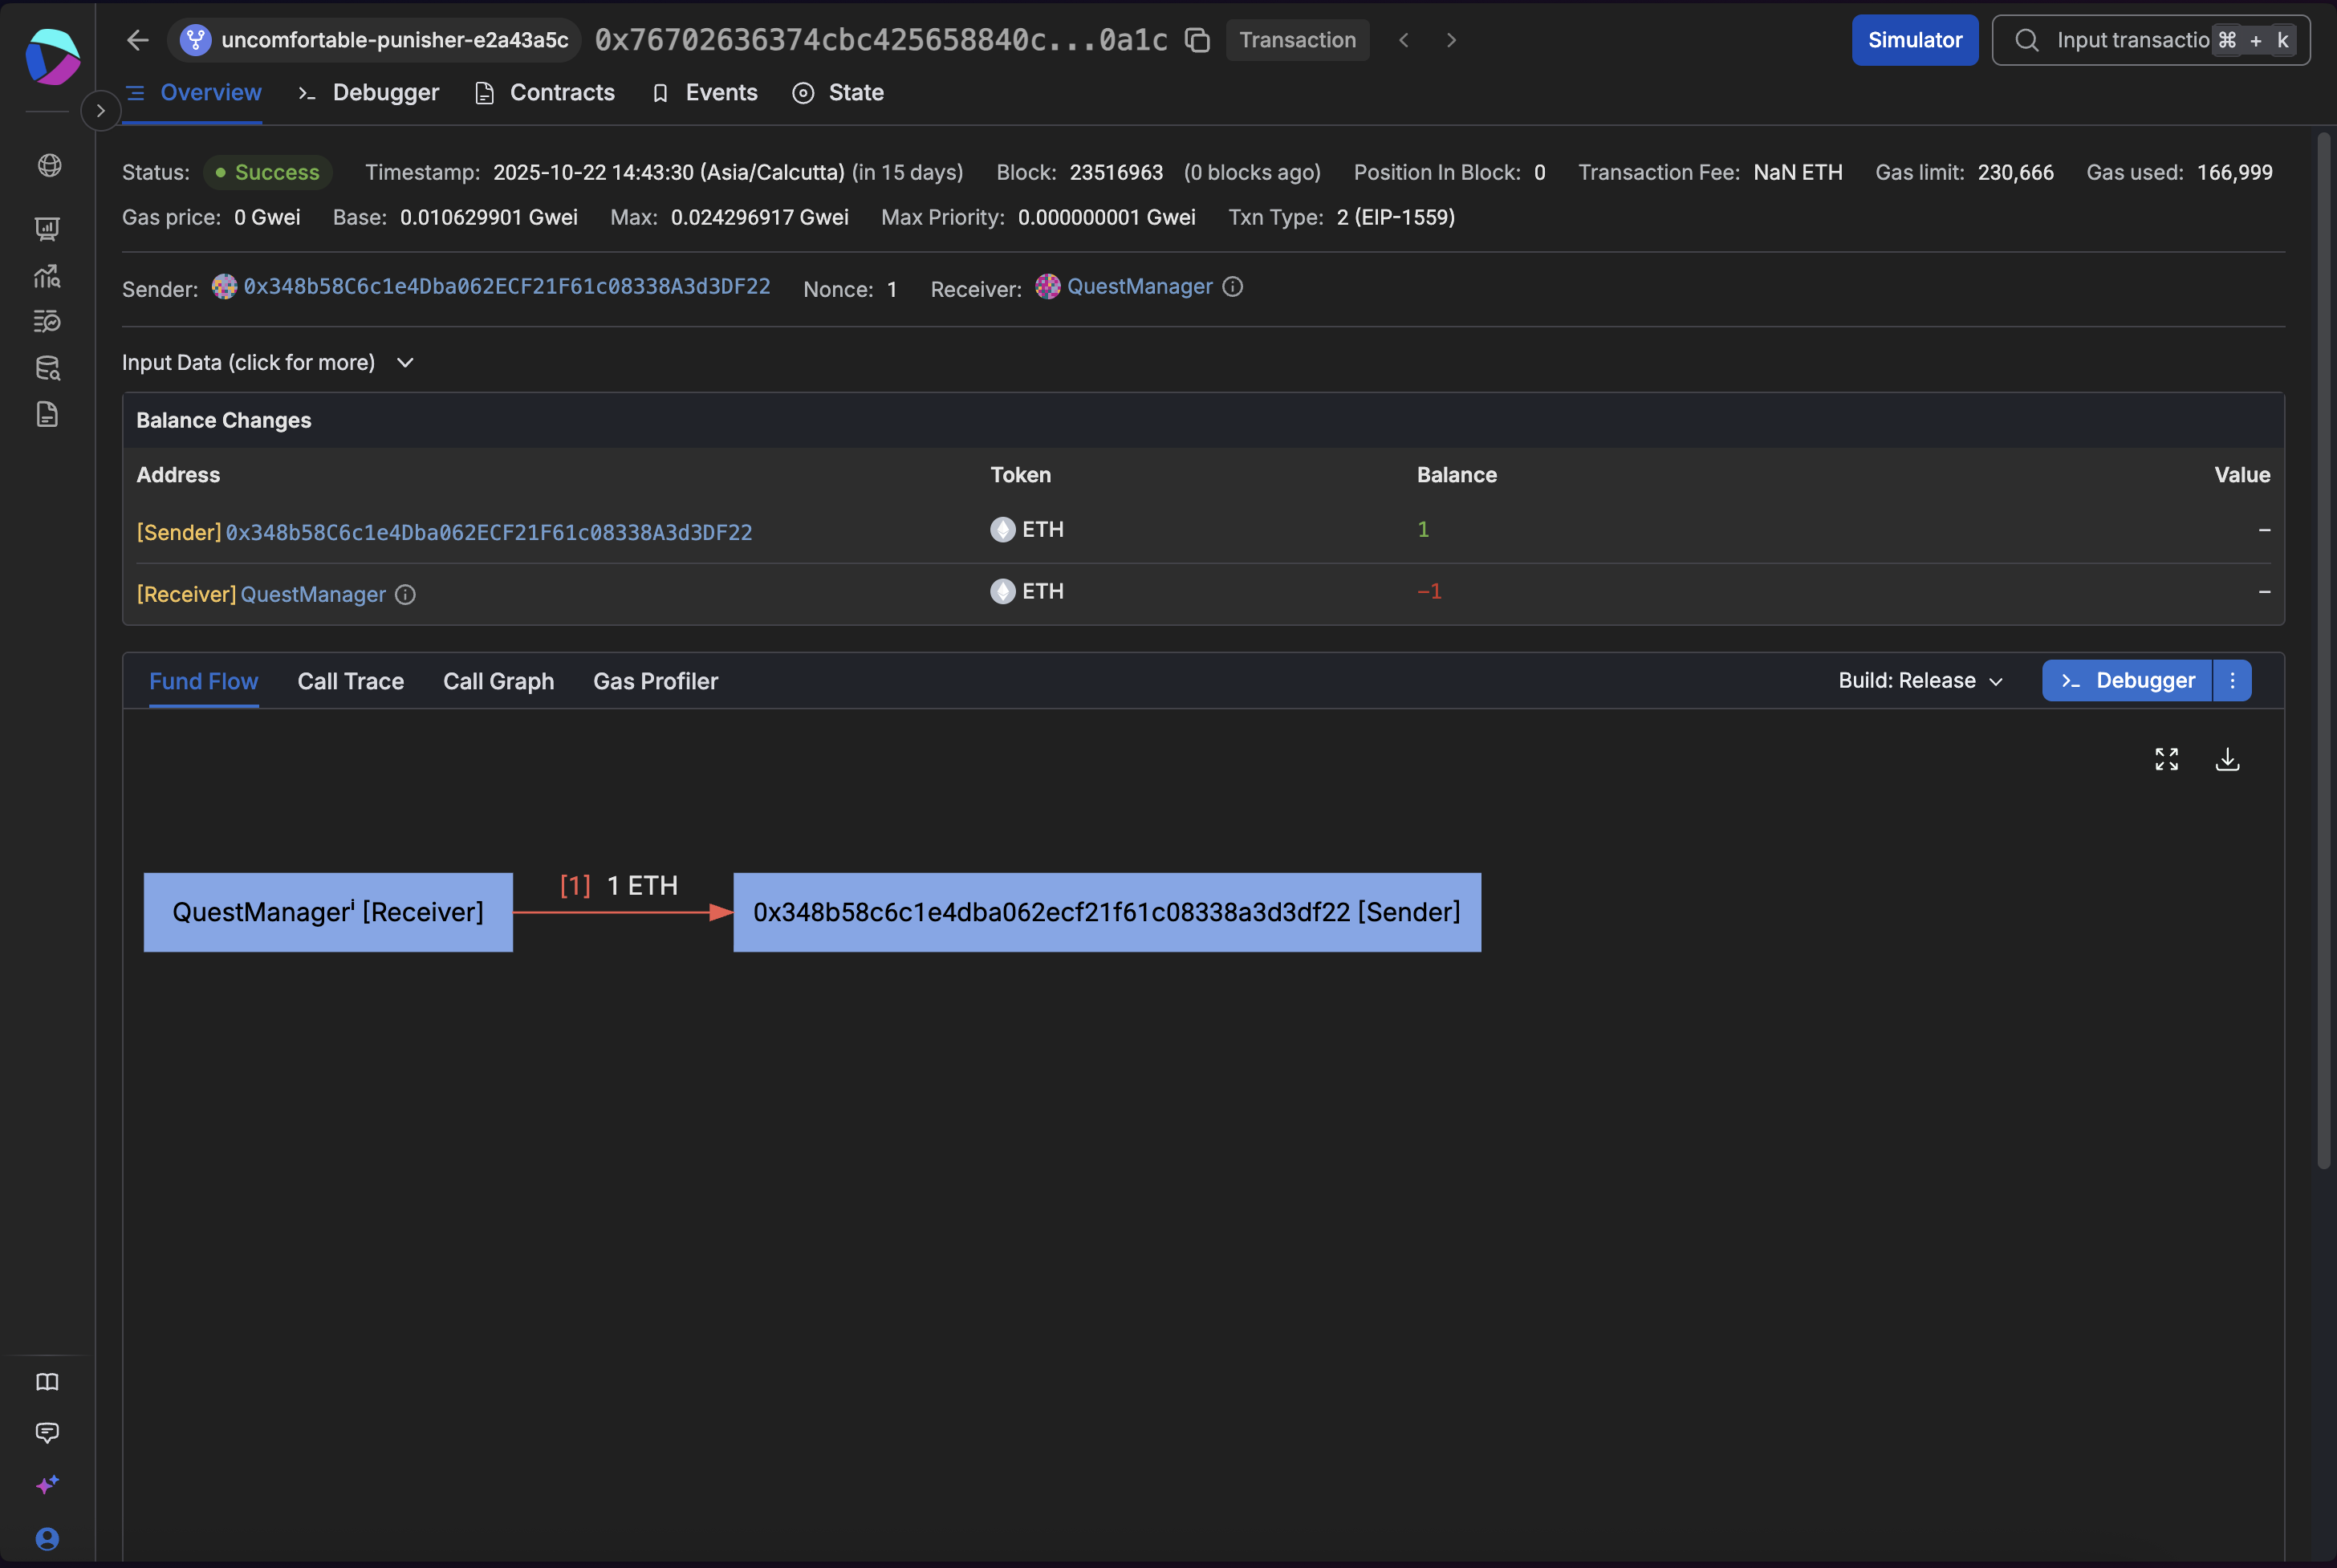
Open the claim reward tx and click on "View Trace on Sentio":
Fund Flow
This tab provides a high-level overview of fund movement directions throughout the transaction.
Call Trace
This tab displays the complete transaction call trace with detailed internal calls, offering granular control over trace depth exploration.
Events
This tab lists all events emitted during transaction execution.
State
This tab shows contract and EOA state changes before and after the transaction.
Conclusion
You’ve now built a QuestManager system in BuildBear:
- Real token locking (native or ERC20)
- Admin-signed reward claims
- Fail-then-succeed claim flow using BuildBear Time Advancement
- Fully observable on BuildBear Explorer and Debugger
This tutorial shows how a user can use BuildBear to test, deploy and interact with time-sensitive contract(s) without mocks or simulations.
Synchronizing Uniswap V2 Reserves in BuildBear Sandbox with Mainnet
Learn to implement a script that continuously synchronizes Uniswap V2 token reserves in a BuildBear Sandbox environment based on the live mainnet reserves data.
Using Chainlink Data Feeds with BuildBear Sandbox
Learn how to test Chainlink Data Feeds with UniLend and Aave protocols using BuildBear's Sandbox environment.