Build a Cross-Chain Bridge with BuildBear Mainnet Sandboxes & Data Feeds
Build a minimal event-driven bridge (WETH ⇄ USDT) using Foundry and Node relayer, fully built in BuildBear Mainnet Sandboxes with the Chainlink DataFeed Plugin.
Introduction
In this tutorial we will build a minimal, event-driven bridge that works end-to-end across two BuildBear Mainnet Sandboxes (Ethereum and Polygon).
Instead of mocks, we will attach real Chainlink ETH/USD feeds via the BuildBear Data Feeds plugin, verify contracts with Sourcify, and debug transactions with Sentio, all in, BuildBear's Sandboxes.
What We Will Learn
- Setting up two BuildBear Mainnet Sandboxes (ETH and Polygon)
- Installing the Data Feeds plugin and attaching the WETH/USD feed on both Sandboxes
- Preparing environment variables and Foundry configs
- Deploying the Bridge with Foundry and verifying via Sourcify
- Running a bi-directional relayer to detect and release assets on destination chain
- Interacting with the bridge (WETH ⇄ USDT) and inspecting results
- End-to-End transaction debugging with Sentio and BuildBear explorer
Project Repository
You can either use the repository provided by us or create your own Foundry Project. Here we will use the repository provided by us.
Directory and Project Structure
How it Works (Mermaid Diagrams)
The following snapshots should give a quick, visual understanding of the system before diving into code. Add your rendered-mermaid images where indicated.
-
High-level sequence

- The user approves and calls
lockAndQuoteon the source bridge. - The bridge pulls the source token, reads WETH/USD from the data feed, computes the destination amount, and emits
BridgeRequested. - The relayer observes that event on the source chain and calls
releaseon the destination bridge with the mapped token, amount, and nonce. - The destination bridge checks the nonce, transfers tokens to the recipient, and emits
TransferReleased. - The destination side is pre-funded and the relayer must be running for events to be processed.
- The user approves and calls
-
Contract internals
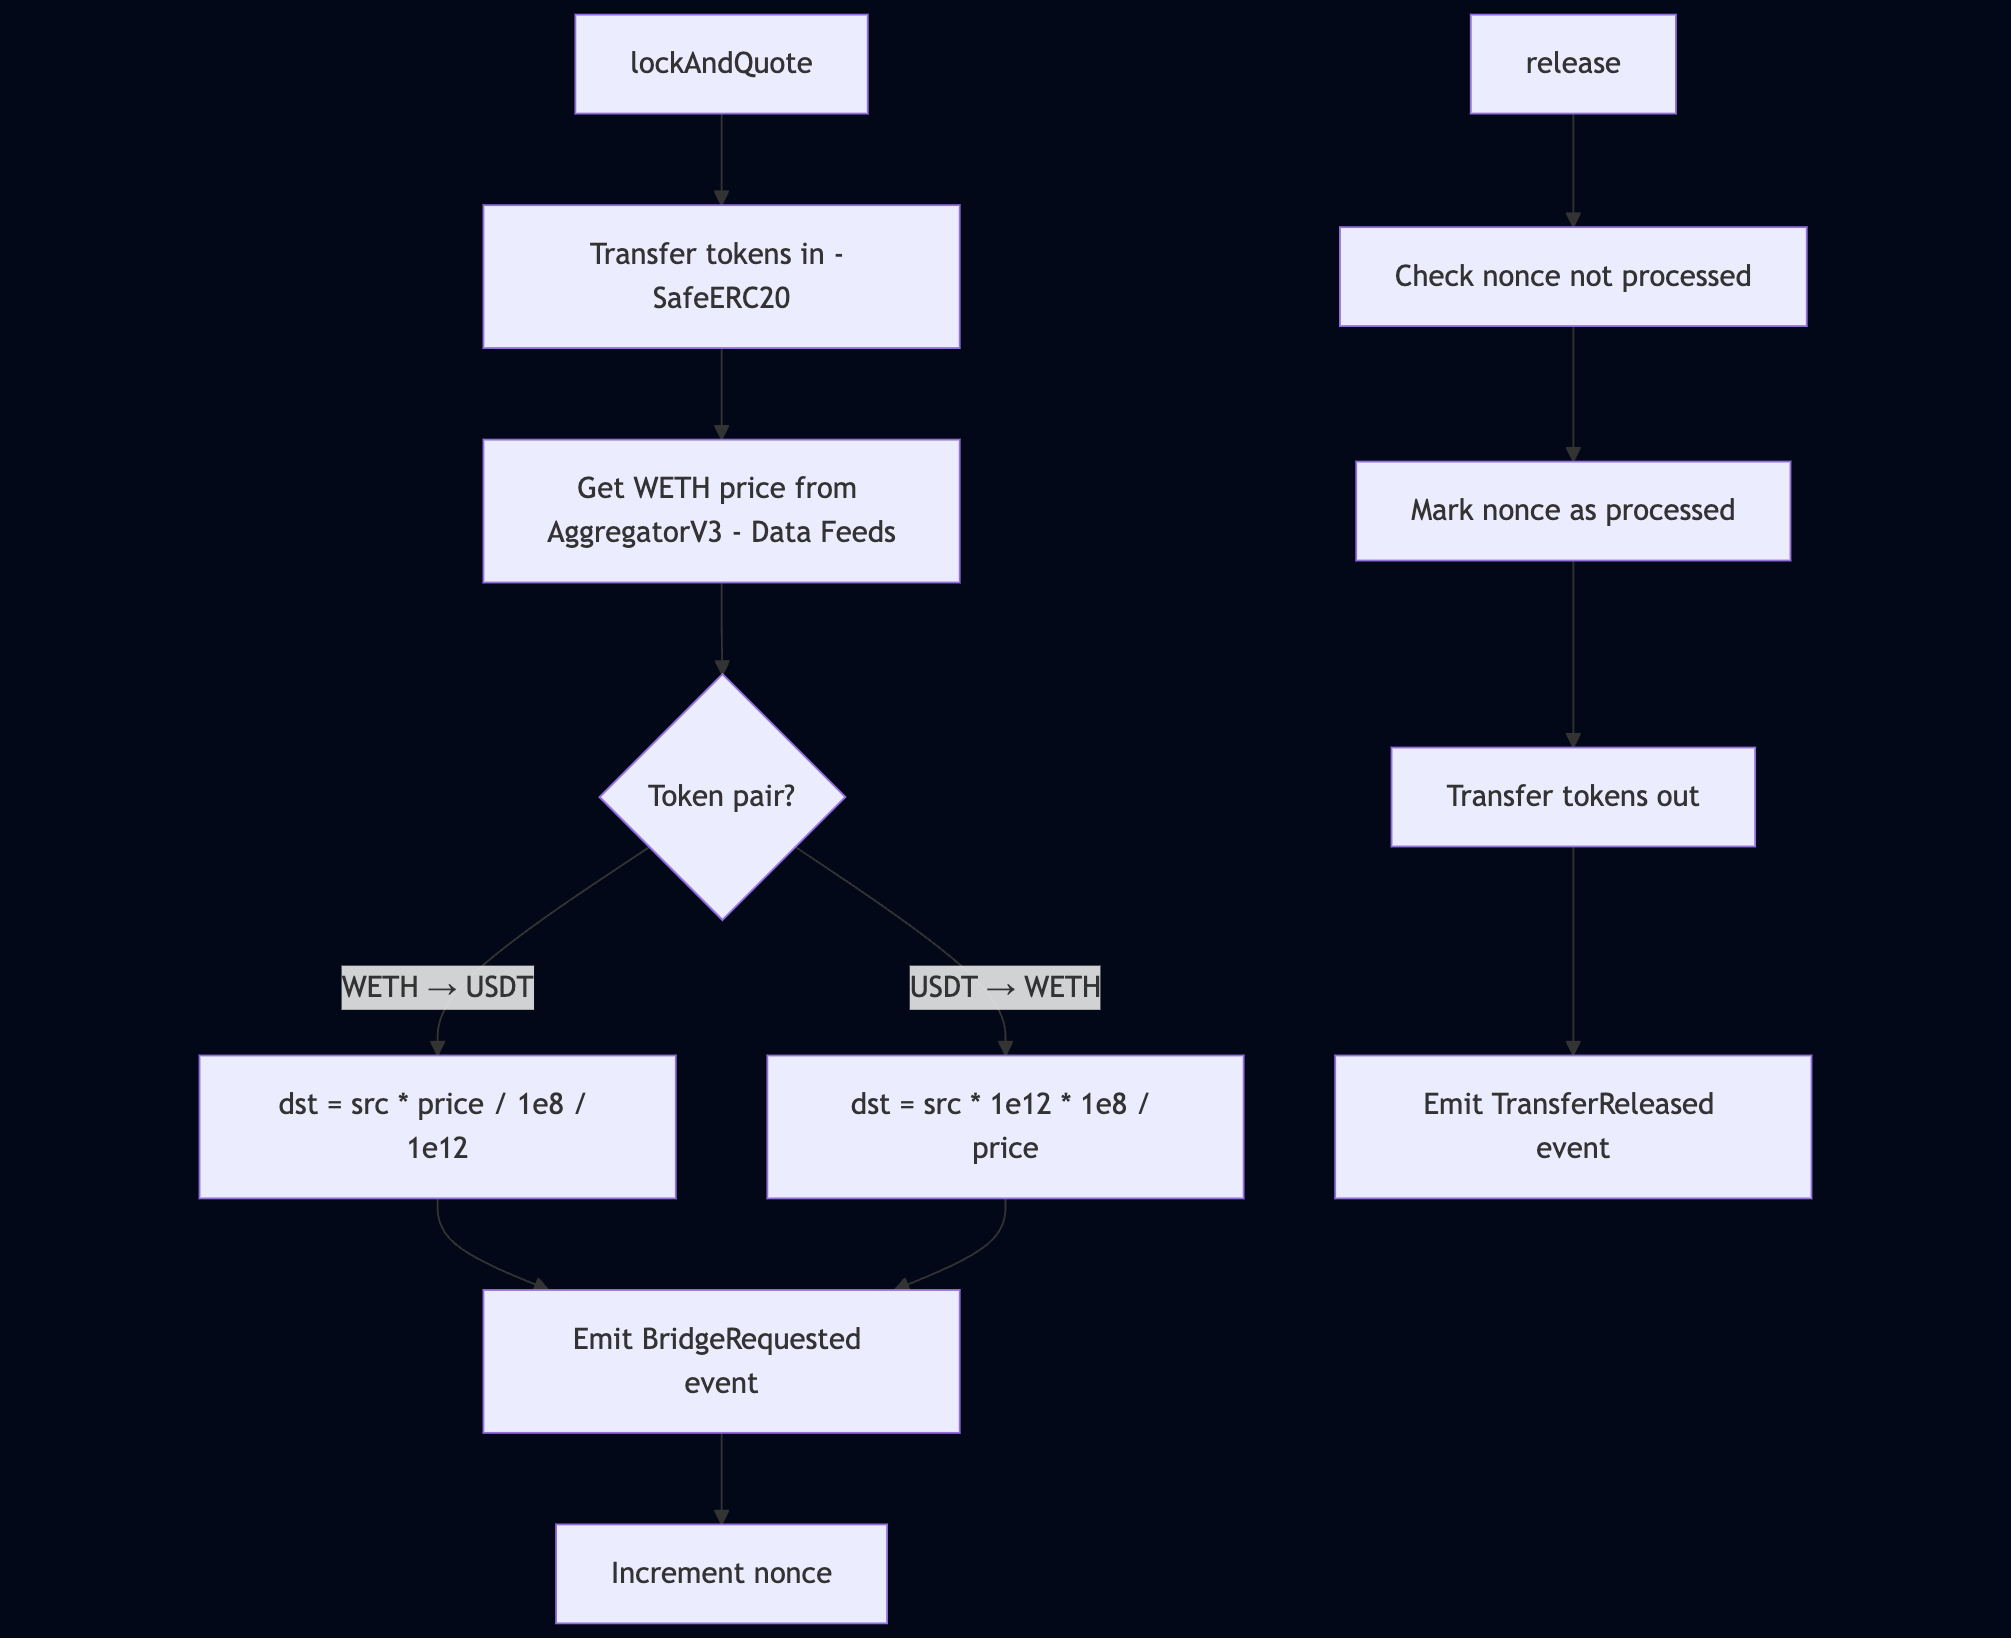
-
Lock-and-QuoteFunctionality- Take custody of the source token via
safeTransferFrom. - Read WETH/USD from the data feed and normalize for math.
- Handle decimals and calculate the destination amount.
- Emit
BridgeRequested. - Increment
nonce.
- Take custody of the source token via
-
ReleaseFunctionality- Enforce admin-only access.
- Ensure the external nonce is unused and mark it processed.
- Transfer tokens out to the recipient.
- Emit
TransferReleased.
-
Step 1: Create Sandboxes and Install Plugins
- Create two Mainnet Sandboxes:
-
Ethereum Mainnet
-
Polygon Mainnet
- Install the following plugins on both Ethereum and Polygon Mainnet Sandboxes:
- Installing and configuring the Chainlink Data Feed Plugin.
- Install the "Chainlink Data Feed" Plugin from the Plugin Marketplace.
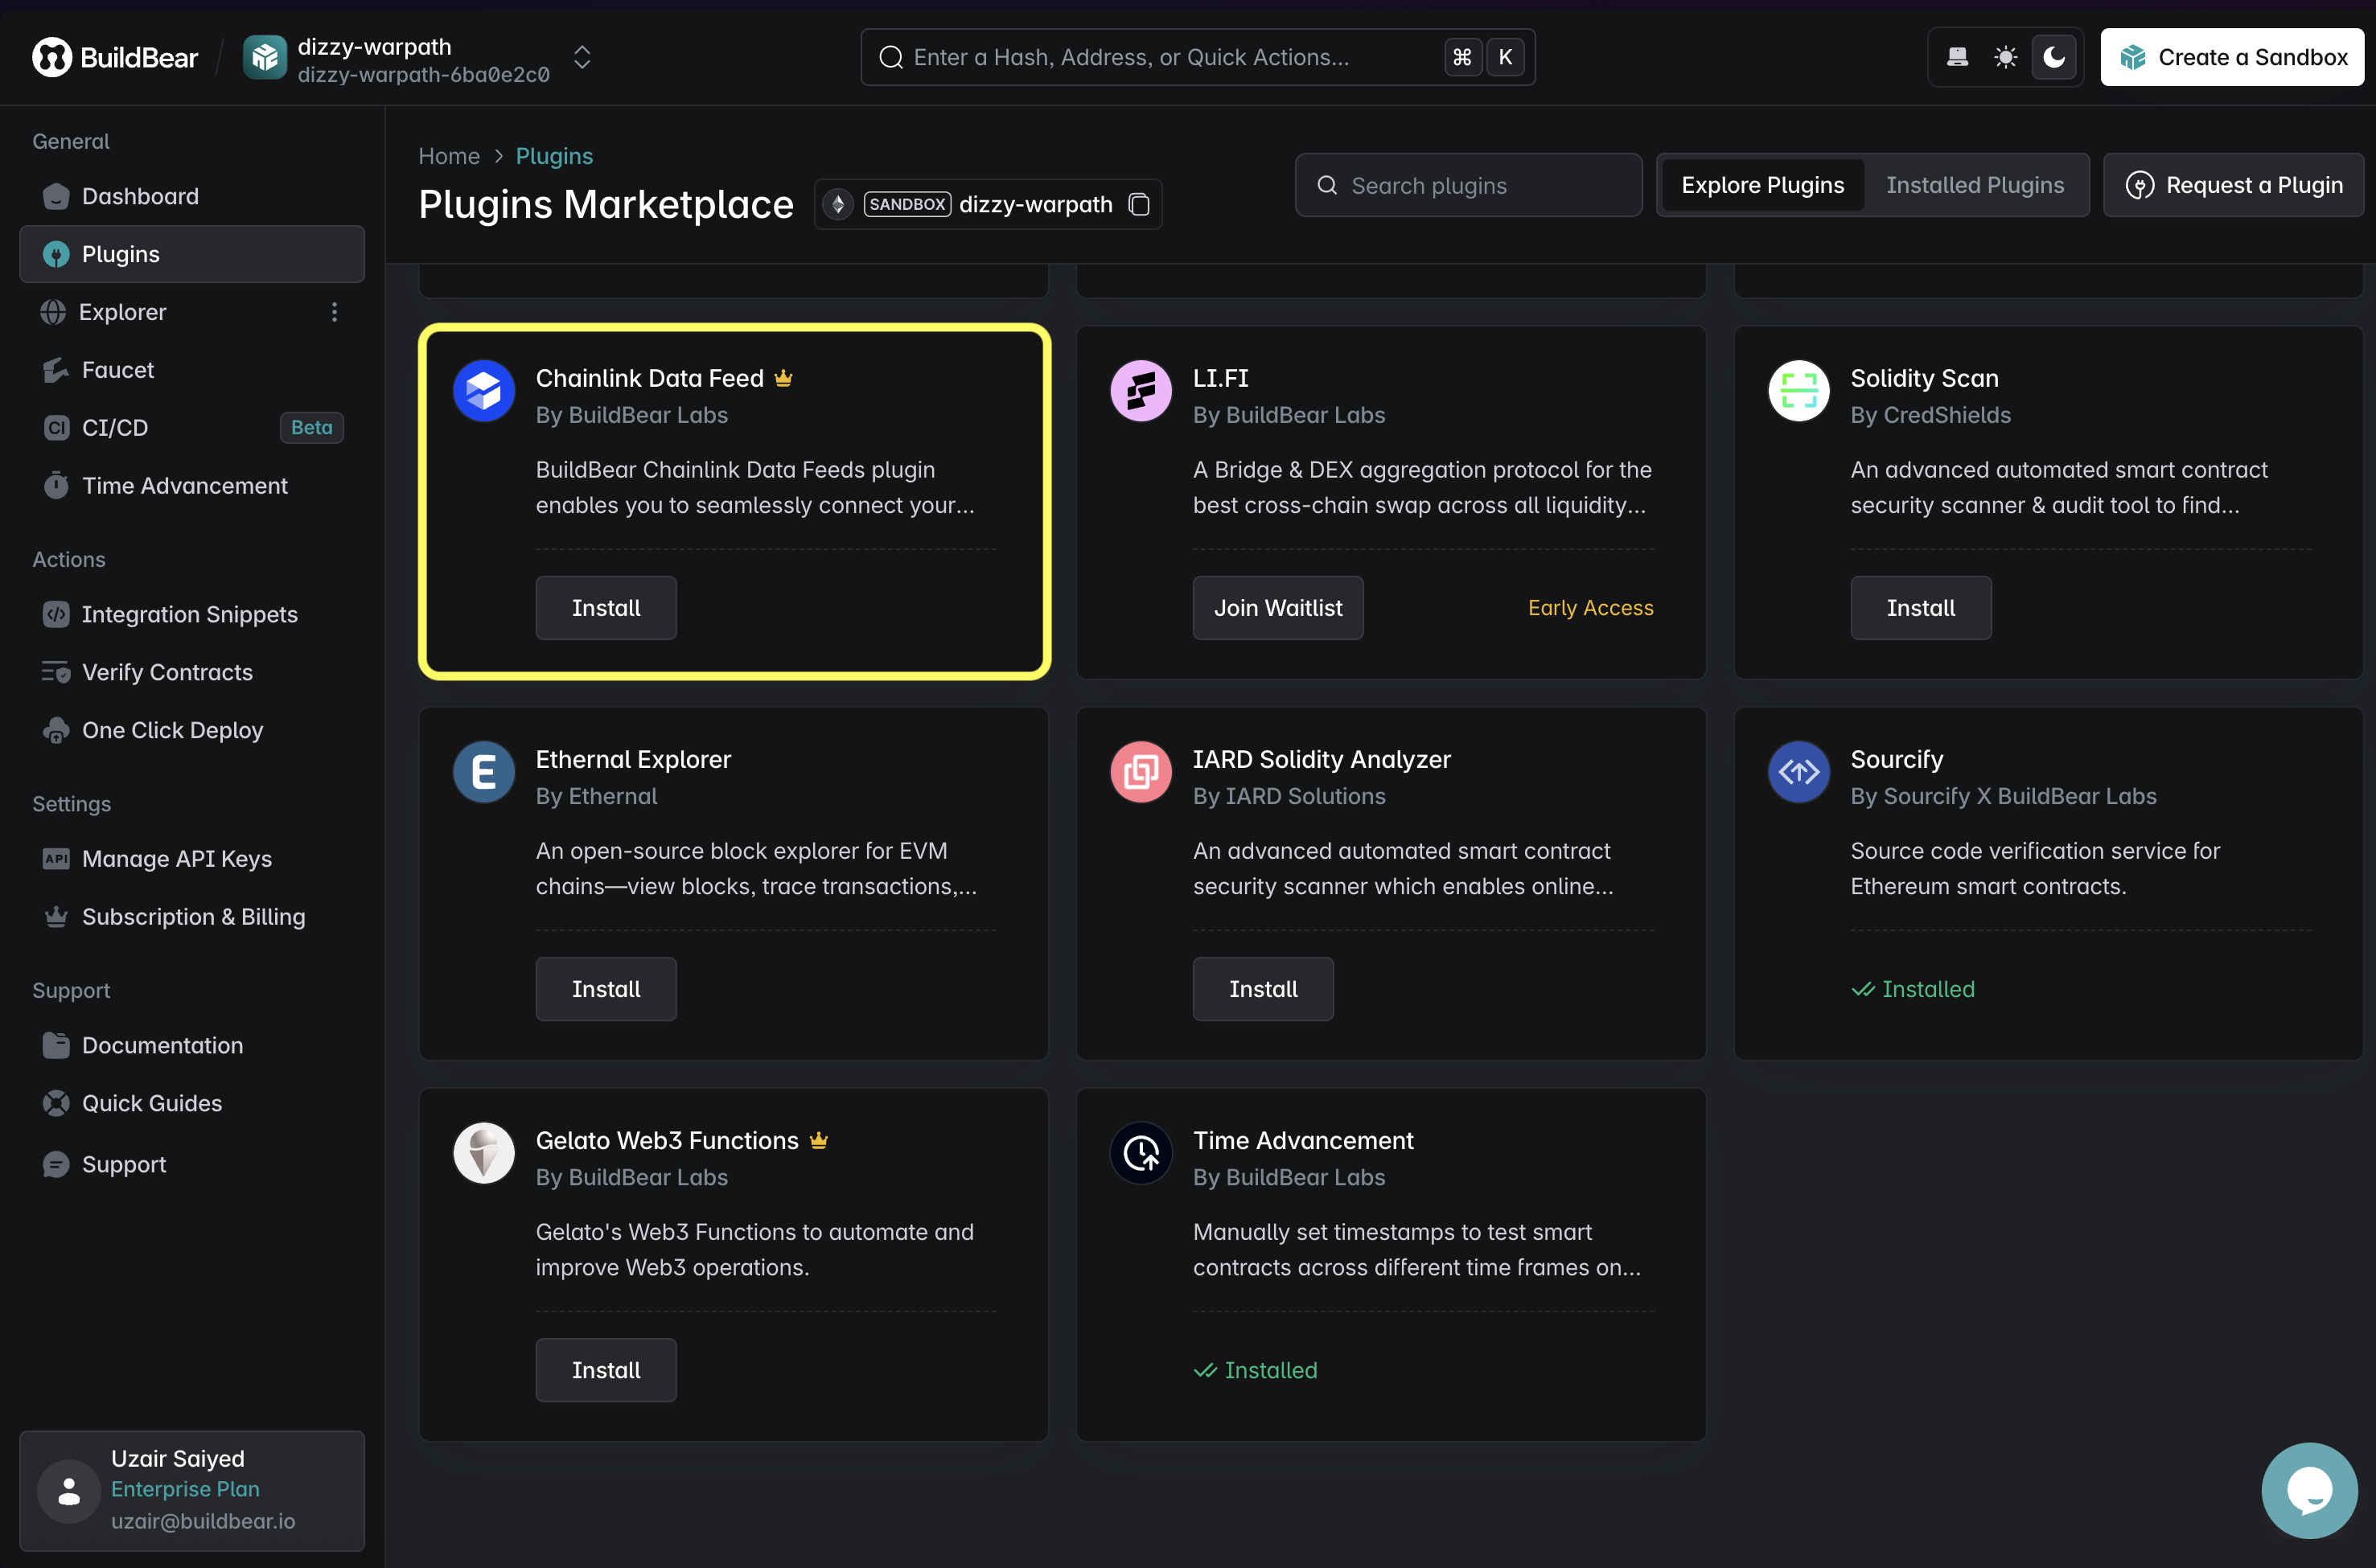
- Search and Subscribe to the "ETH/USD" feed.
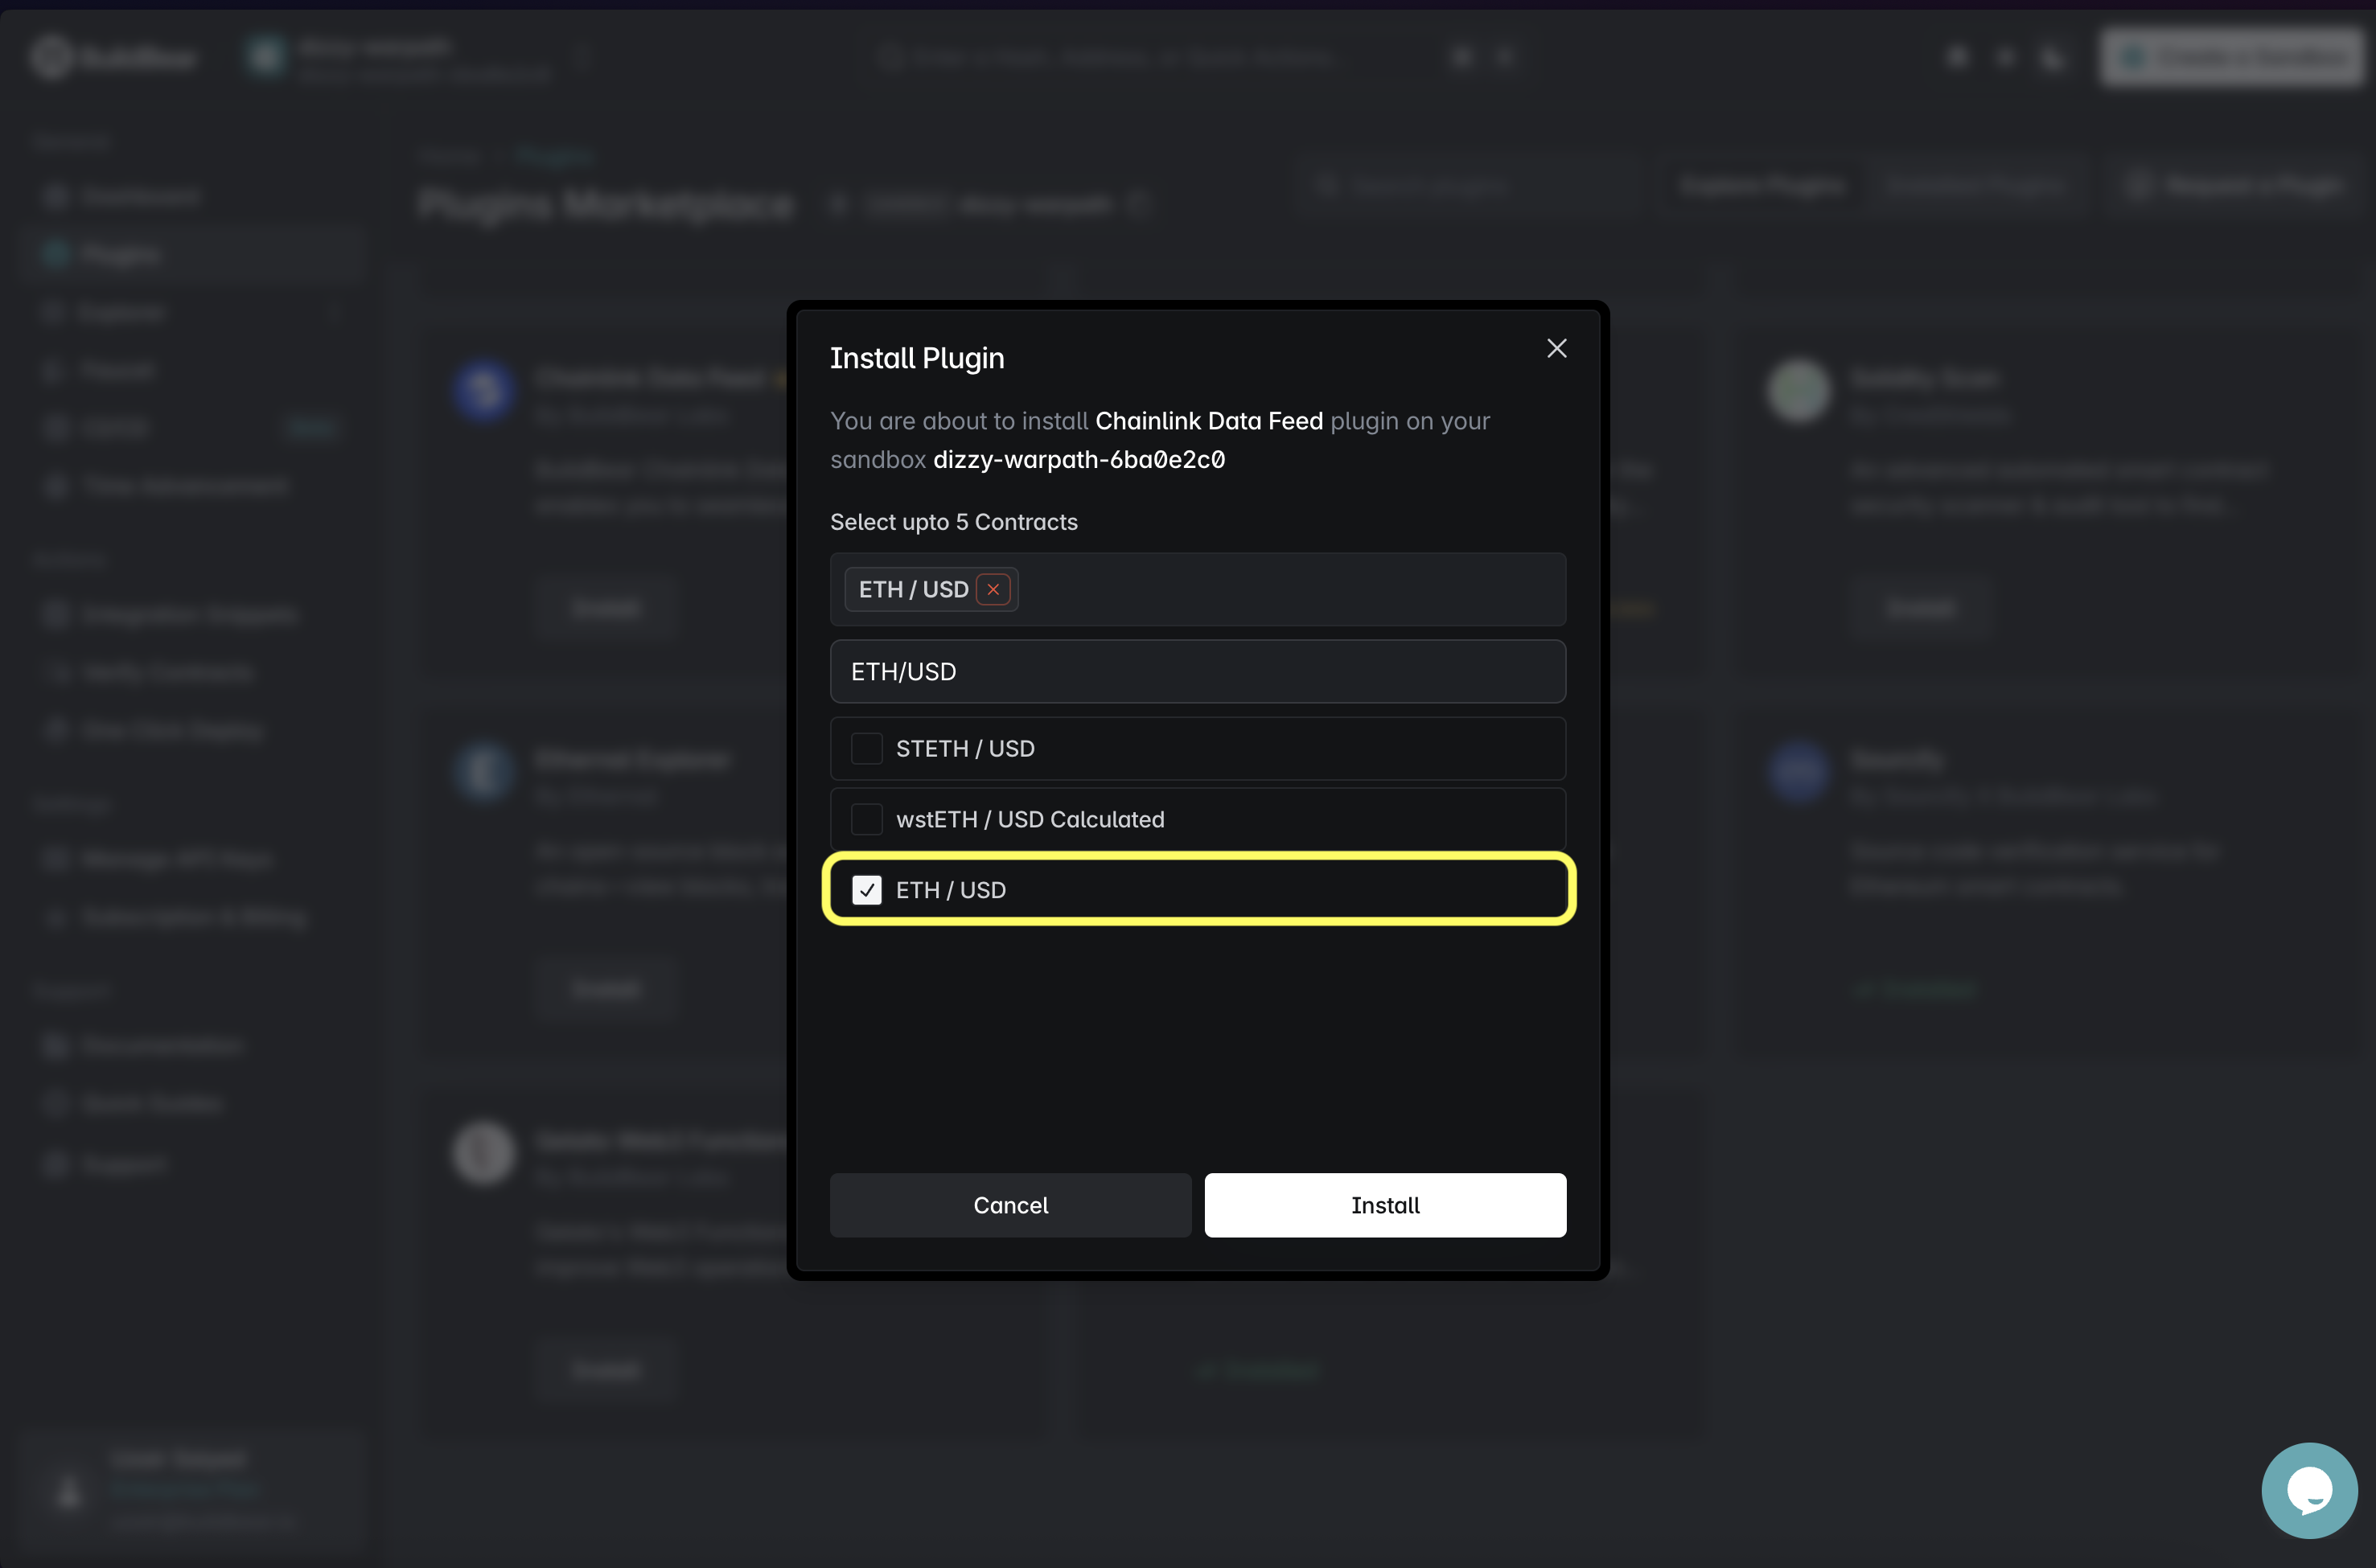
- Once you have, installed the Data-Feeds on both the Sandboxes, verify that your feed addresses match the addresses below:
- Ethereum Mainnet (ETH/USD Feed):
0x5f4eC3Df9cbd43714FE2740f5E3616155c5b8419 - Polygon Mainnet (ETH/USD Feed):
0xF9680D99D6C9589e2a93a78A04A279e509205945
- Ethereum Mainnet (ETH/USD Feed):
You can also visit Chainlink Data Feed Dashboard to see your subscribed feeds, and add/remove feeds.
- Install the "Chainlink Data Feed" Plugin from the Plugin Marketplace.
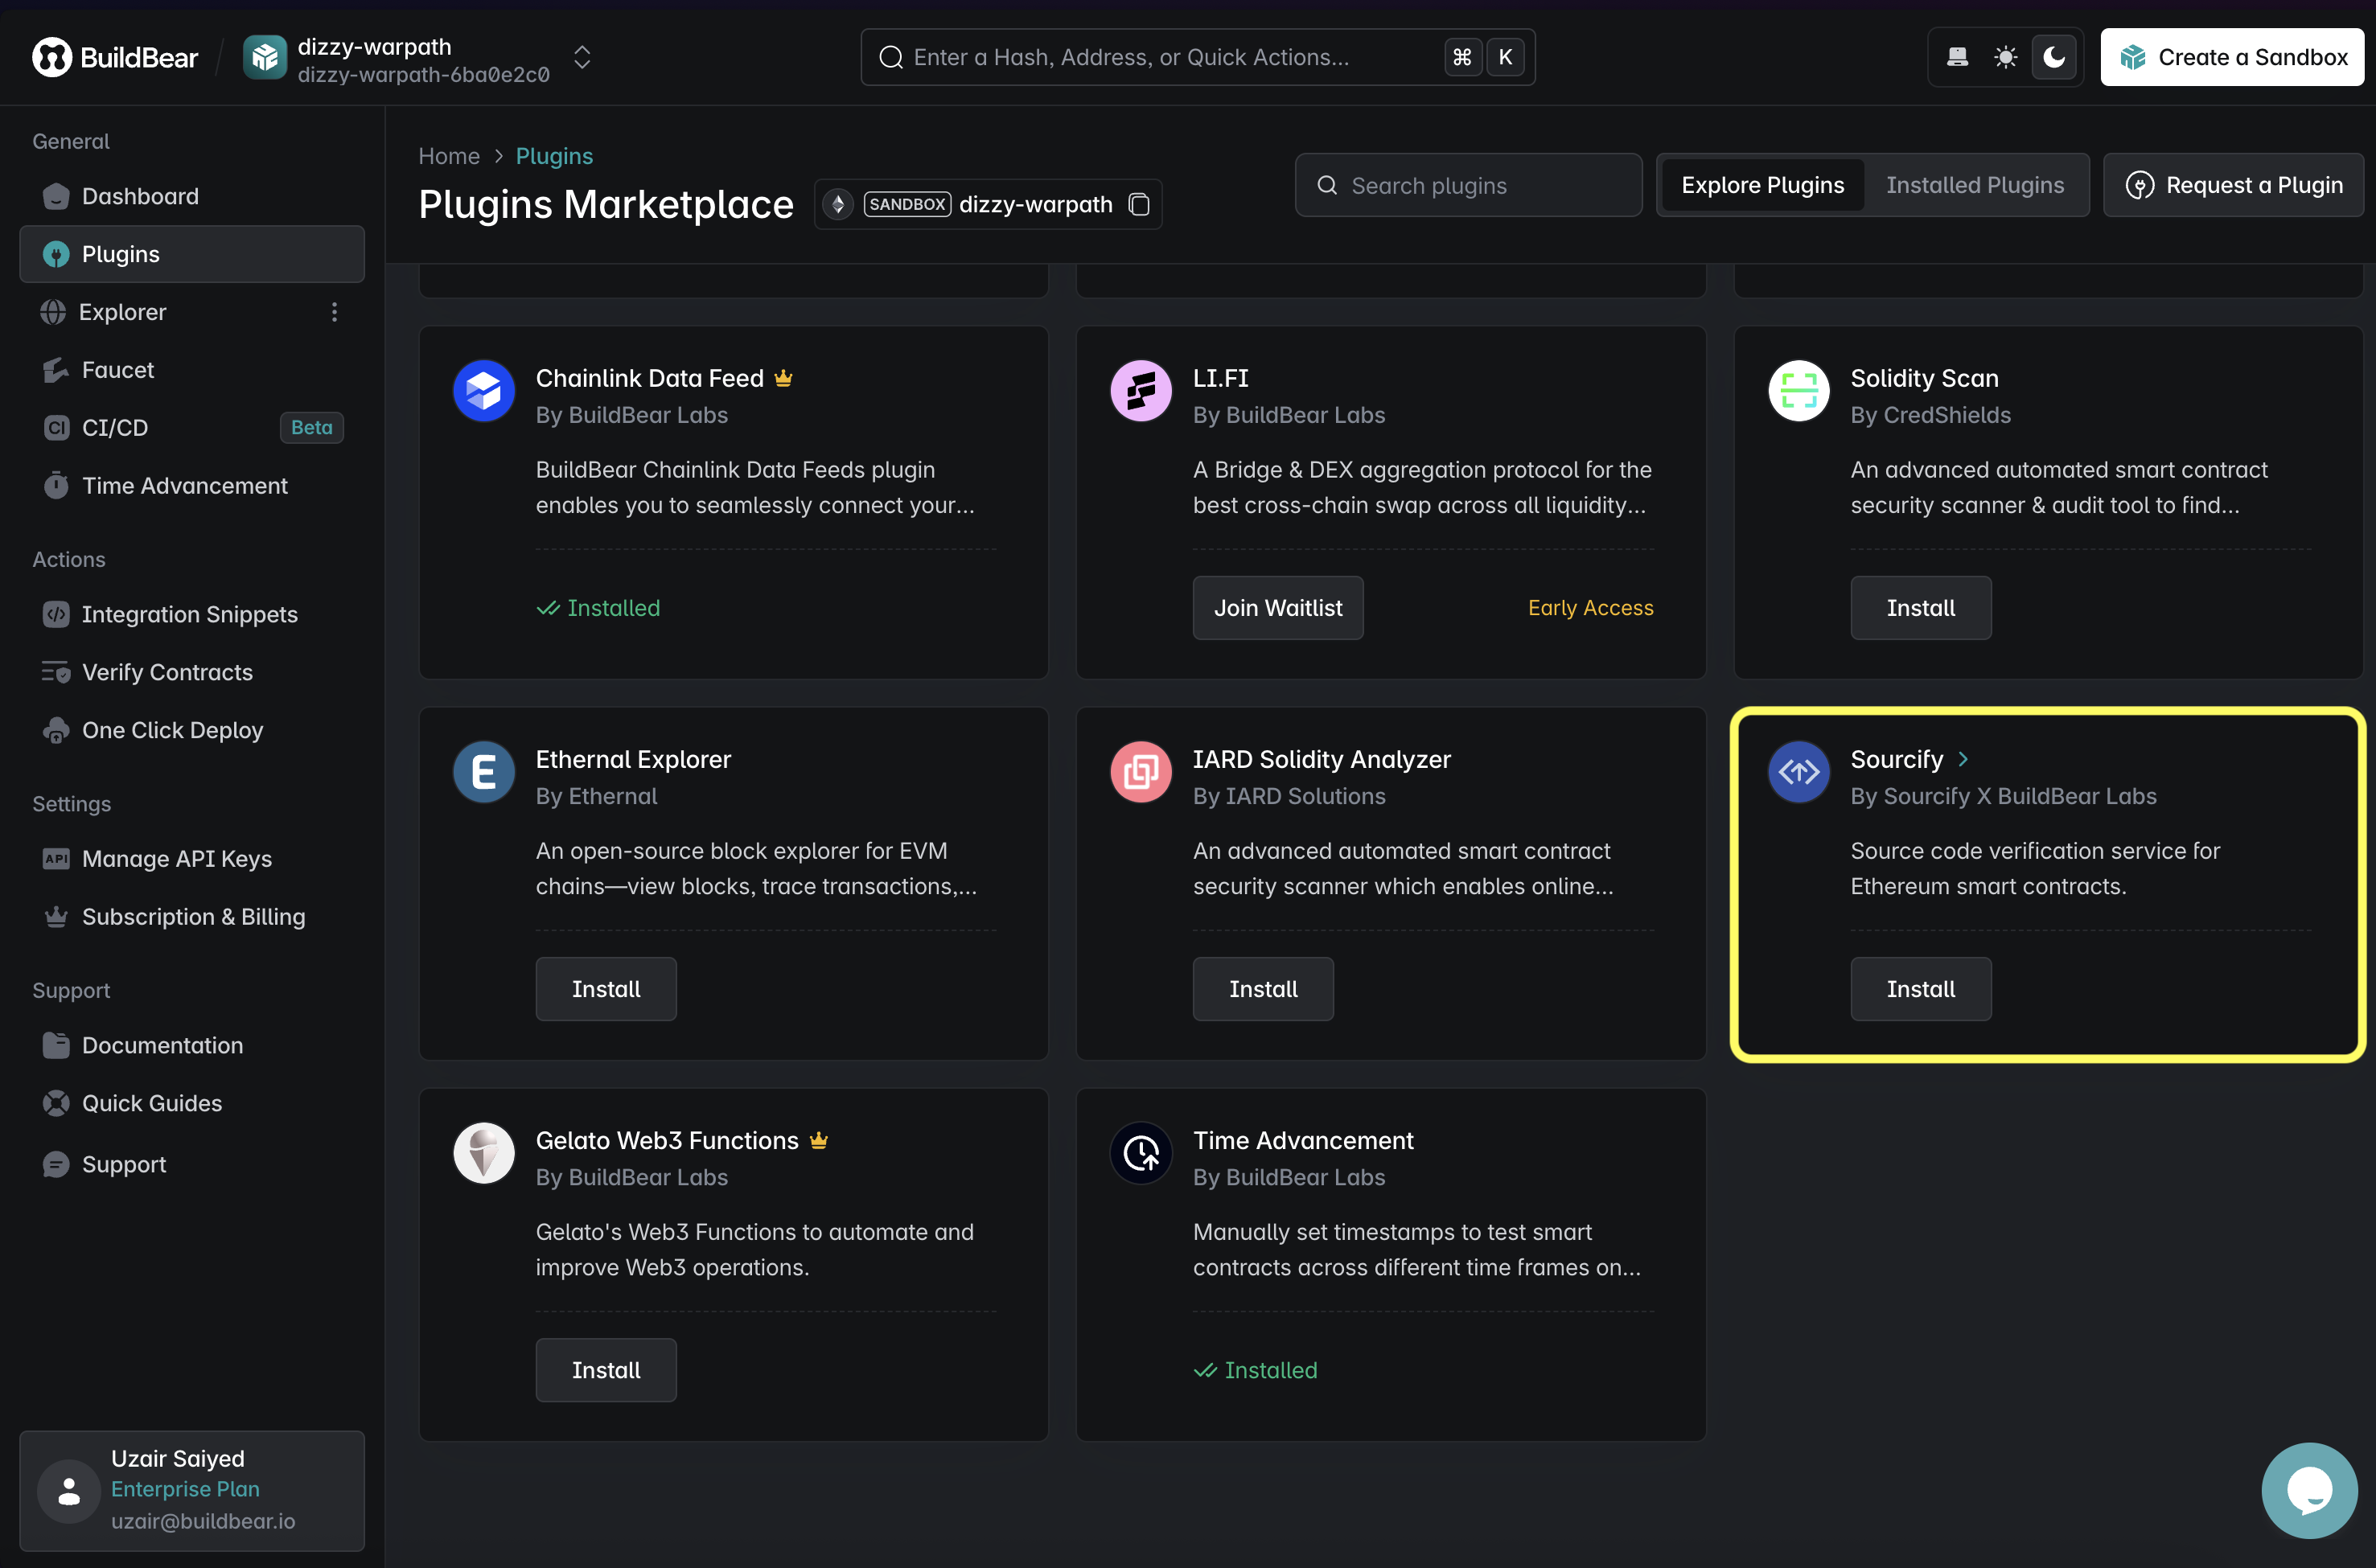
- Installing the Sourcify Plugin
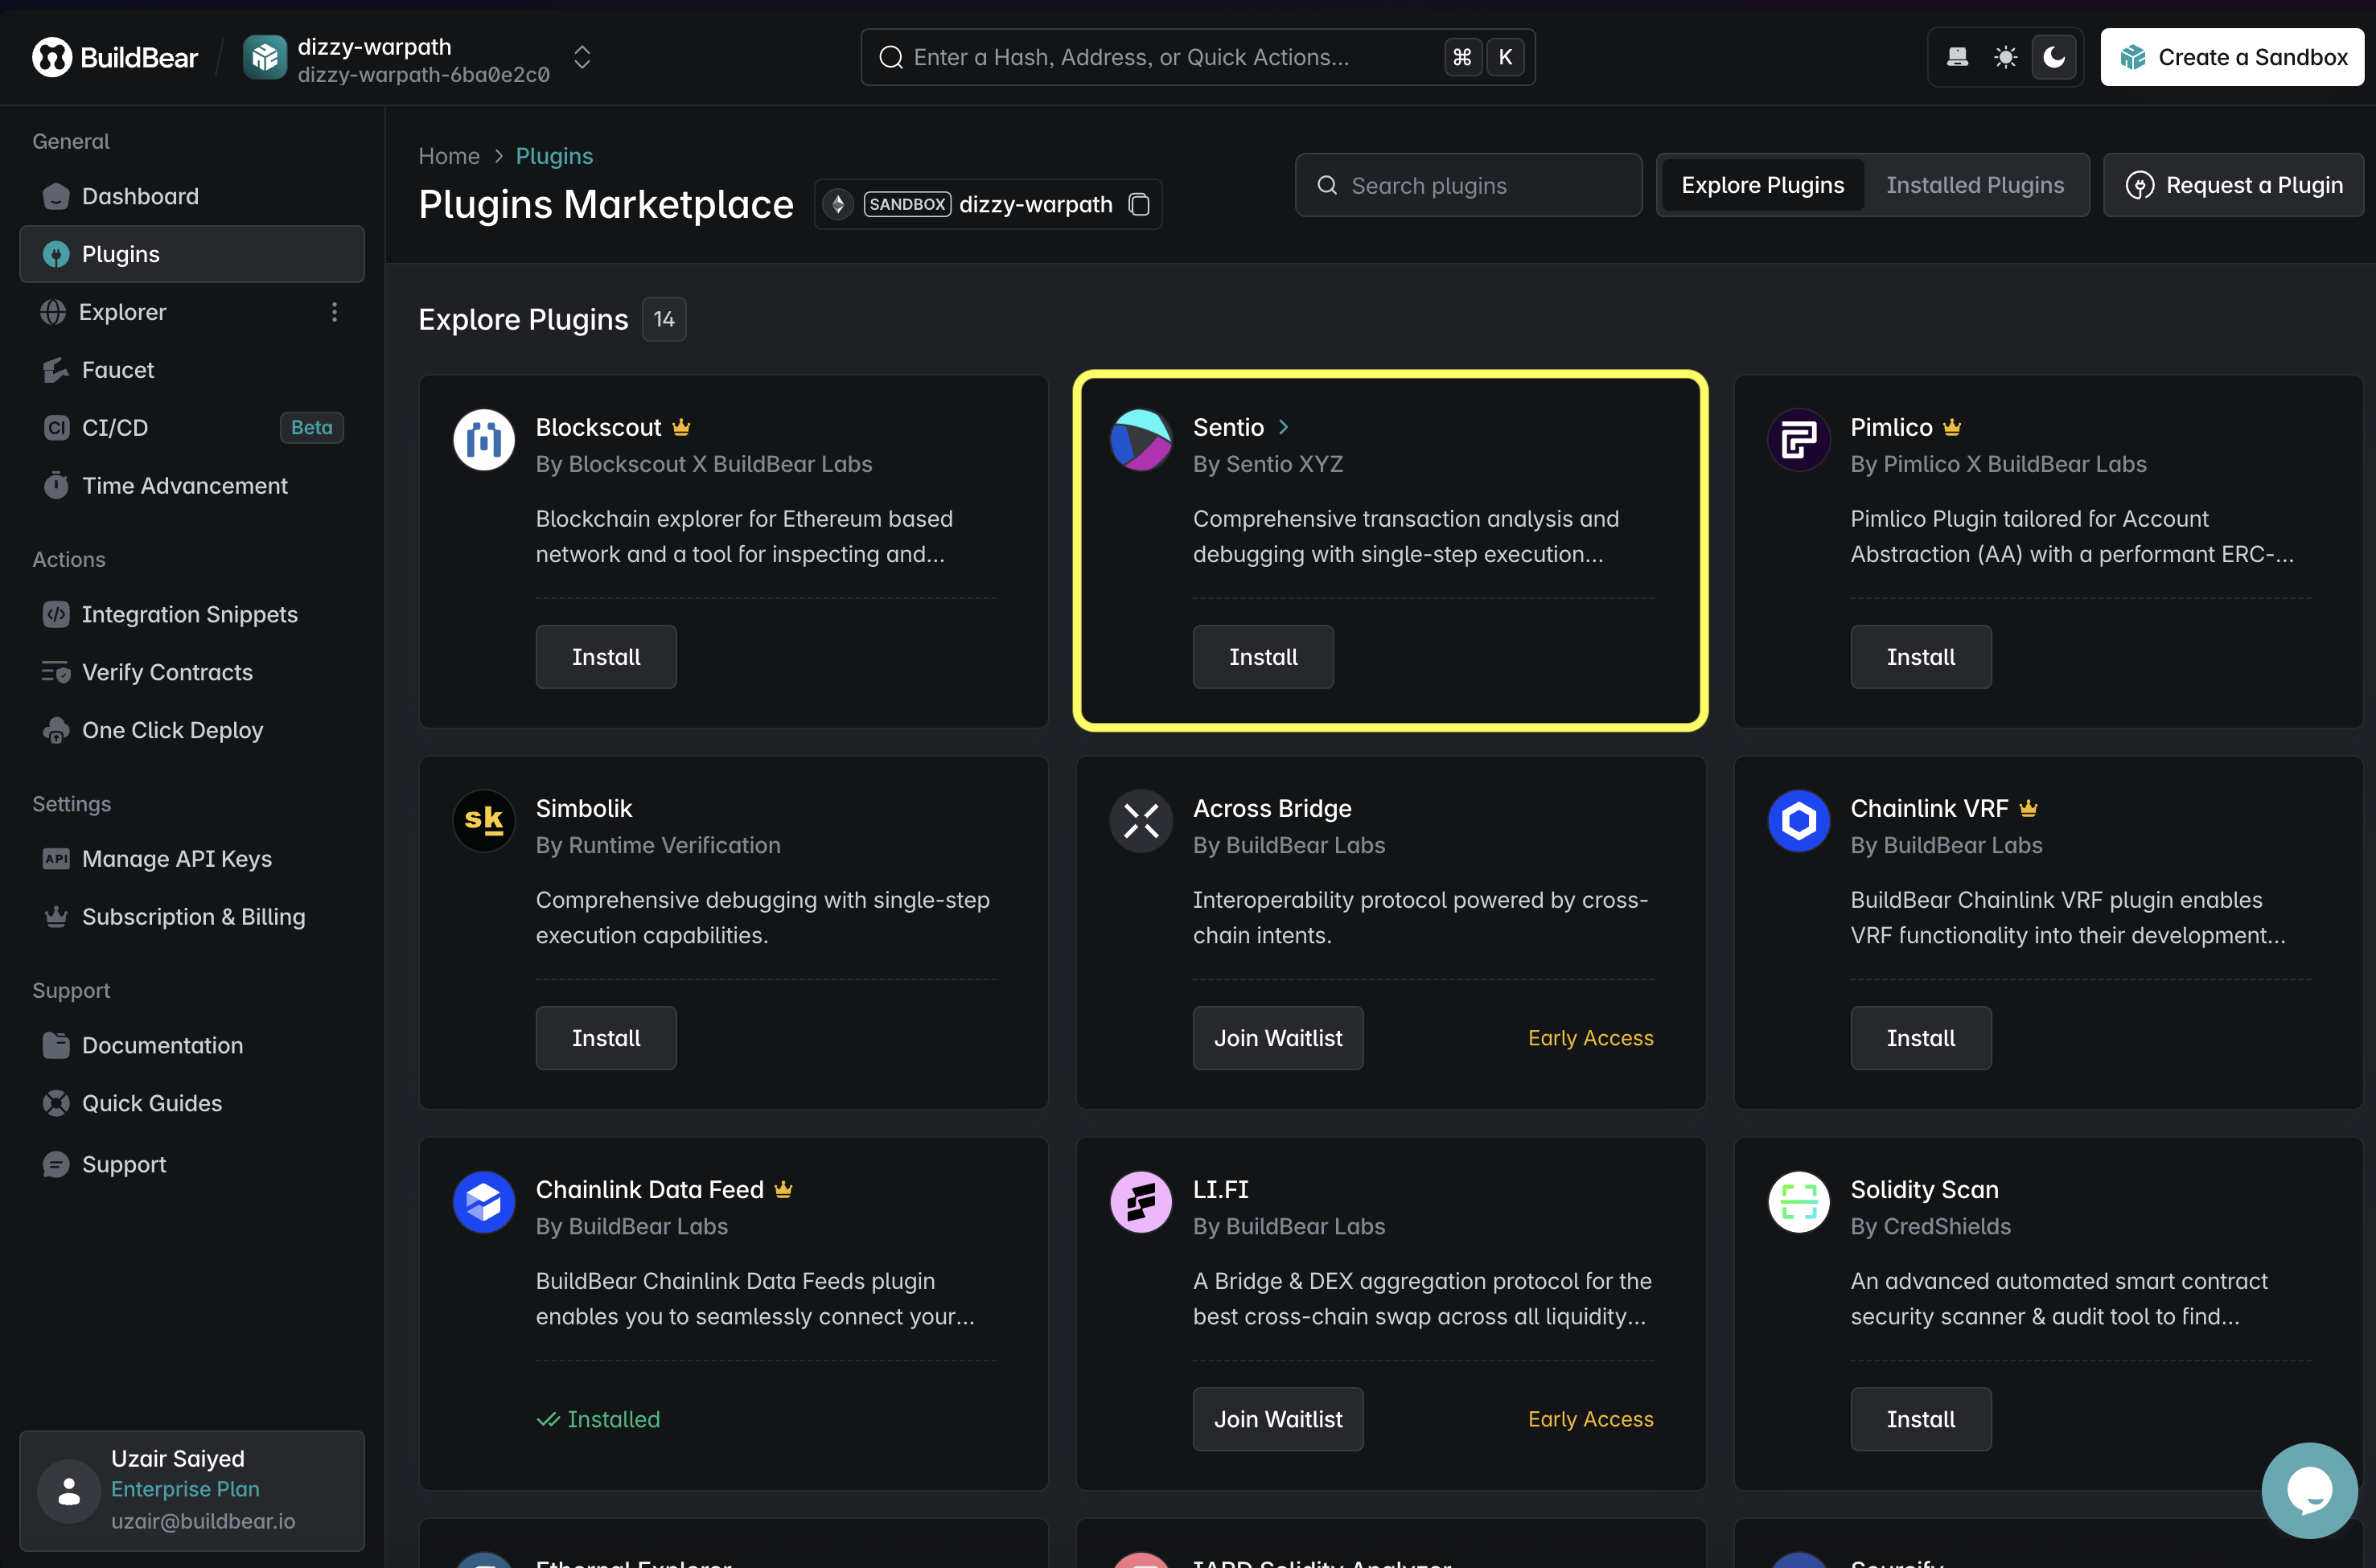
- Optionally, Install Sentio Plugin for Debugging and Tx Tracing
Step 2: Environment Variables & Wallet Setup
Copy .env.example to .env and fill in values.
We have some values pre-filled to save you some time sleuthing for addresses.
These mirror Mainnet token addresses and price feed addresses that BuildBear exposes inside the Sandboxes after the plugins are installed and configured.
foundry.toml
We also need some npm packages for the relayer to work, refer to the package.json file or put the contents below in it:
Need a new wallet keypair? Create one with cast
Funding your Deployer & Receiver Wallet
Once you have configured your wallets, you will need to fund your wallets with enough funds to:
- Cover deployment and interaction gas costs.
- Fund the bridges while deployment from
deployerto the Bridge- Requires
deployerto hold more than1000WETH and25000USDT.
- Requires
- Fund the receiver wallet with some
WETHto allow interaction with Bridge.sol and bridge the assets.
Why do we need to pre-fund wallet-addresses?
The relayer's call to release funds depends on the destination bridge already holding the mapped token. Without initial liquidity, release would fail due to insufficient balance.
Step 3: Creating Contracts & Scripts
3.1 Bridge.sol Contract
Roles and Storage
admin: deployer; the only caller allowed torelease.nonce: increments per request; included inBridgeRequested.processedNonces: marks opposite-chain nonces as used to prevent re-release.wethToken,usdtToken: ERC-20s handled on this chain.wethUsdFeed: Chainlink WETH/USD aggregator.
Price & Quotes
_getWethPrice()reads Chainlink and normalizes the result to1e8decimals for stable math.- Pulls
srcAmountin viasafeTransferFrom. - Gets WETH/USD price once & computes
dstAmount - Emits
BridgeRequested(...)and incrementsnonce.
Assets Release Post-Bridging
- Triggered by relayer with
onlyAdminrestriction and check for unusedprocessedNonces[externalChainNonce], and marks it used. - Transfers
amountoftokentoto. - Emits
TransferReleased(...).
3.2 Foundry Scripts & Their Usage
HelperConfig.s.sol
- Defines a
NetworkConfigstruct that carries:deployerKey(private key pulled from env),wethToken,usdtToken,wethUsdFeed,deployer(EOA that will pre-fund the bridge).
- Chooses
activeNetworkConfigbased onblock.chainid:1for the Ethereum Sandbox,137for the Polygon Sandbox.
- All addresses and keys are read with
vm.env*so you configure once in.env.
When to reference it:
- Deployment and interaction scripts use
HelperConfigto get chain-specific parameters without branching logic scattered across scripts.
DeployBridge.s.sol
- Starts a broadcast with
deployerKey. - Deploys
Bridge(wethToken, usdtToken, wethUsdFeed). The deployer becomesadmin. - Pre-funding from
deployerto the deployed bridge:-
Requires
deployerto hold more than1000e18WETH and25_000e6USDT. -
Transfers a fixed seed amount to the bridge (
1000e18WETH and25_000e6USDT).- Lower or remove the
requirethresholds to demo with smaller balances. - Add more tokens or feeds by extending constructor arguments and storage.
- Lower or remove the
-
Why the pre-funding check exists?
The relayer's call to release funds depends on the destination bridge already holding the mapped token. Without initial liquidity, release would fail due to insufficient balance.
InteractBridge.s.sol
- Reads the deployed bridge address for the current
block.chainidfrombroadcast/DeployBridge.s.sol/<chainId>/run-latest.json. - Loads
wethTokenandusdtTokenfromHelperConfig. - Uses
RECEIVER_WALLETandRECEIVER_PRIVATE_KEYto send the tx. - Approves the source token, then calls
lockAndQuote(wethToken, usdtToken, 1e18, receiver)to perform WETH → USDT on the current chain. - Emits
BridgeRequested, which the relayer observes to callreleaseon the opposite chain. - For USDT → WETH, swap the token params from before and use, 6-decimals (e.g.,
1000e6). - Works on chain 1 and 137 since addresses come from
HelperConfigand broadcast files at runtime.
How these script work together
- Deploy the bridge on both Sandboxes. Each bridge has its own admin and token/feed wiring.
- Pre-fund both bridges with the destination tokens you expect to release.
- Start the relayer. It subscribes to
BridgeRequestedon both chains, maps tokens for the opposite chain, and callsreleaseas the admin there. - Run the interaction script on the source chain. It locks tokens and emits the event. The relayer fulfills on the destination chain.
This separation keeps on-chain logic minimal and pushes cross-chain coordination into the relayer, which is appropriate for an educational, event-driven demo.
3.3 Relayer
Purpose: watchBridgeRequestedon the source chain and callreleaseon the destination chain as the bridge admin.Setup: loads bridge addresses from Foundry broadcasts, creates JSON-RPC providers, and builds a signer on the destination chain usingPRIVATE_KEY.Flow: poll logs forBridgeRequested, parse{to, dstToken, dstAmount, nonce}, mapdstTokenviaTOKEN_MAP, then sendrelease(mappedDstToken, to, dstAmount, nonce)on the destination bridge.Safety: destination bridge enforces one-time processing withprocessedNonces[nonce]to prevent replay.Requirements: destination bridge must hold sufficient token liquidity; the signer must be the bridge admin.Scope: the shown script is one-directional (ETH to POL). To support both directions, add a second poller for Polygon and callreleaseon Ethereum with an ETH-side admin signer.Limitation: processes only events observed while running; no backfill of past events.
Step 4: Configuring Makefile
Put this Makefile at the project root. It installs dependencies, deploys with Sourcify verification on both Sandboxes, and provides interaction targets. It basically takes away the overhead of writing commands again and again, working with complex commands and replacing them with simpler ones.
Remember to replace the placeholders in verifier-urls below with your actual BuildBear Sandbox ID
How it is set up:
installinstalls Foundry dependencies, Node packages, and builds contracts.deploy-mainnet-sourcifydeploys to the ETH Sandbox and verifies via the Sourcify plugin endpoint.deploy-pol-sourcifydeploys to the Polygon Sandbox and verifies via the corresponding Sourcify plugin endpoint.interact-mainnet-bridgeruns your interaction script against the ETH Sandbox to bridge assets.interact-pol-bridgeruns your interaction script against the Polygon Sandbox to bridge assets.
Step 5: Install and Build
This installs Foundry dependencies into lib, installs Node dependencies for the relayer, and compiles the contracts.
Step 6: Deploy and Verify
Deploy both bridges:
Your Foundry broadcast files will include the deployed addresses. Sourcify verification will be available in the Sandbox explorer.

Pre-funding note from your deploy script:
- Ensure the deployer wallet has sufficient WETH and USDT in both Sandboxes for the seed transfers. Adjust or remove the
requirechecks inside the script if you want smaller demo amounts.
Step 7: Start the Relayer
Remember to install the dependencies as mentioned before, and run the relayer:
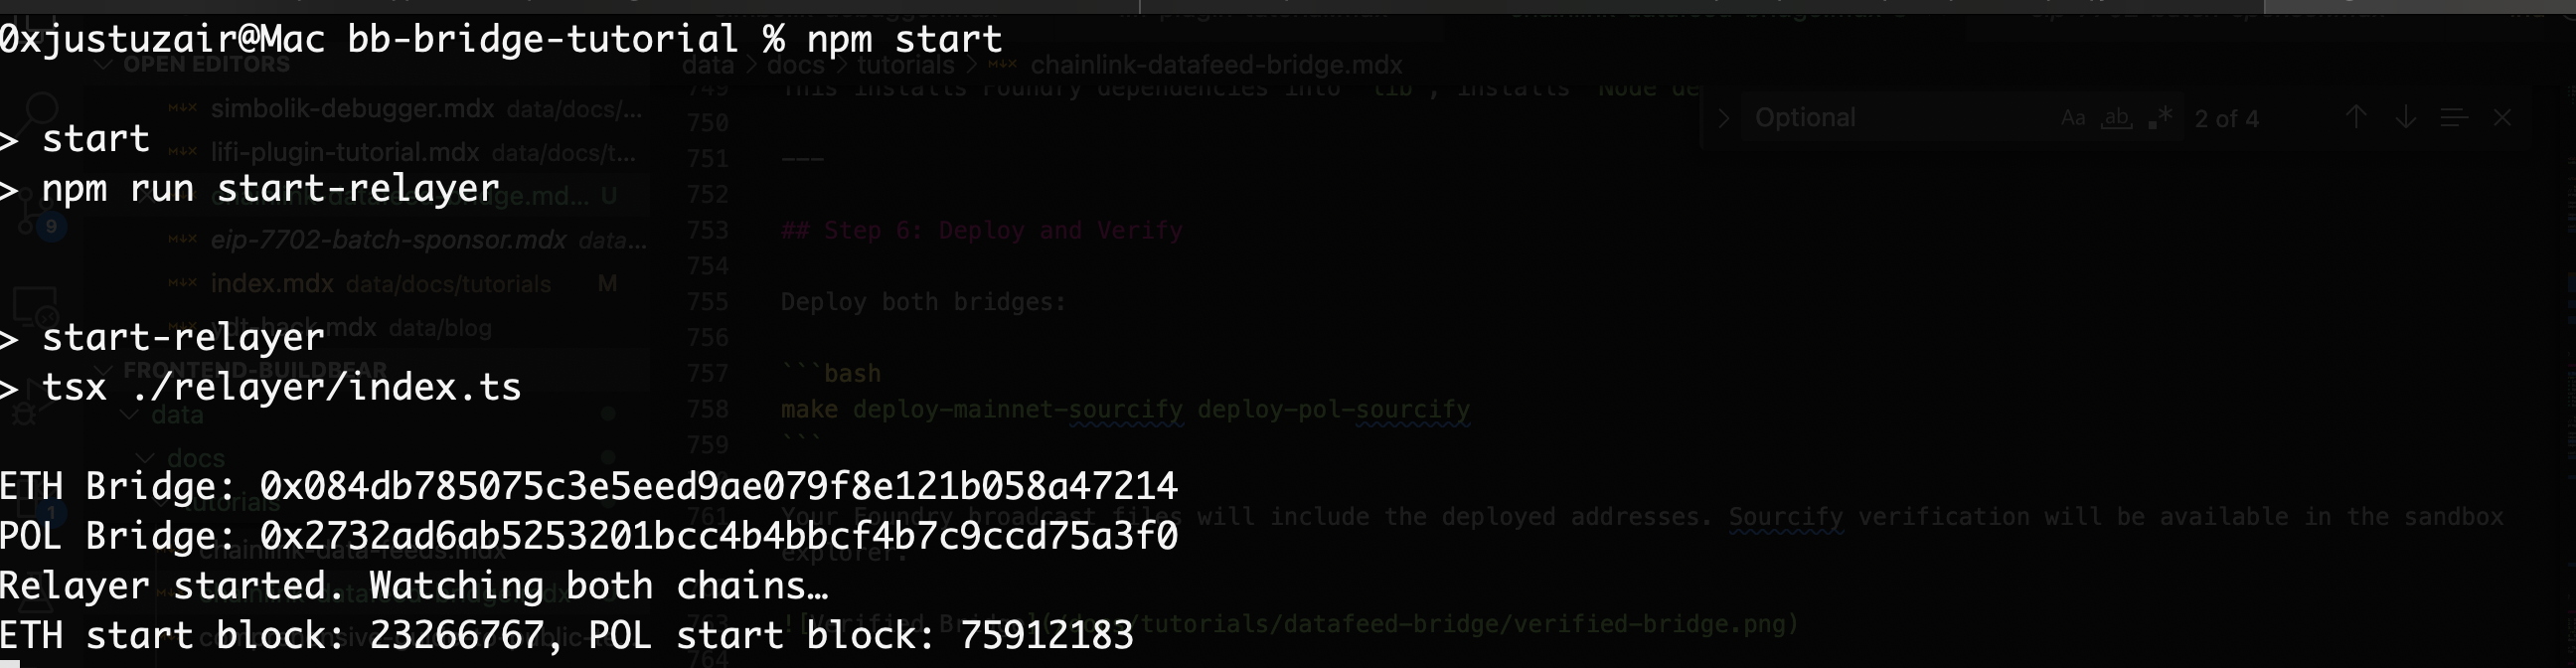
This relayer processes only those events that occur while it is running. Backfill isn't supported, by the script for the purpose of simplicity and ease of implementation
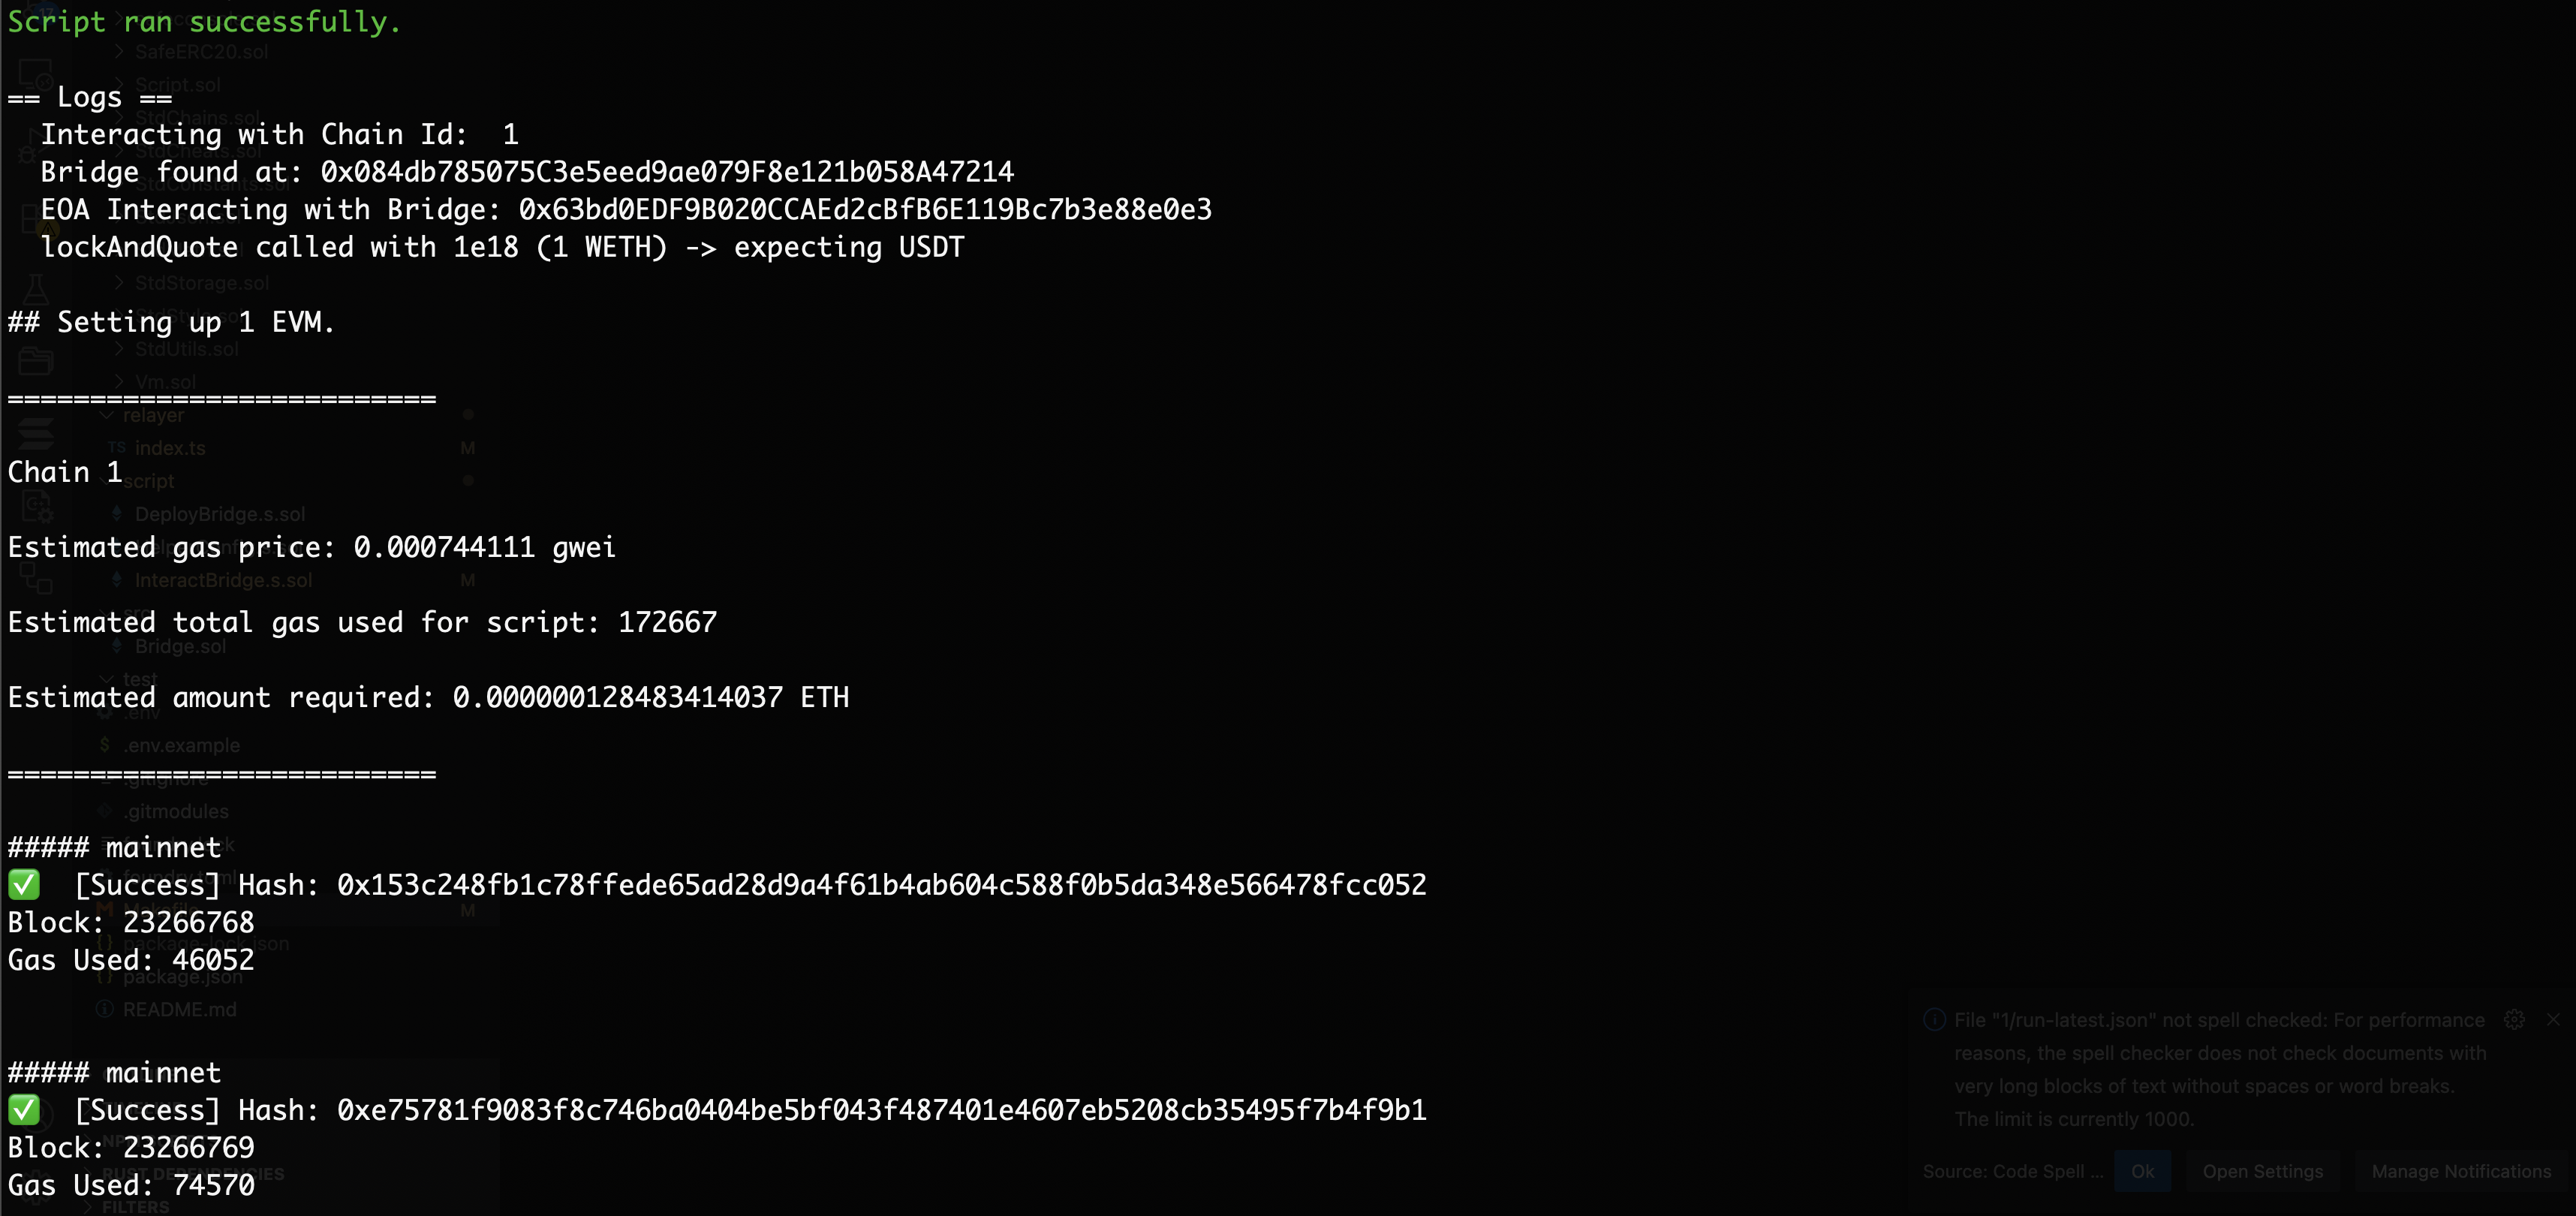
Step 8: Interact and Bridge the Assets
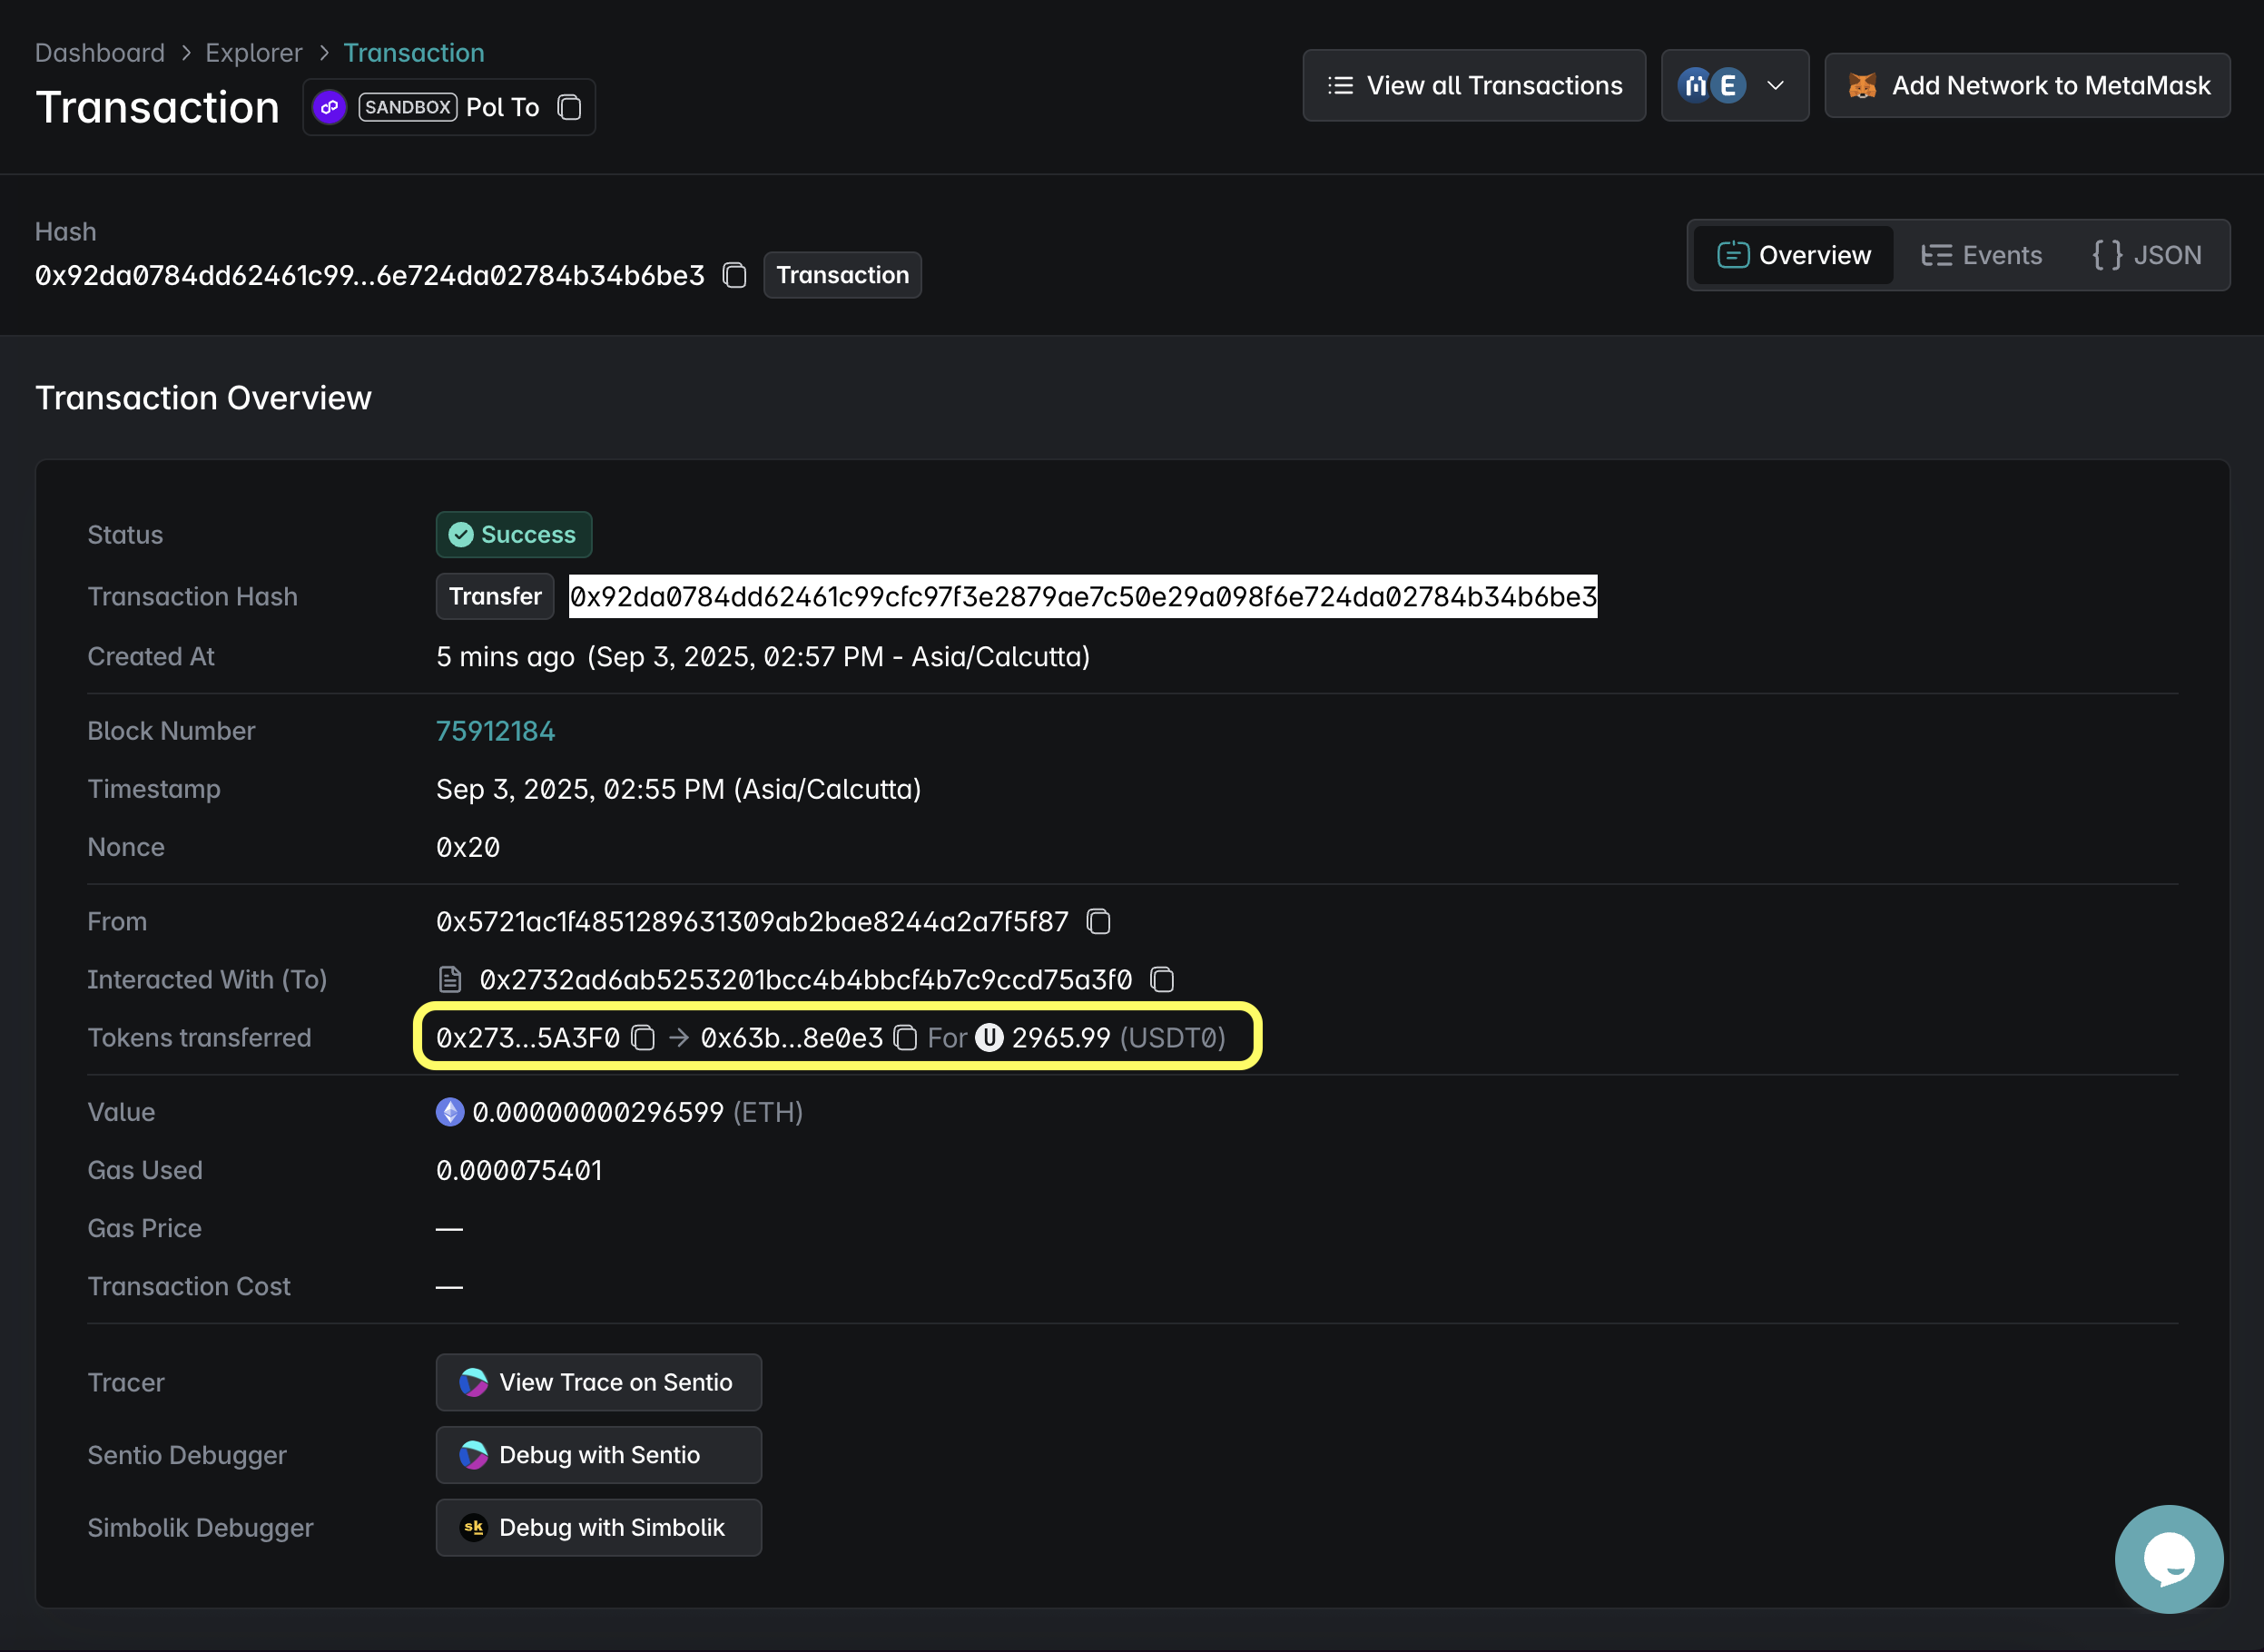
ETH to Polygon Bridging:
Remember to start the relayer before you call the Interact-Bridge Script on either of the Sandboxes.
While the relayer is running, in another terminal, execute a interaction with the bridge
Script Broadcast
 Tx on BuildBear Explorer

Your interaction script reads the last deployment address from Foundry broadcasts, approves the source token, and calls lockAndQuote. The relayer observes the BridgeRequested event on the source chain and calls release on the destination bridge.
- In the output below, relayer captured the
BridgeRequested(...)event and released the asset on Polygon Mainnet Sandbox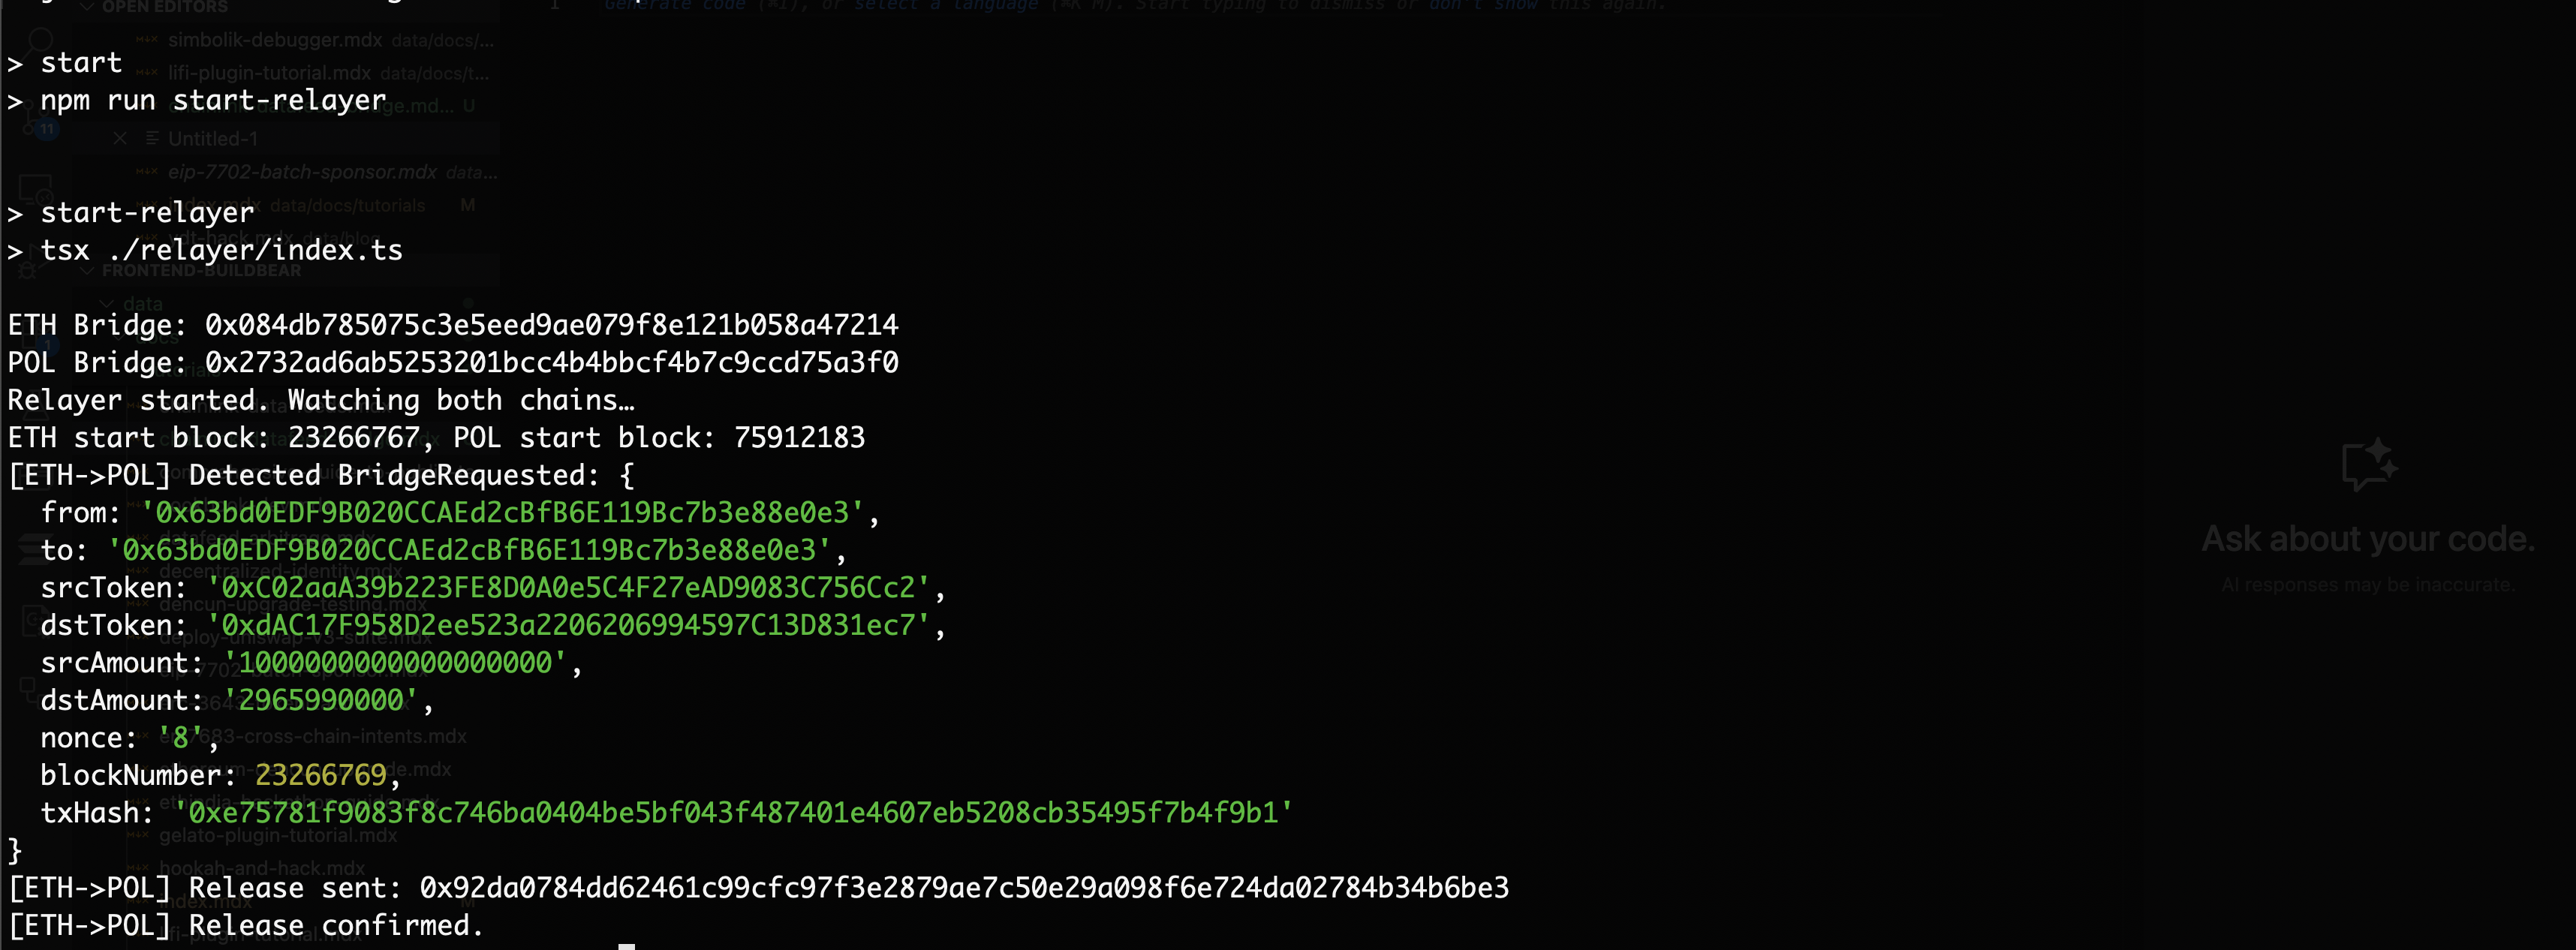
- Asset release tx on Polygon Mainnet Sandbox
Step 9: Transaction Debugging with Sentio Plugin (Optional)
This section is optional and shows how to inspect an end-to-end transfer using the explorer and Sentio.
For the Sentio Debugger to work, you will need to install the Sentio Plugin from BuildBear Plugin Marketplace
Source: Bridging Tx
Open the source Sandbox explorer.
Find the tx hash for the interaction with lockAndQuote, on the bridge contract.
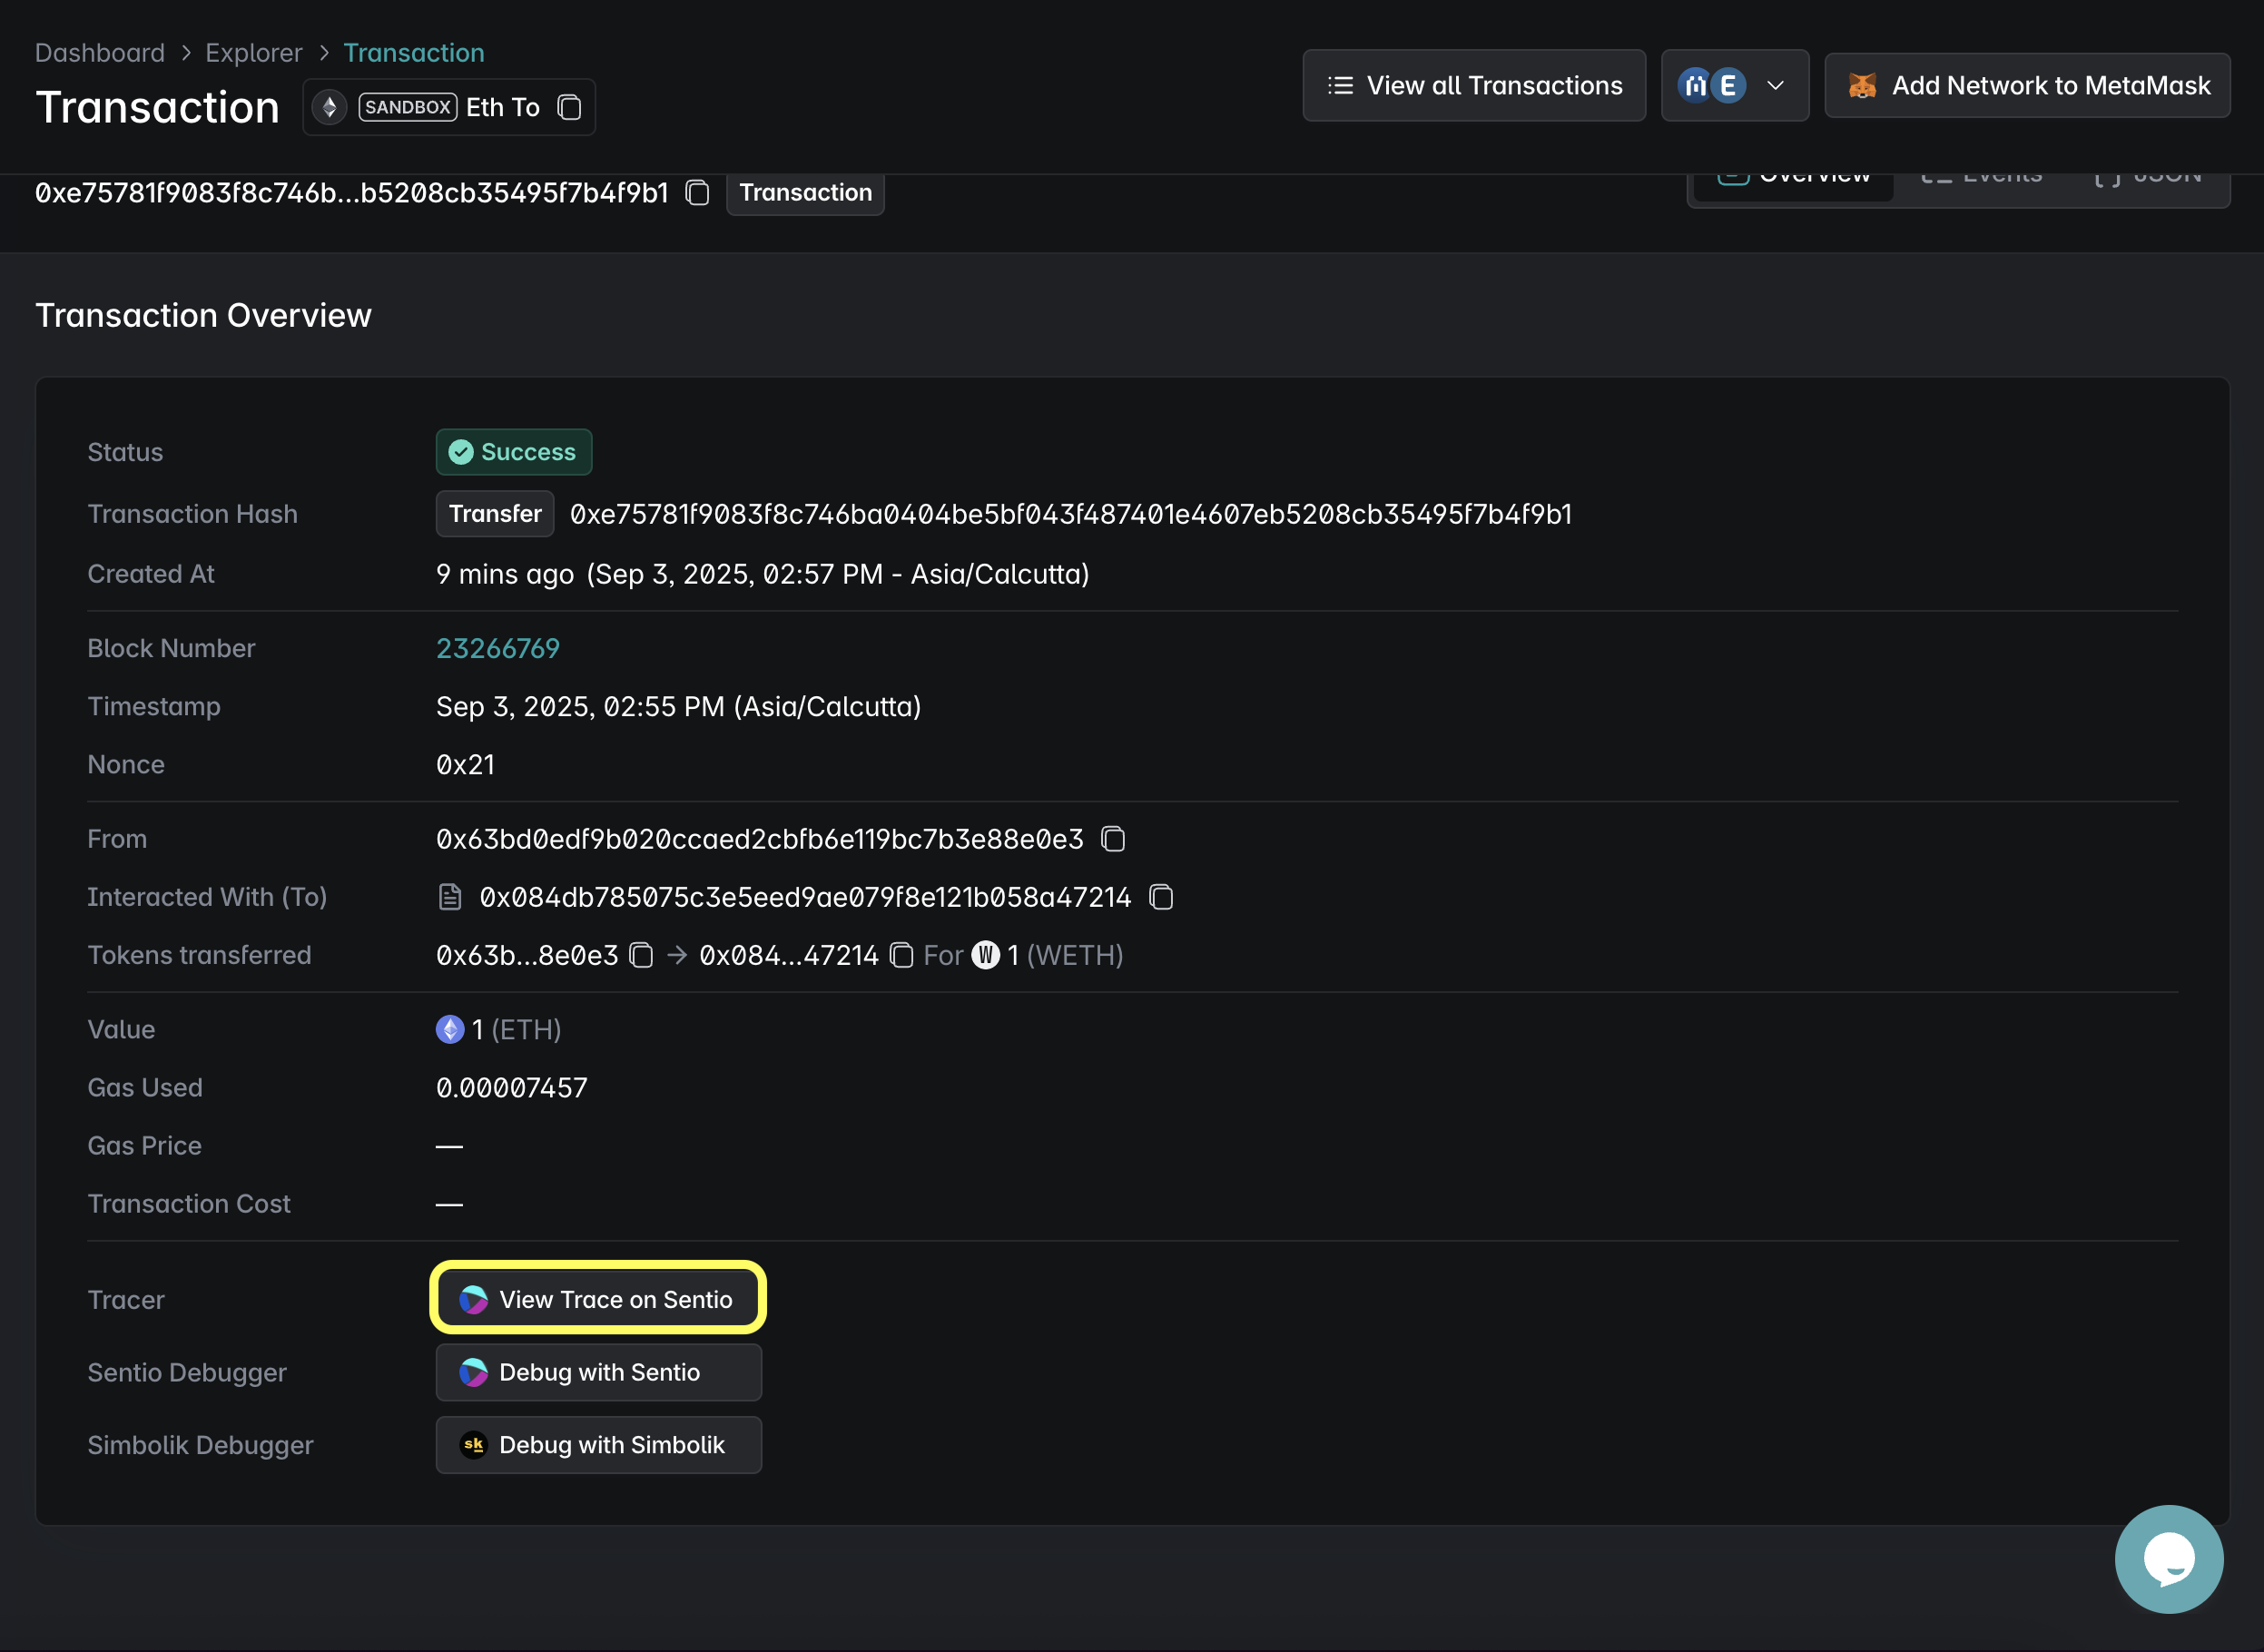
Click on "View Trace on Sentio"
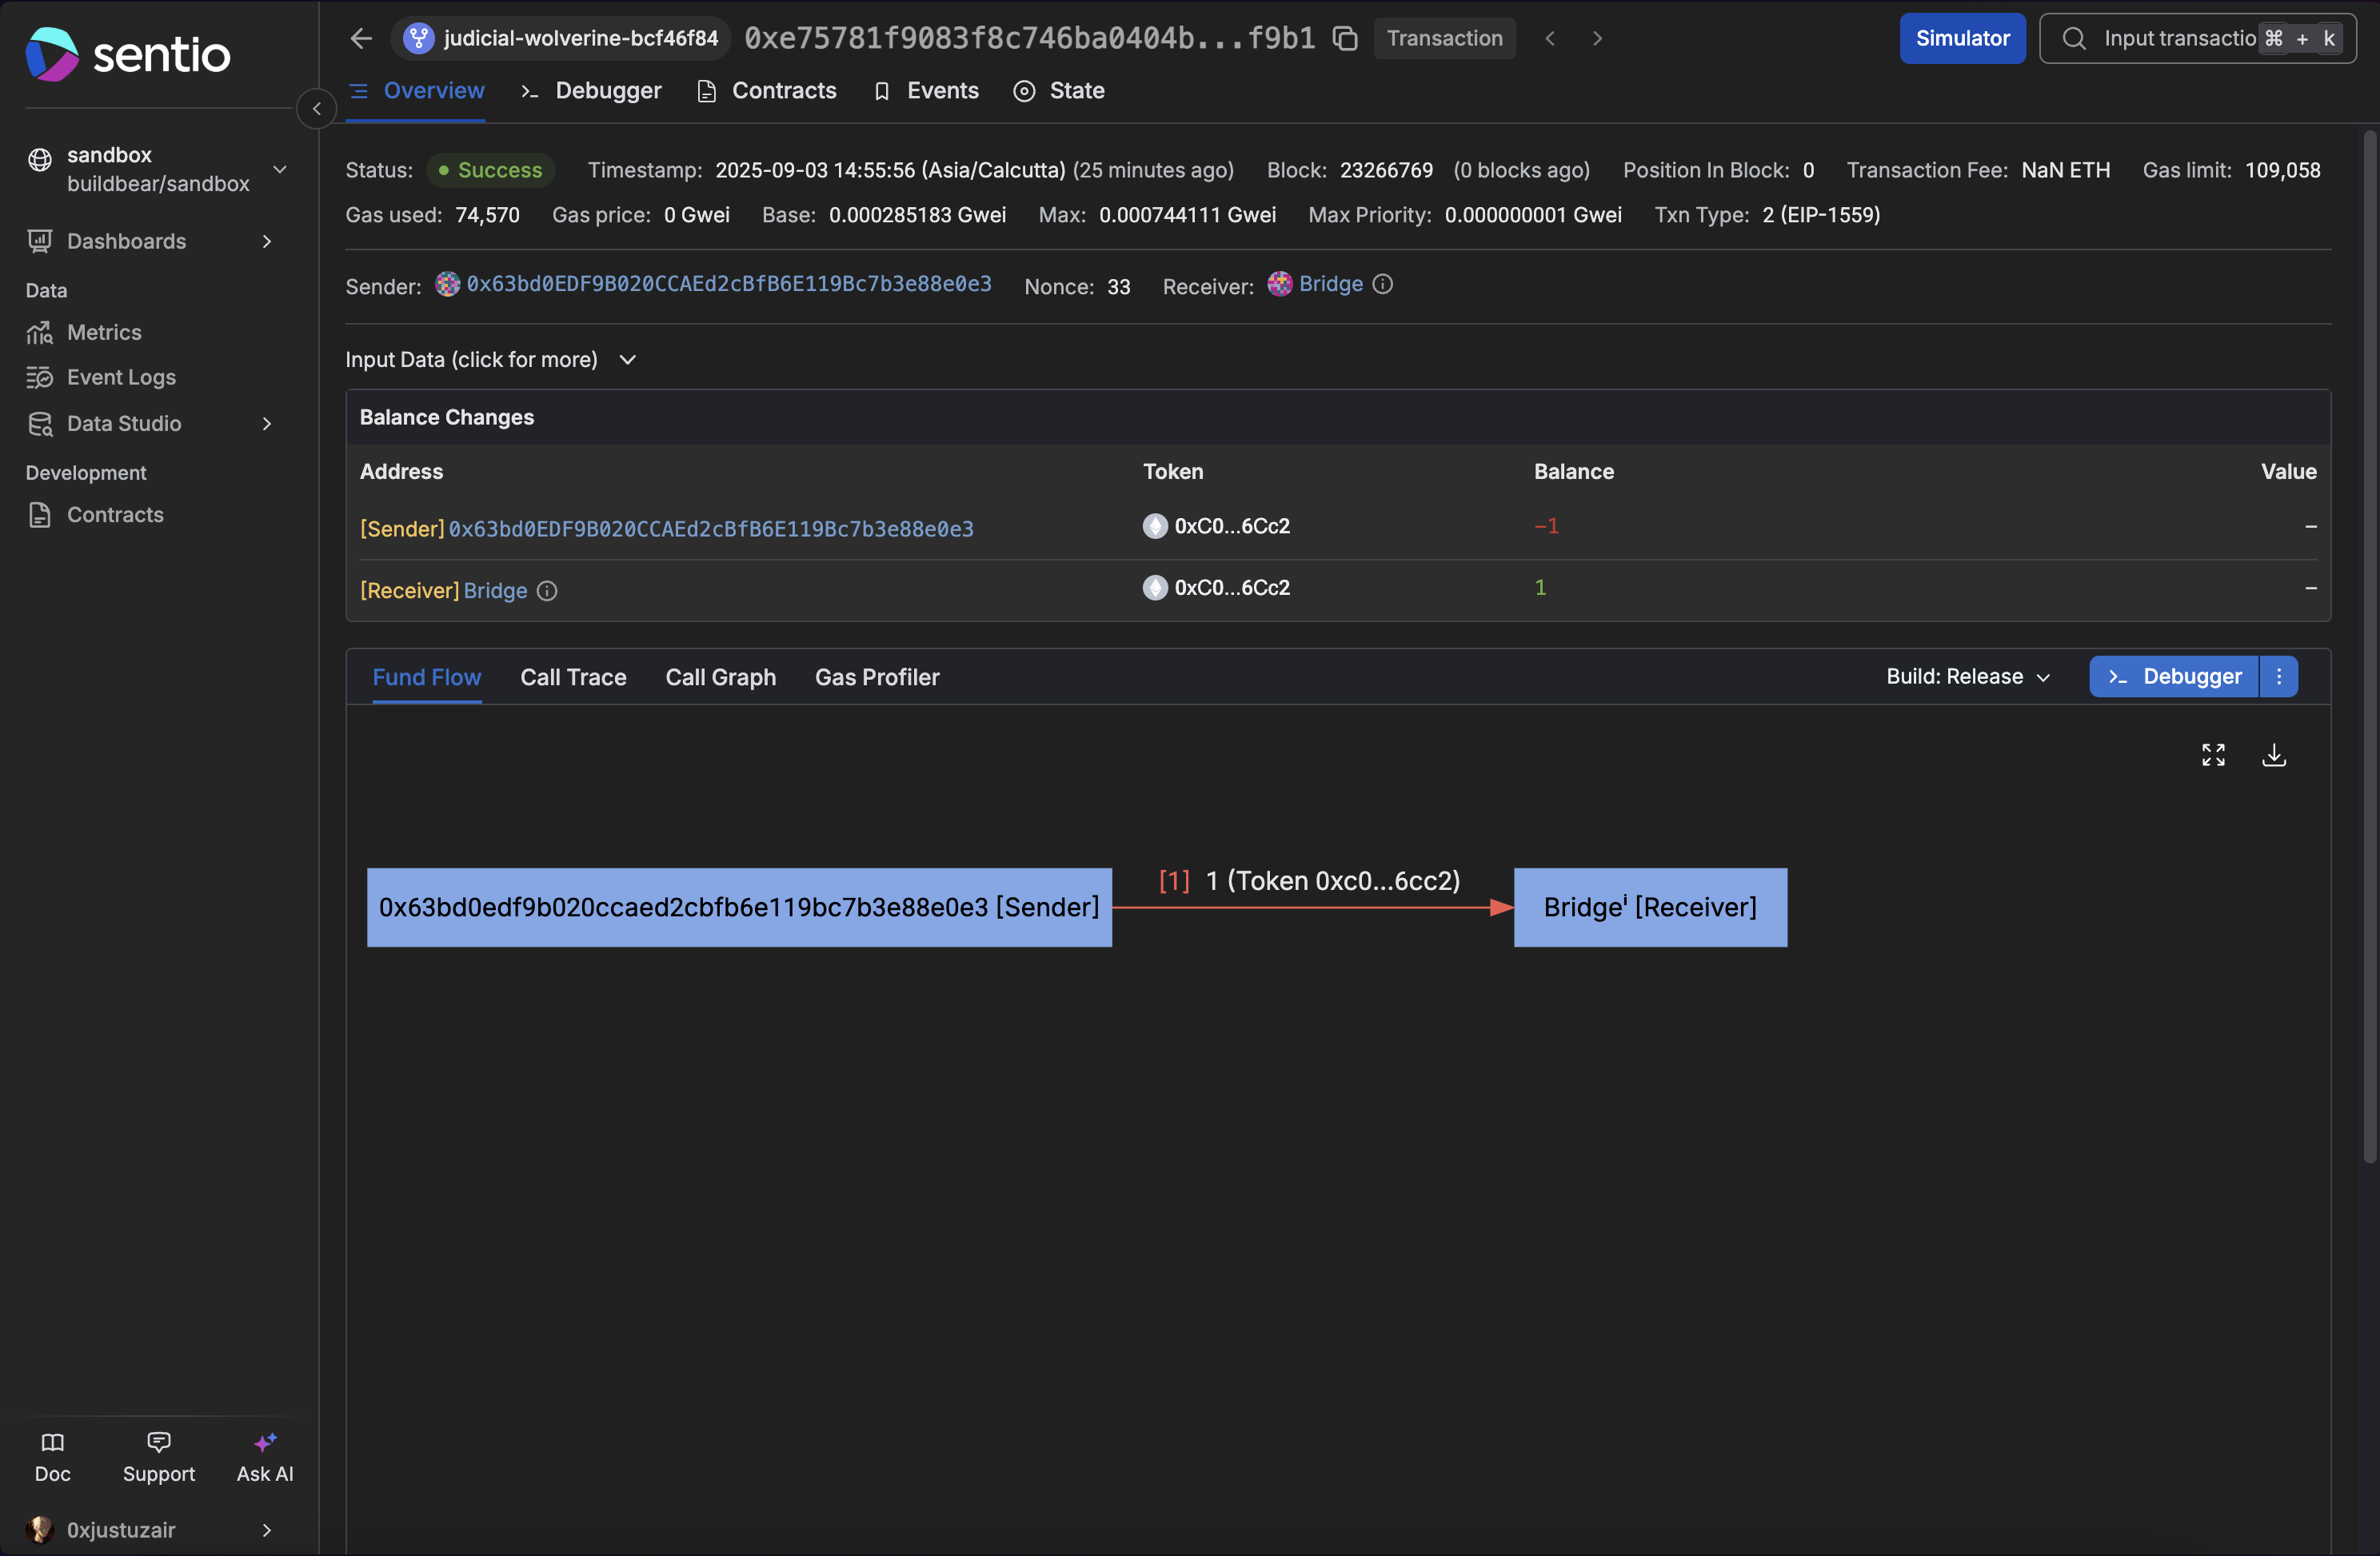
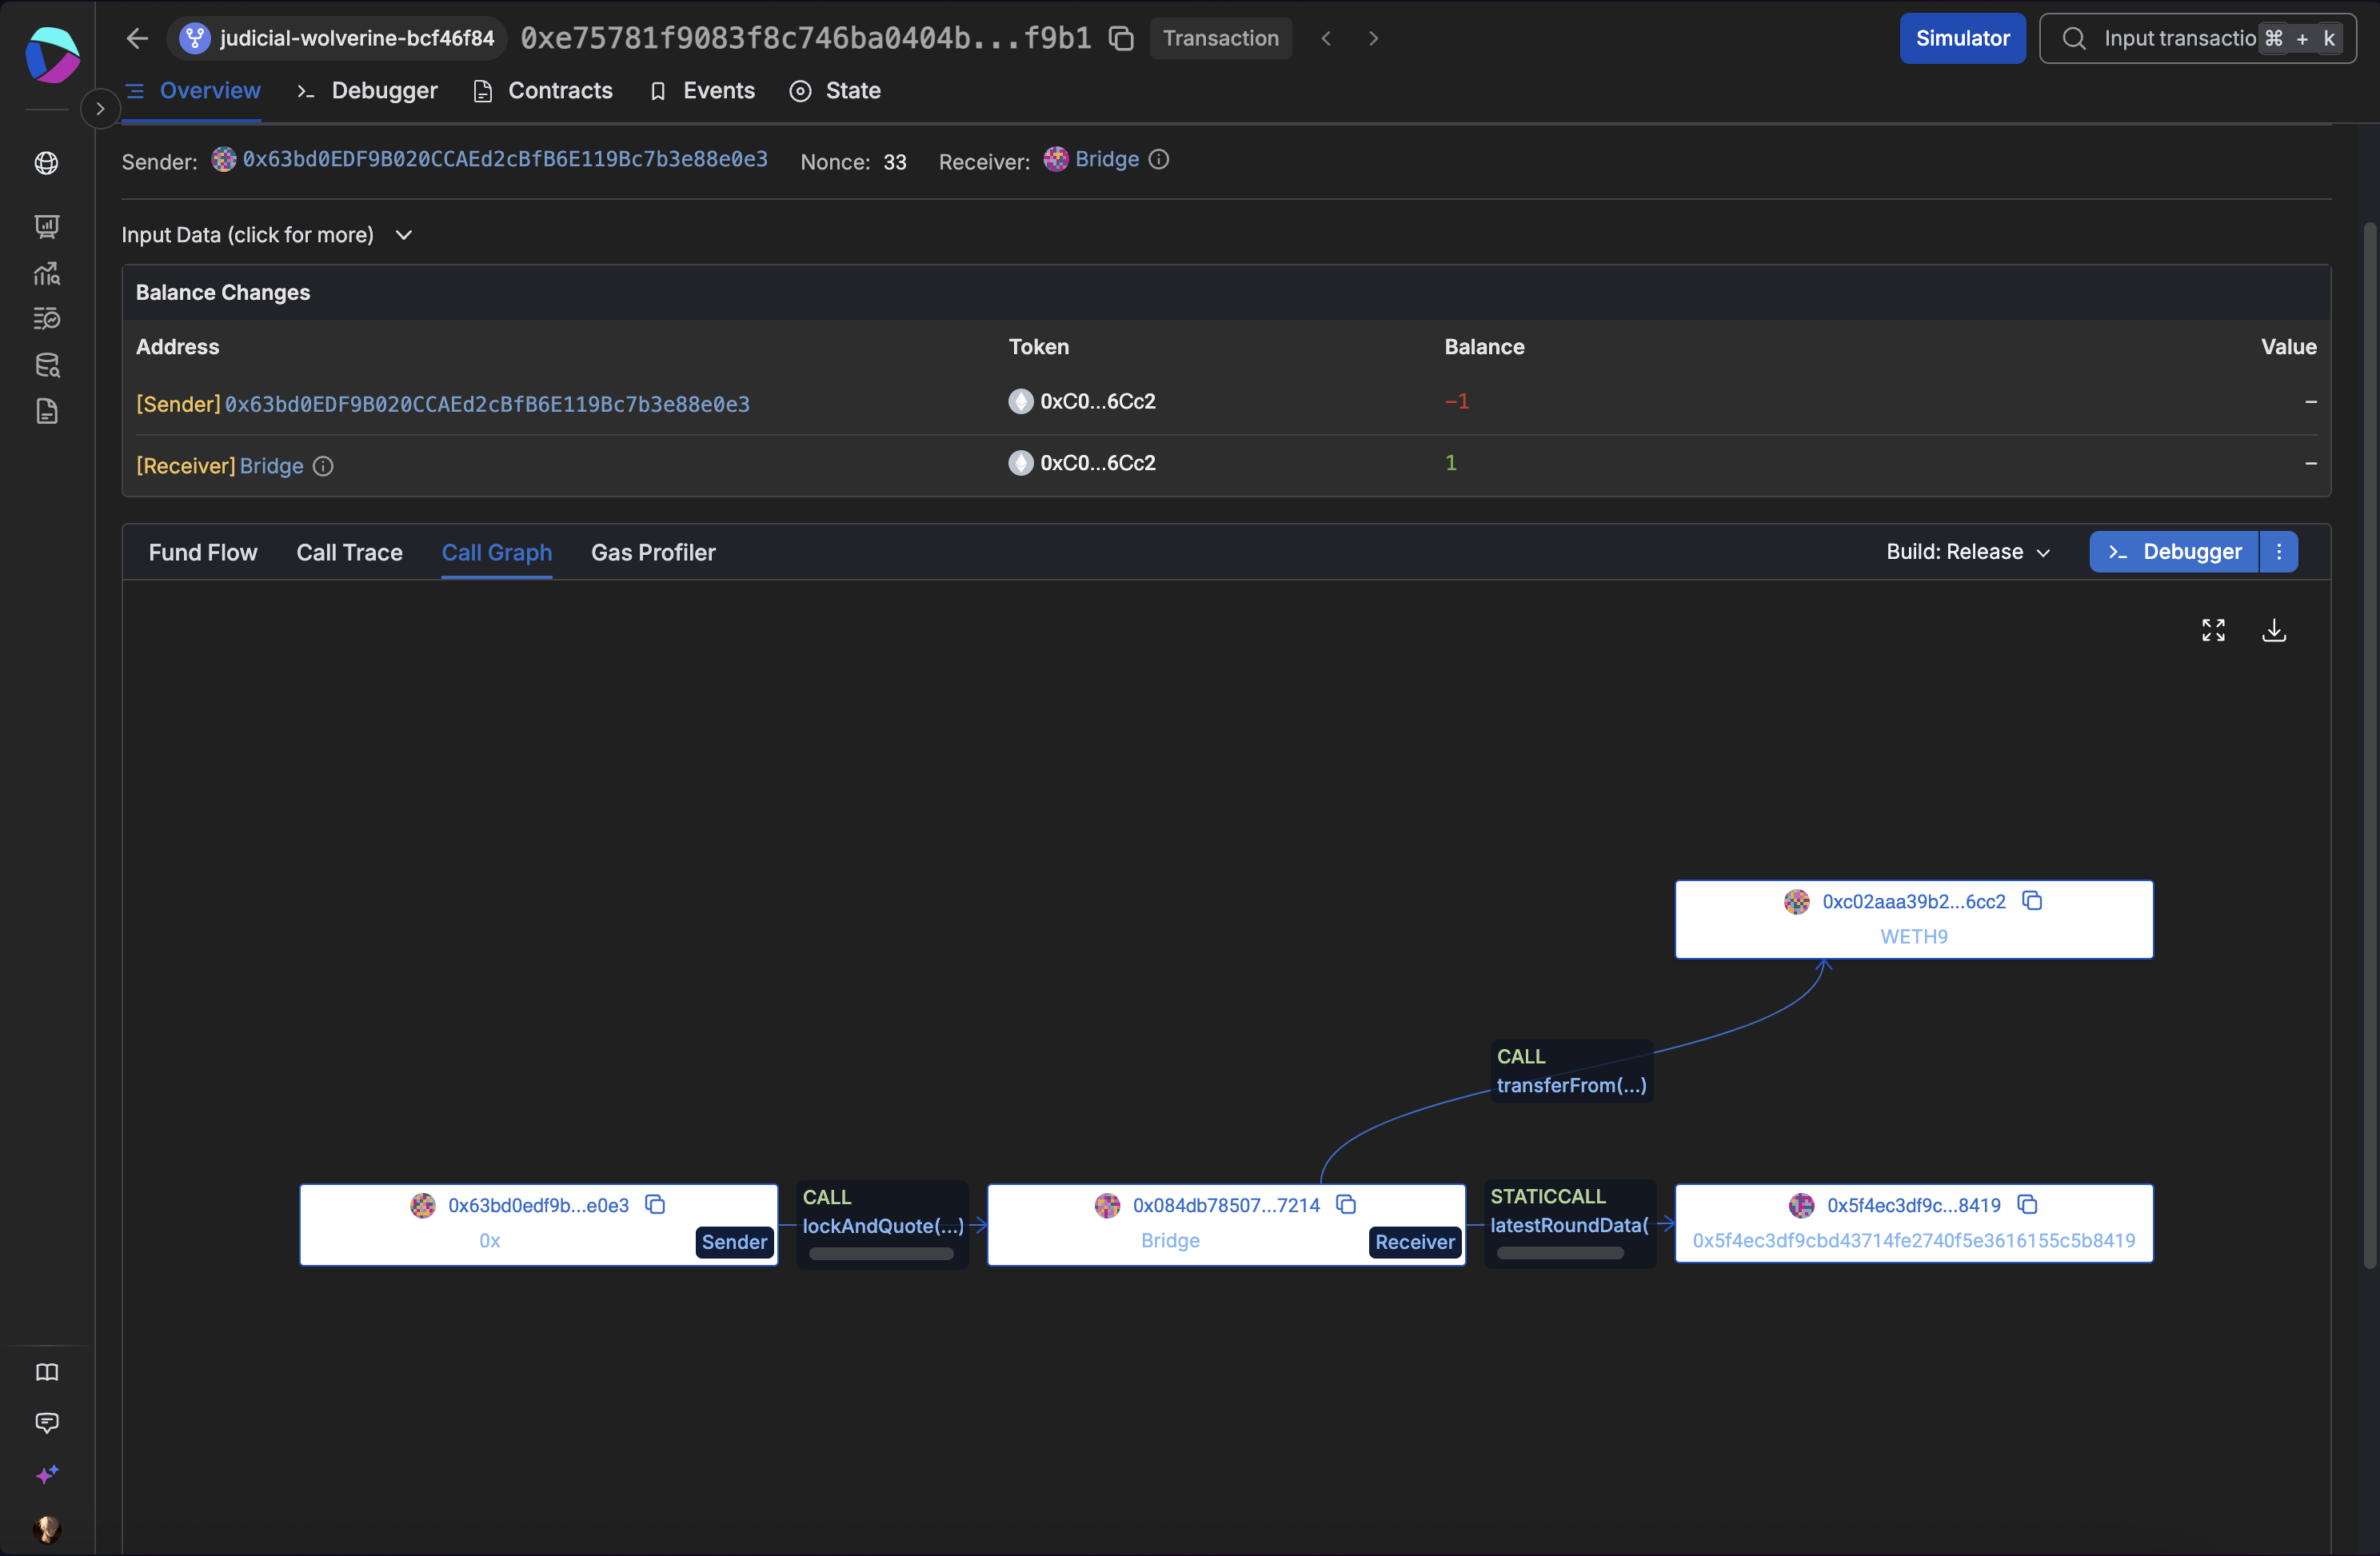
Fund Flow
A visual map of token movement for the source transaction. Use it to confirm transferFrom into the bridge and any intermediate ERC20 flows.
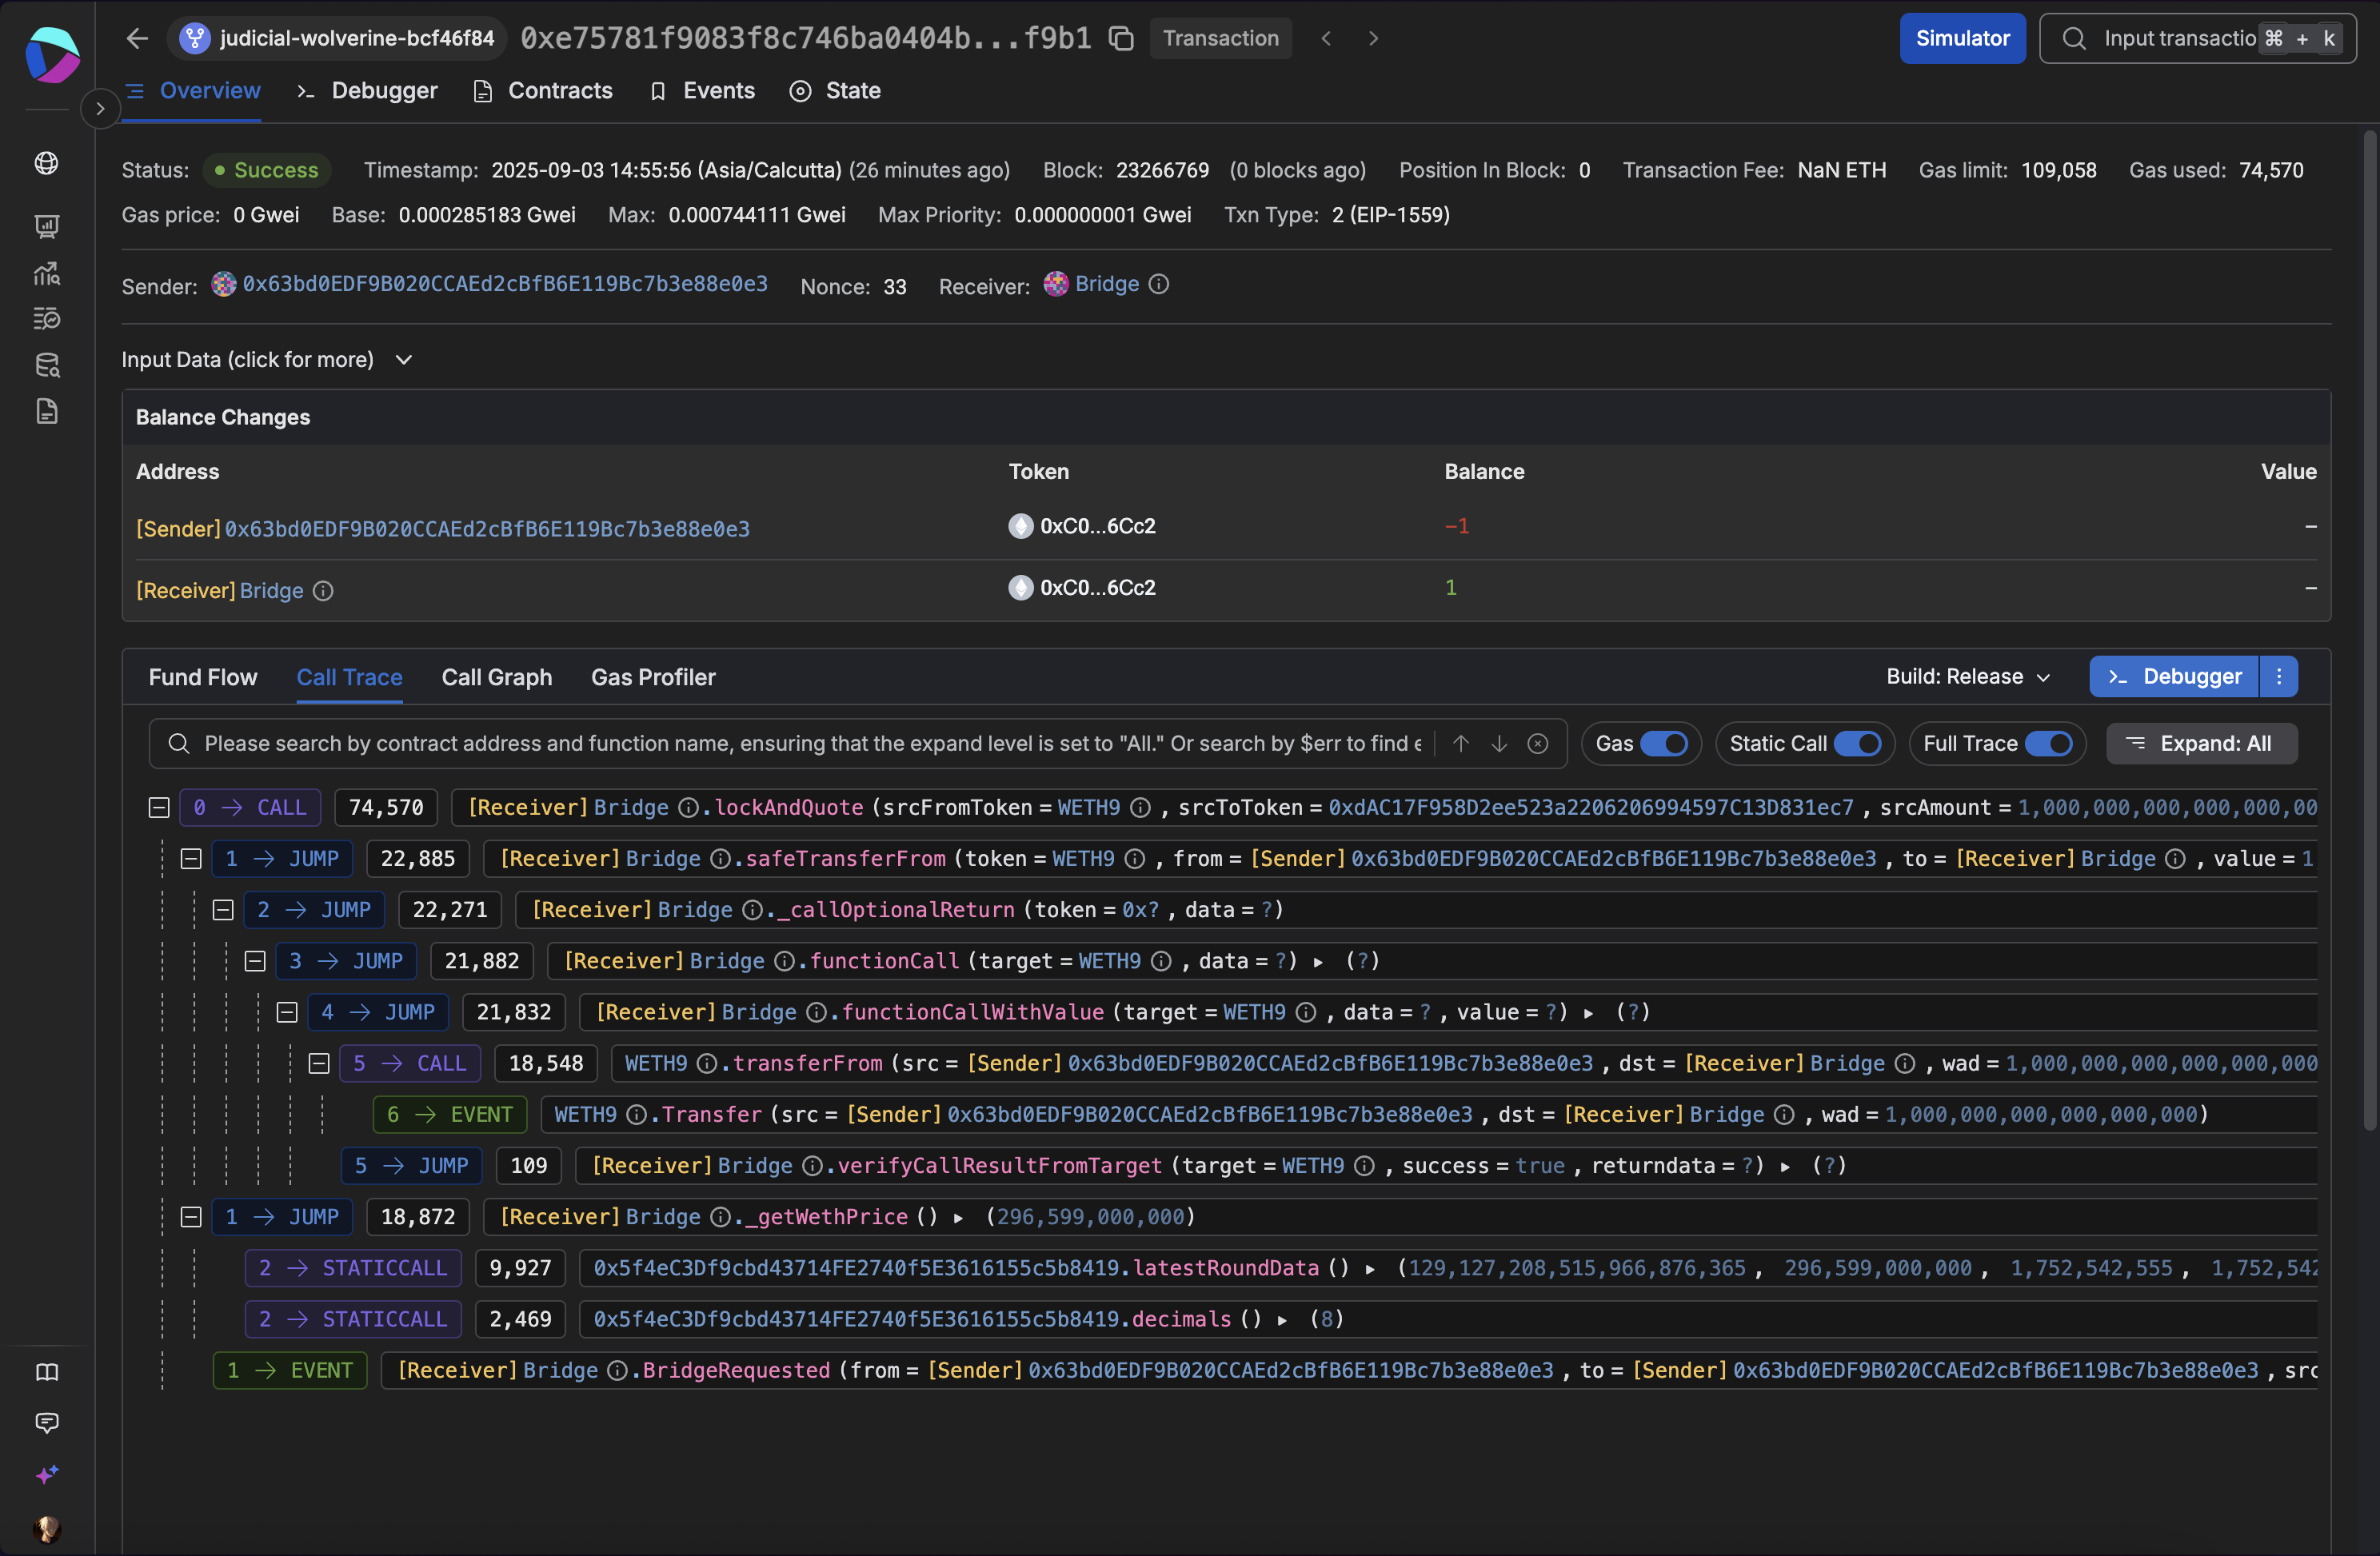
Call Trace
A step by step execution trace. Helpful to see the call into lockAndQuote, the oracle read, and the event emission order.
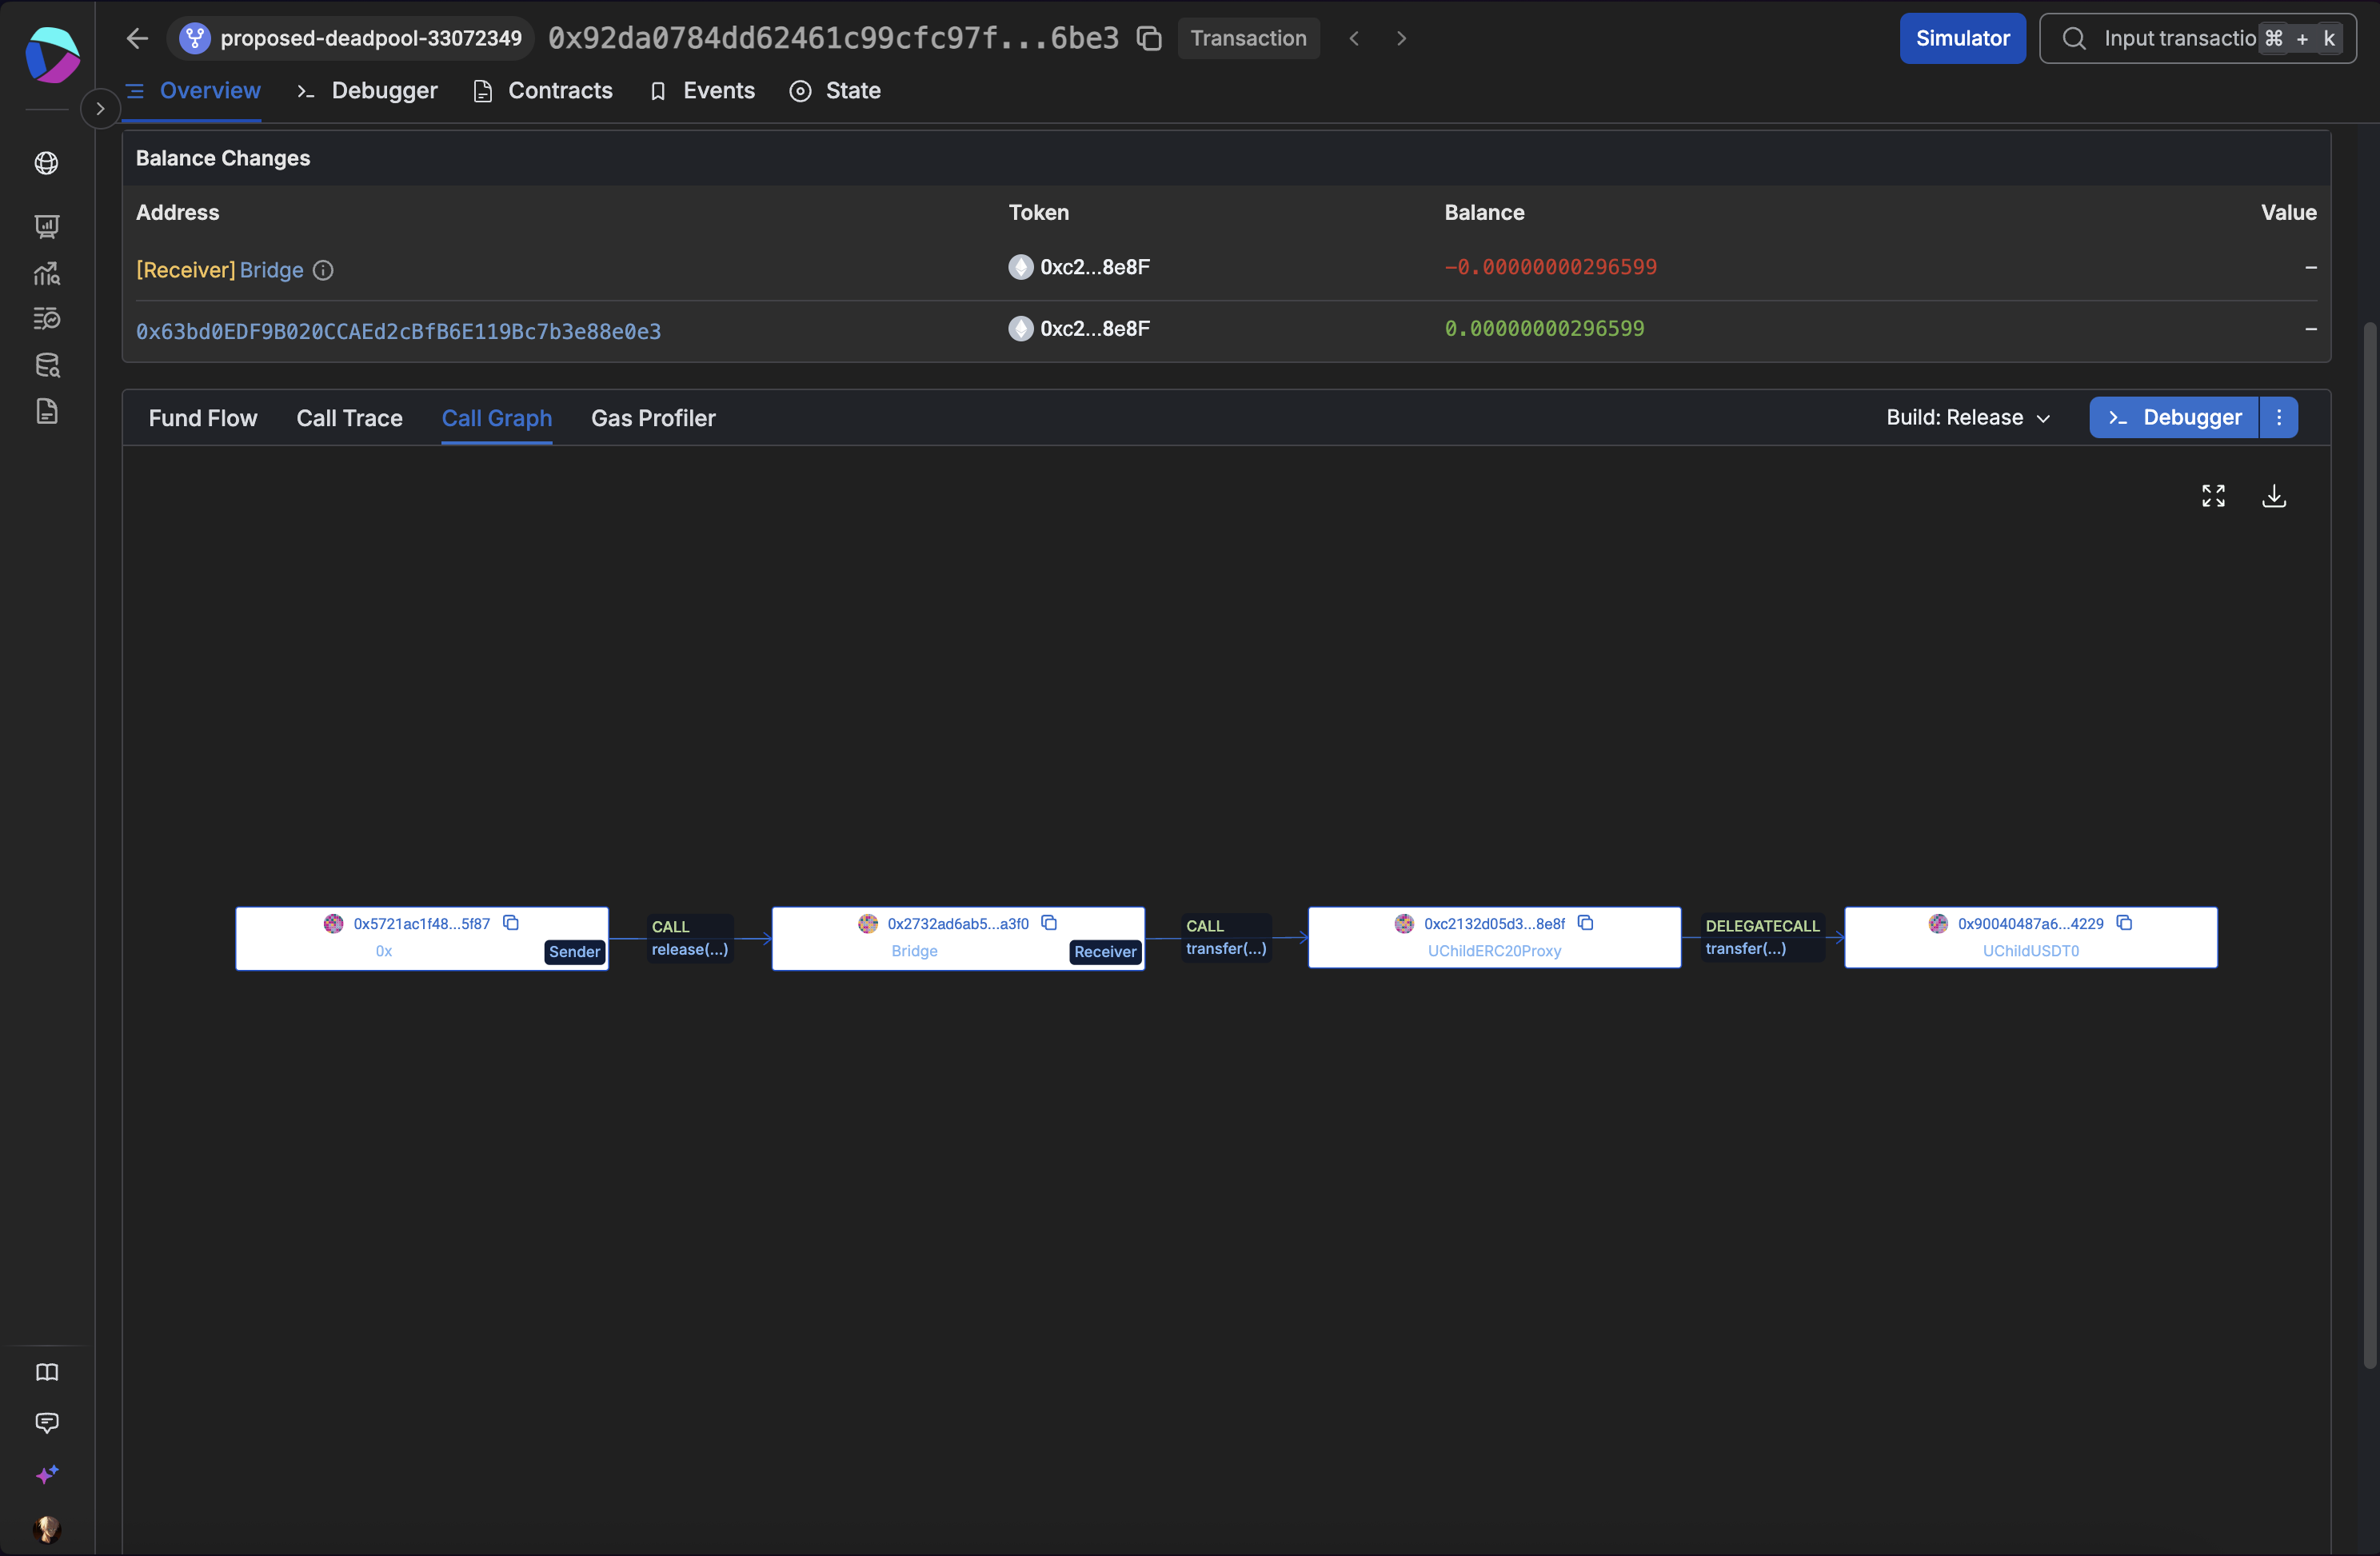
Call Graph
Graph view of calls across contracts during the source transaction. Useful to understand the sequence and fan out of internal calls.
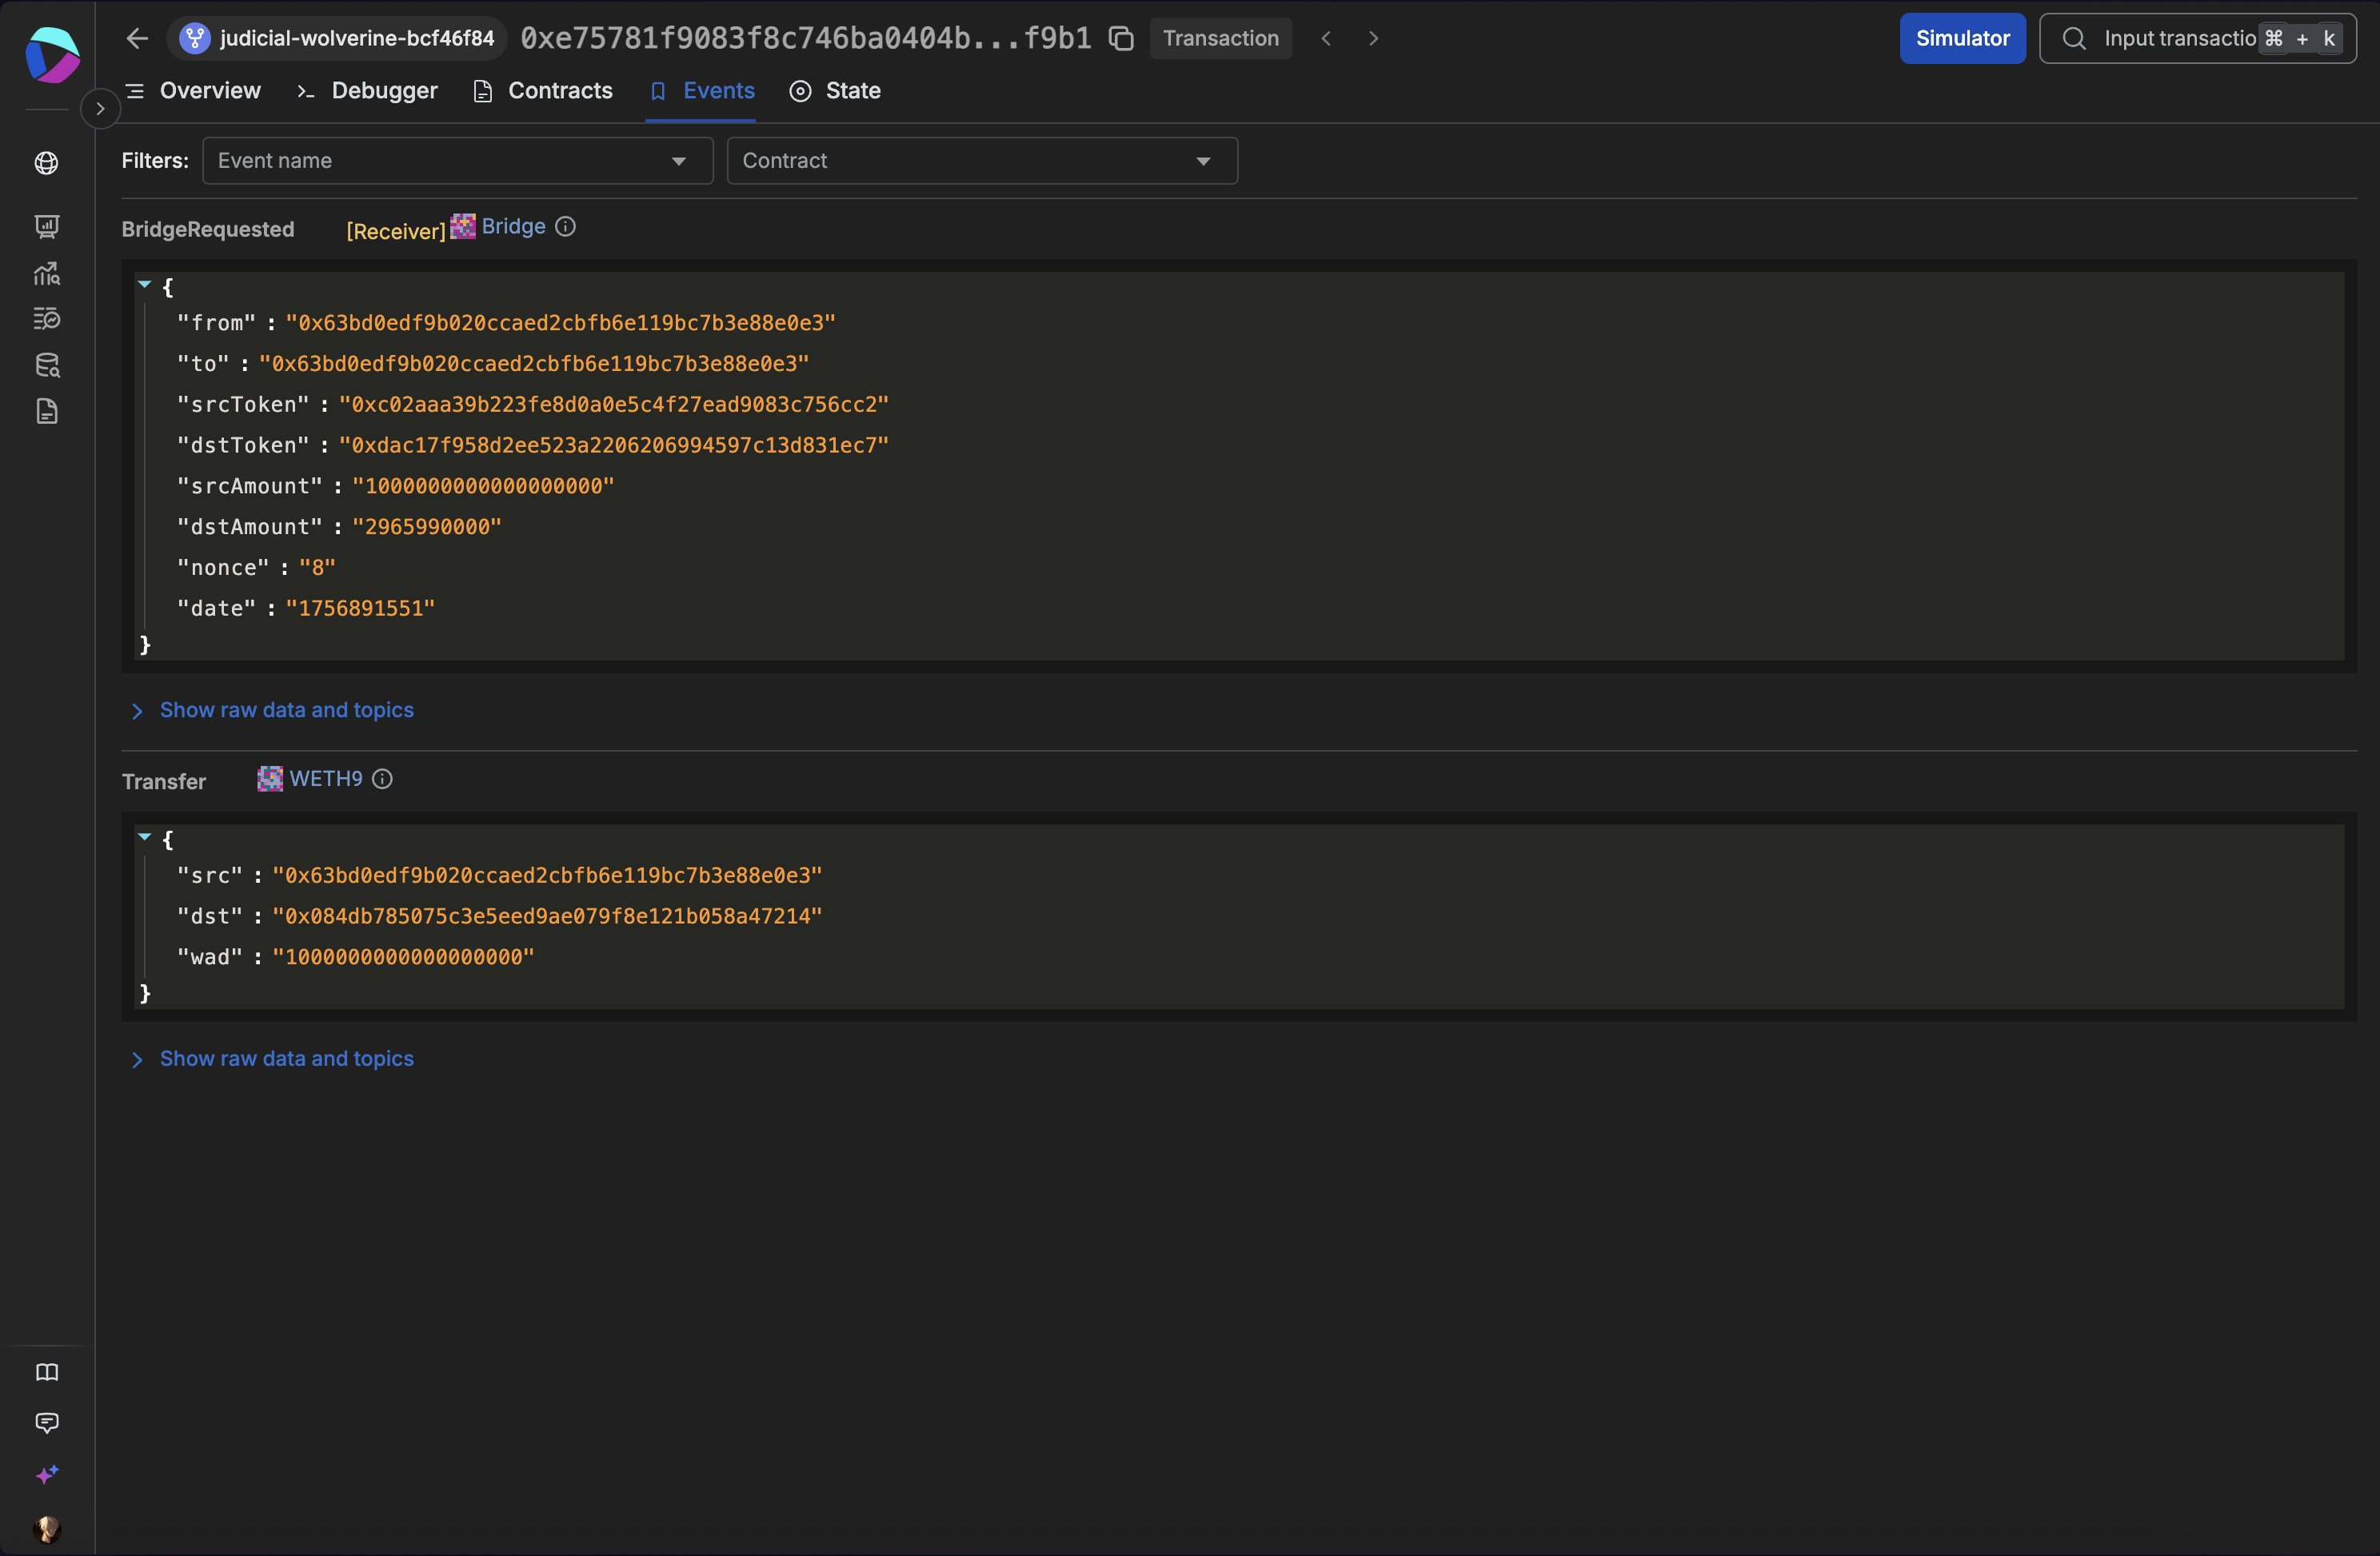
Events Tab
Structured list of emitted events. Verify BridgeRequested fields such as srcToken, dstToken, dstAmount, and nonce.
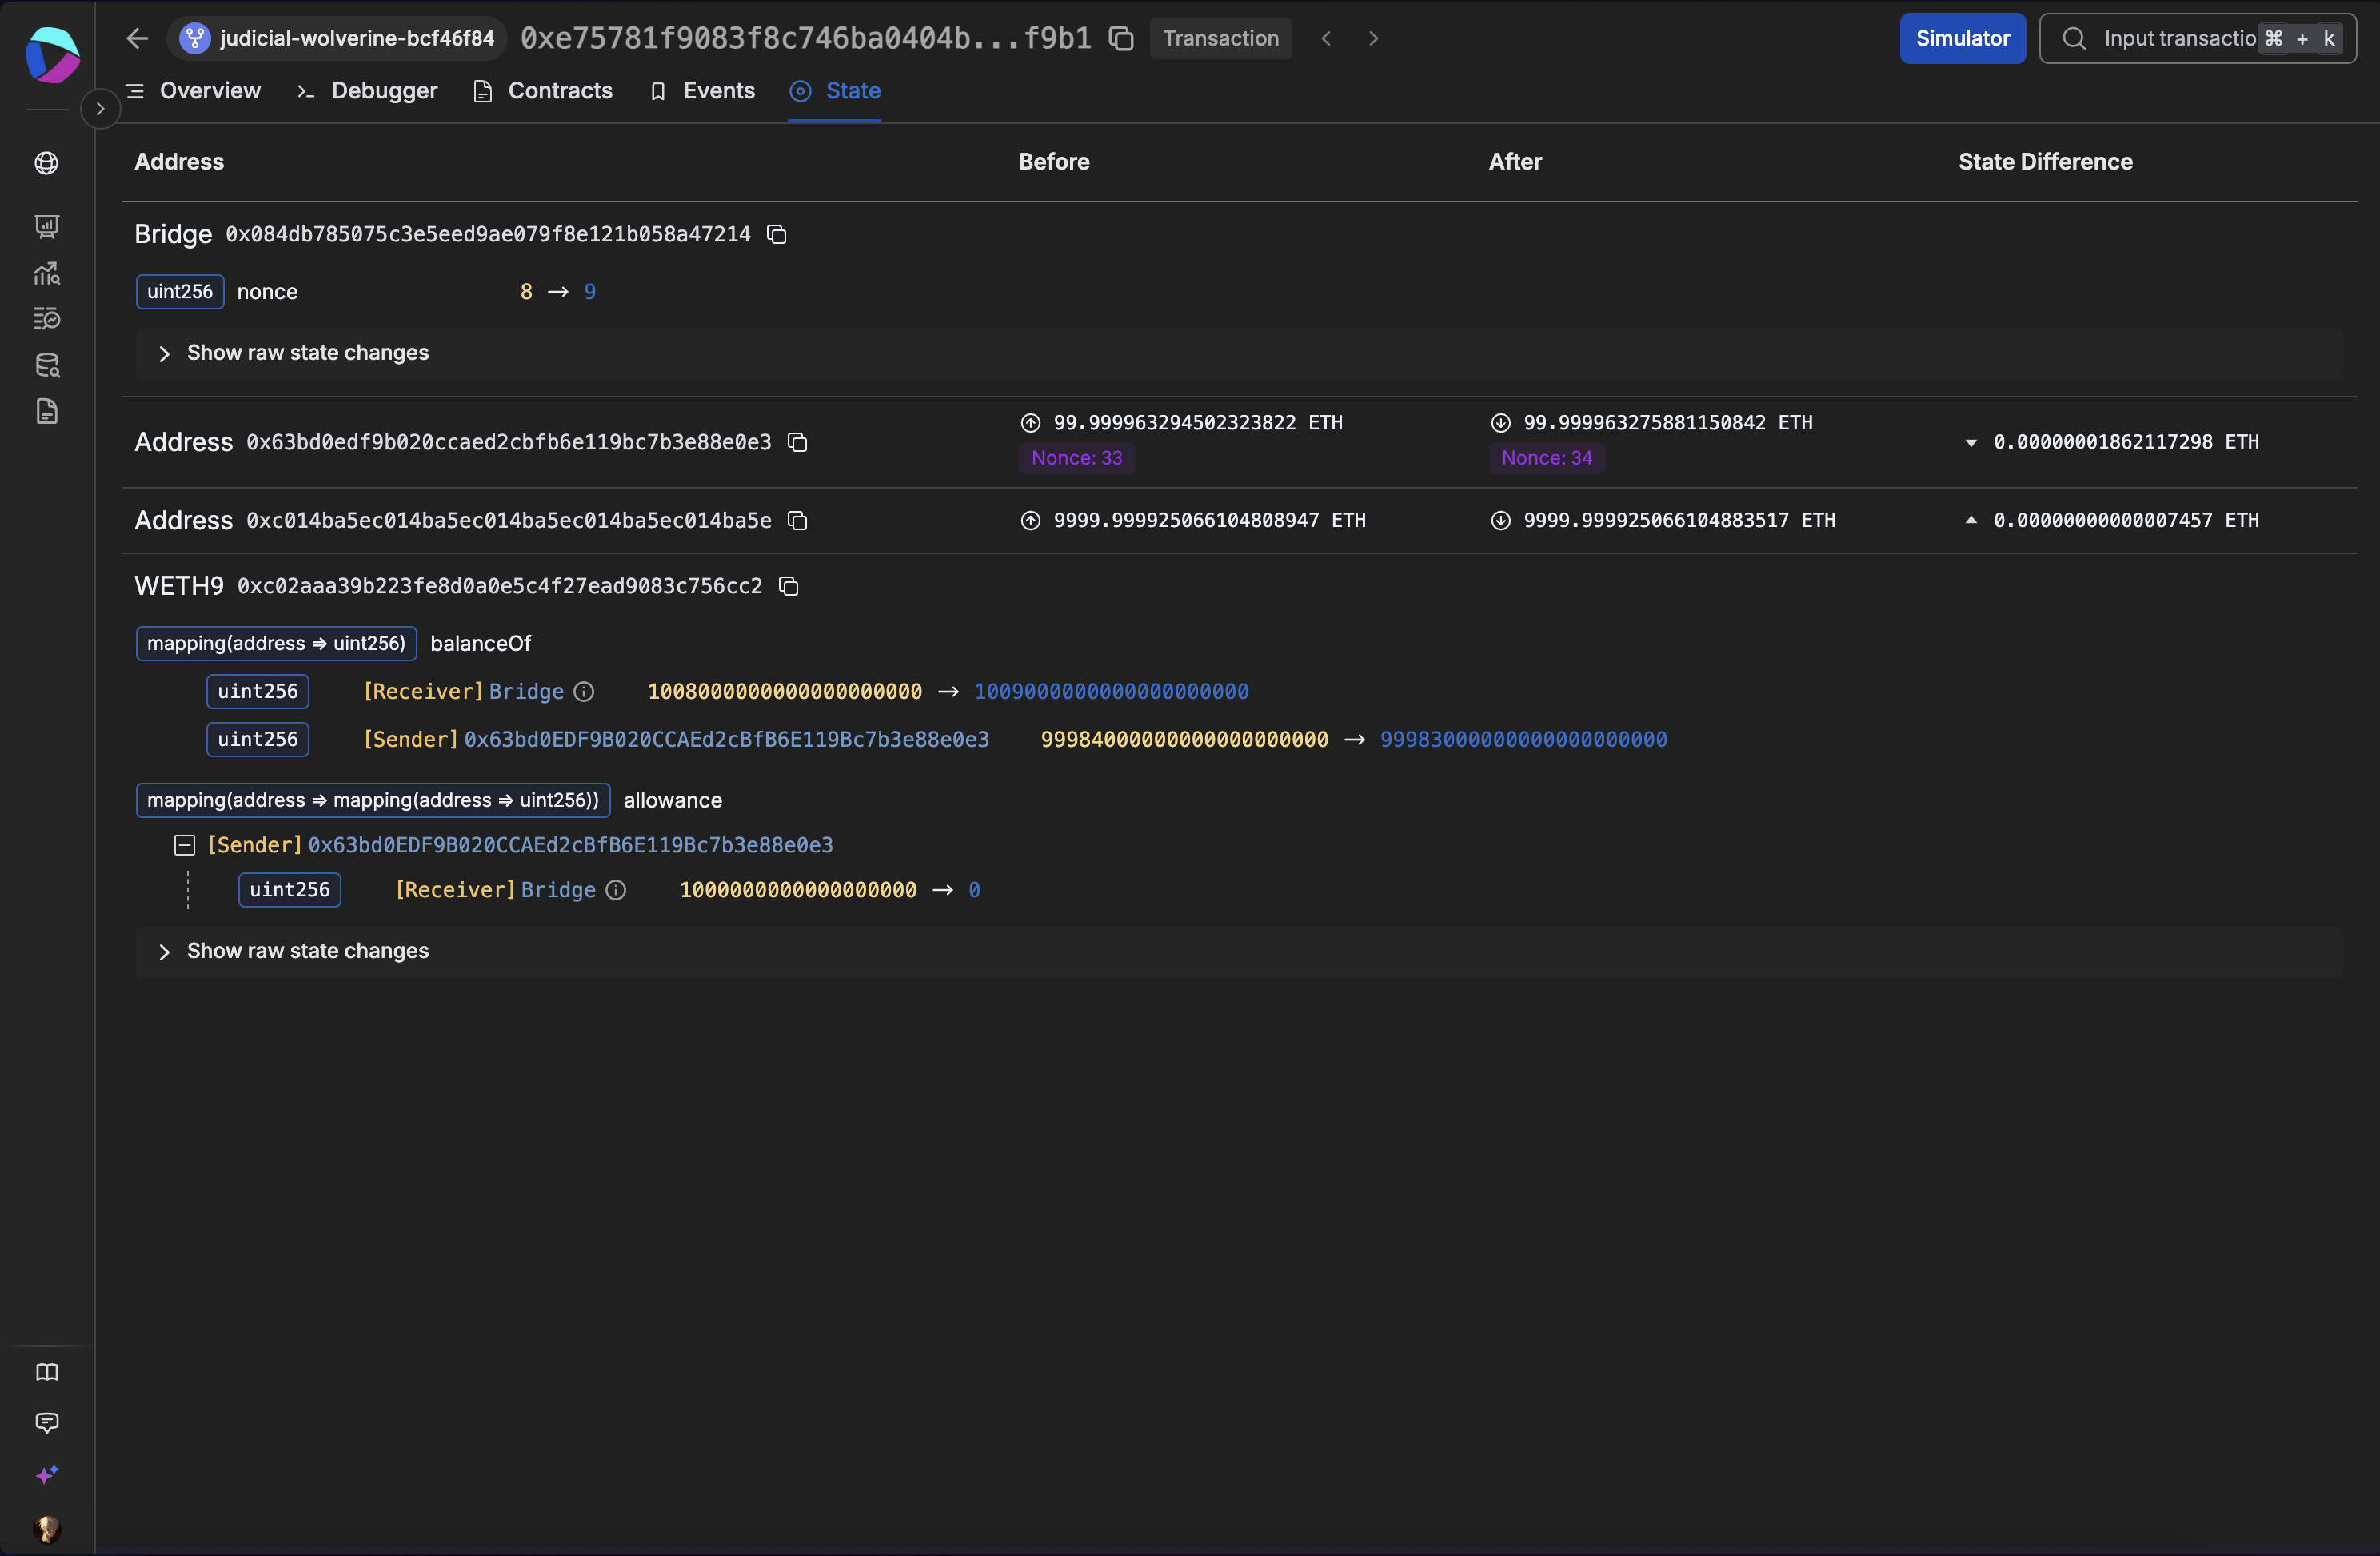
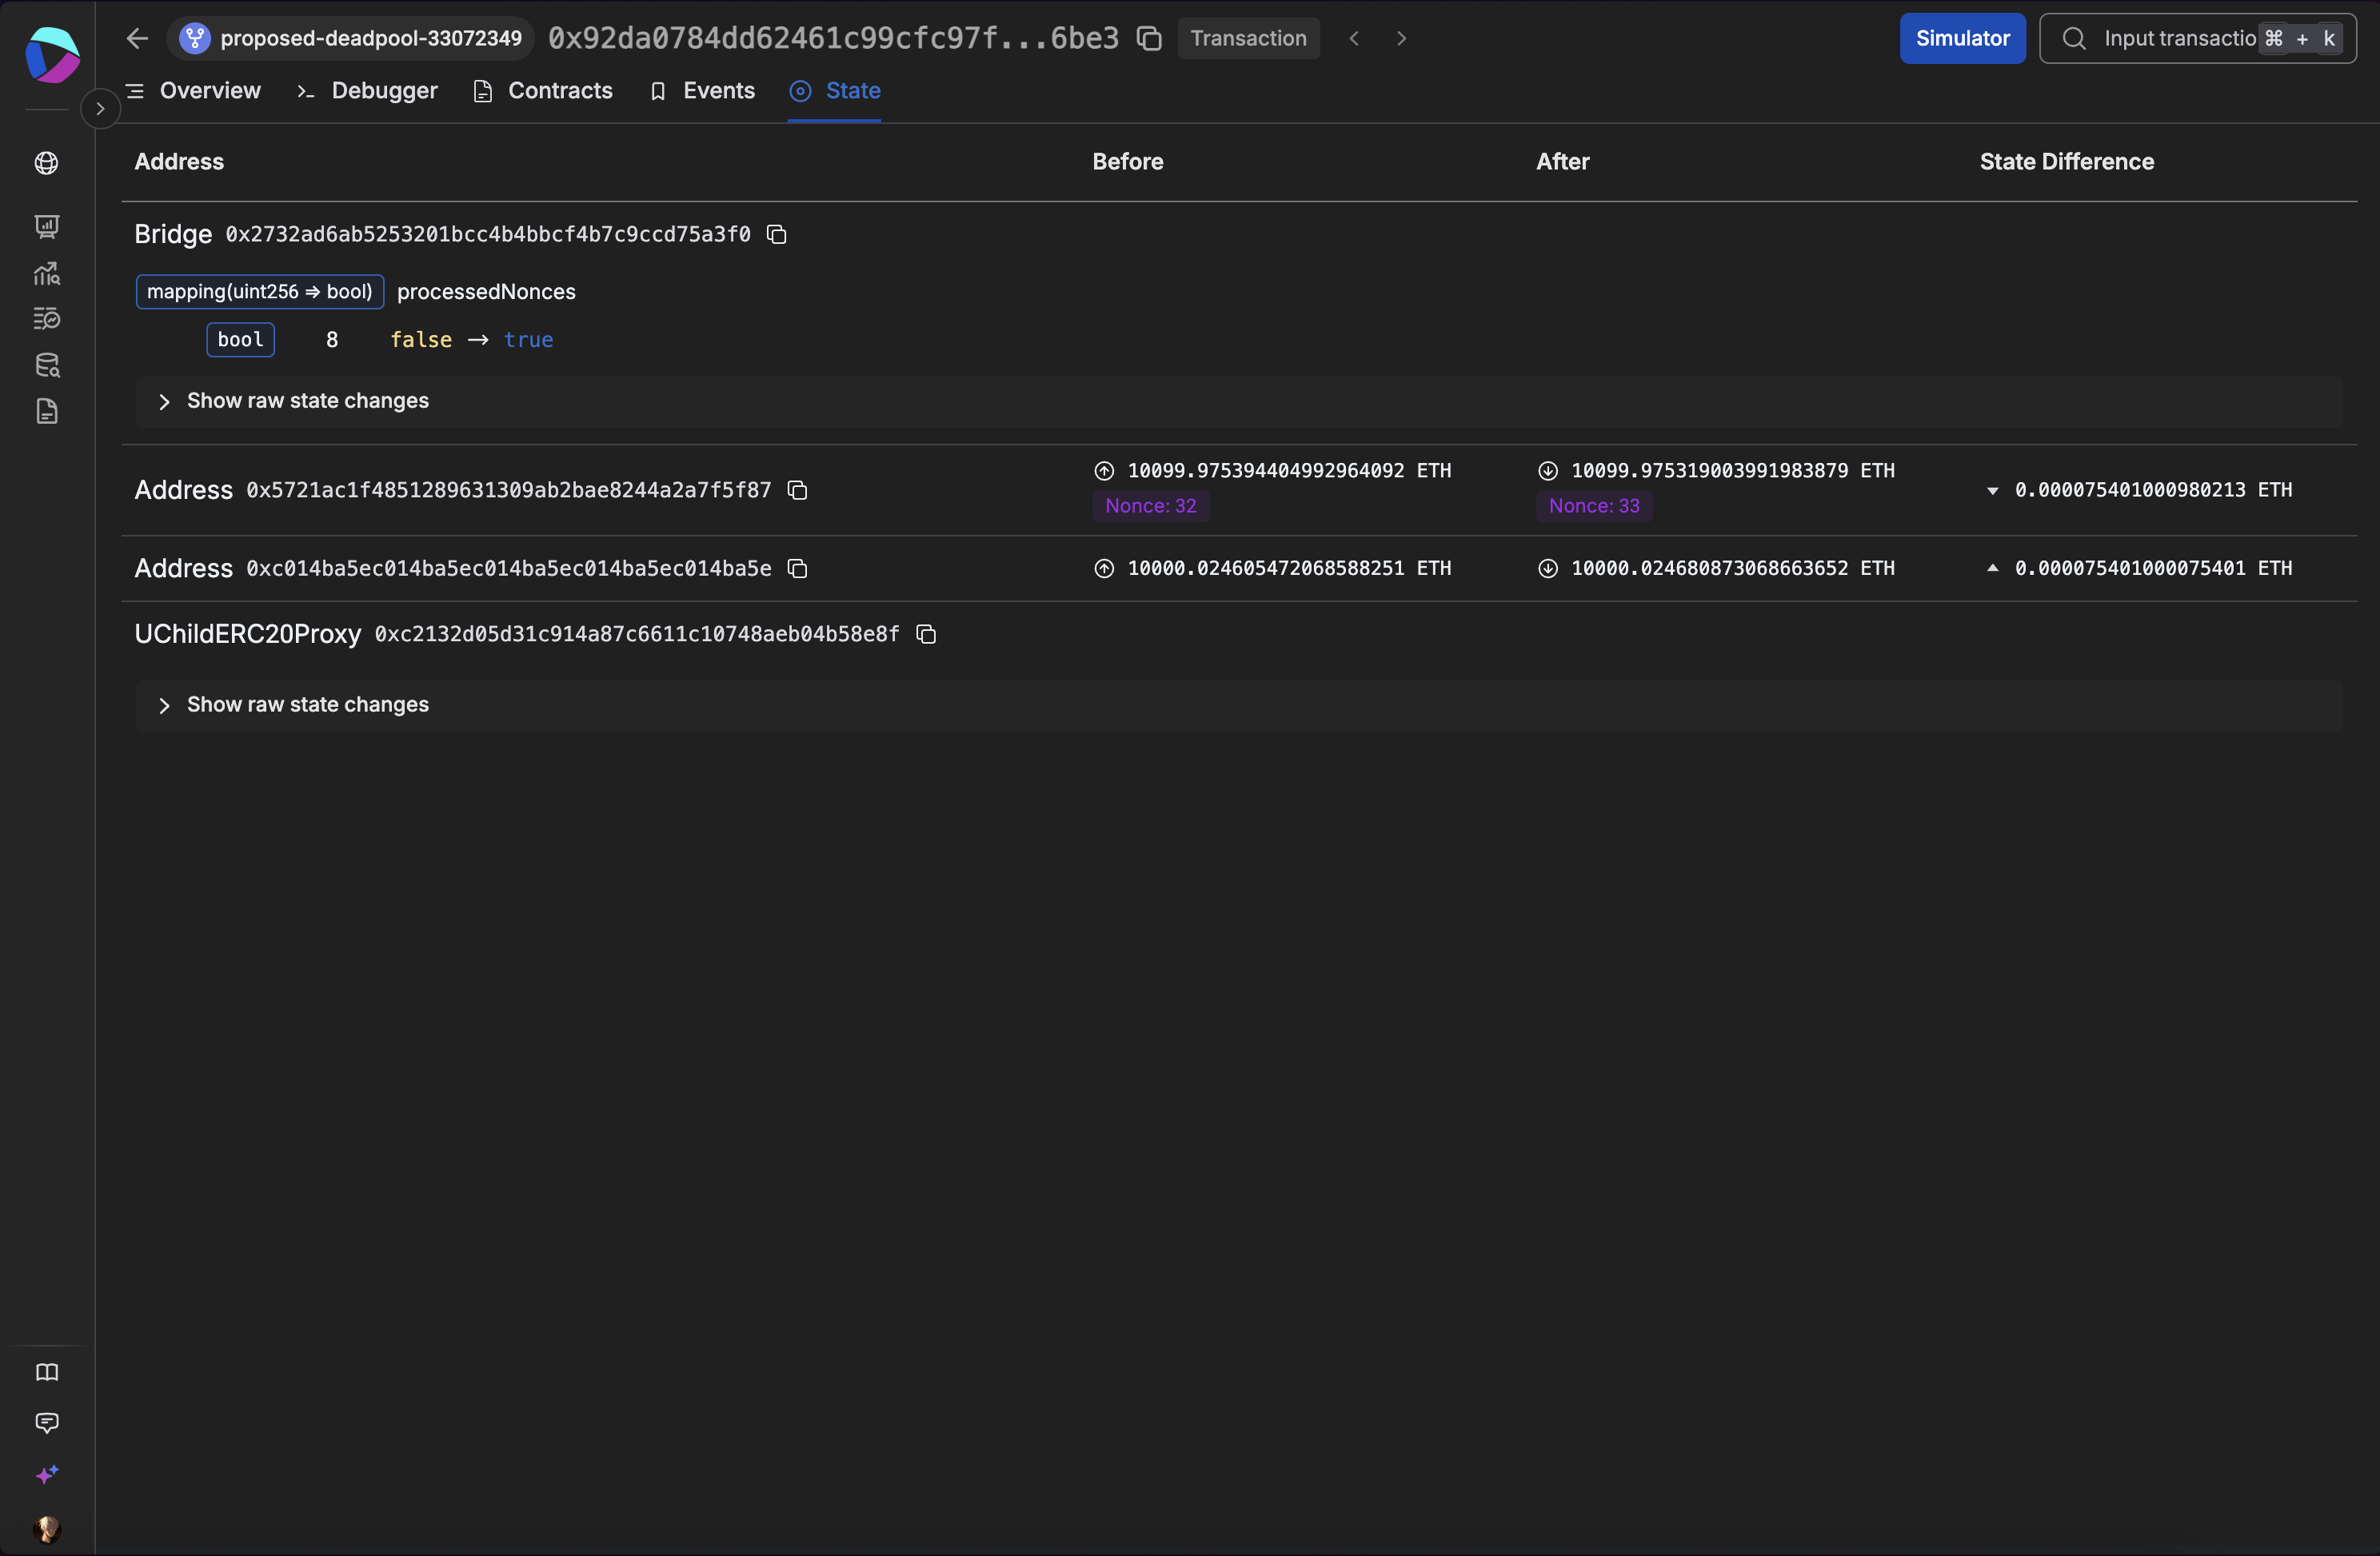
State Tab
Storage and variable snapshots at key points. Useful for checking nonce increments and any flags written during the call.
Destination: Release Tx
- Open the destination Sandbox explorer.
- Find the relayer
releasetransaction on the bridge contract, that transfers assets from Bridge to thereceiver.
- Click on "
View Trace on Sentio"
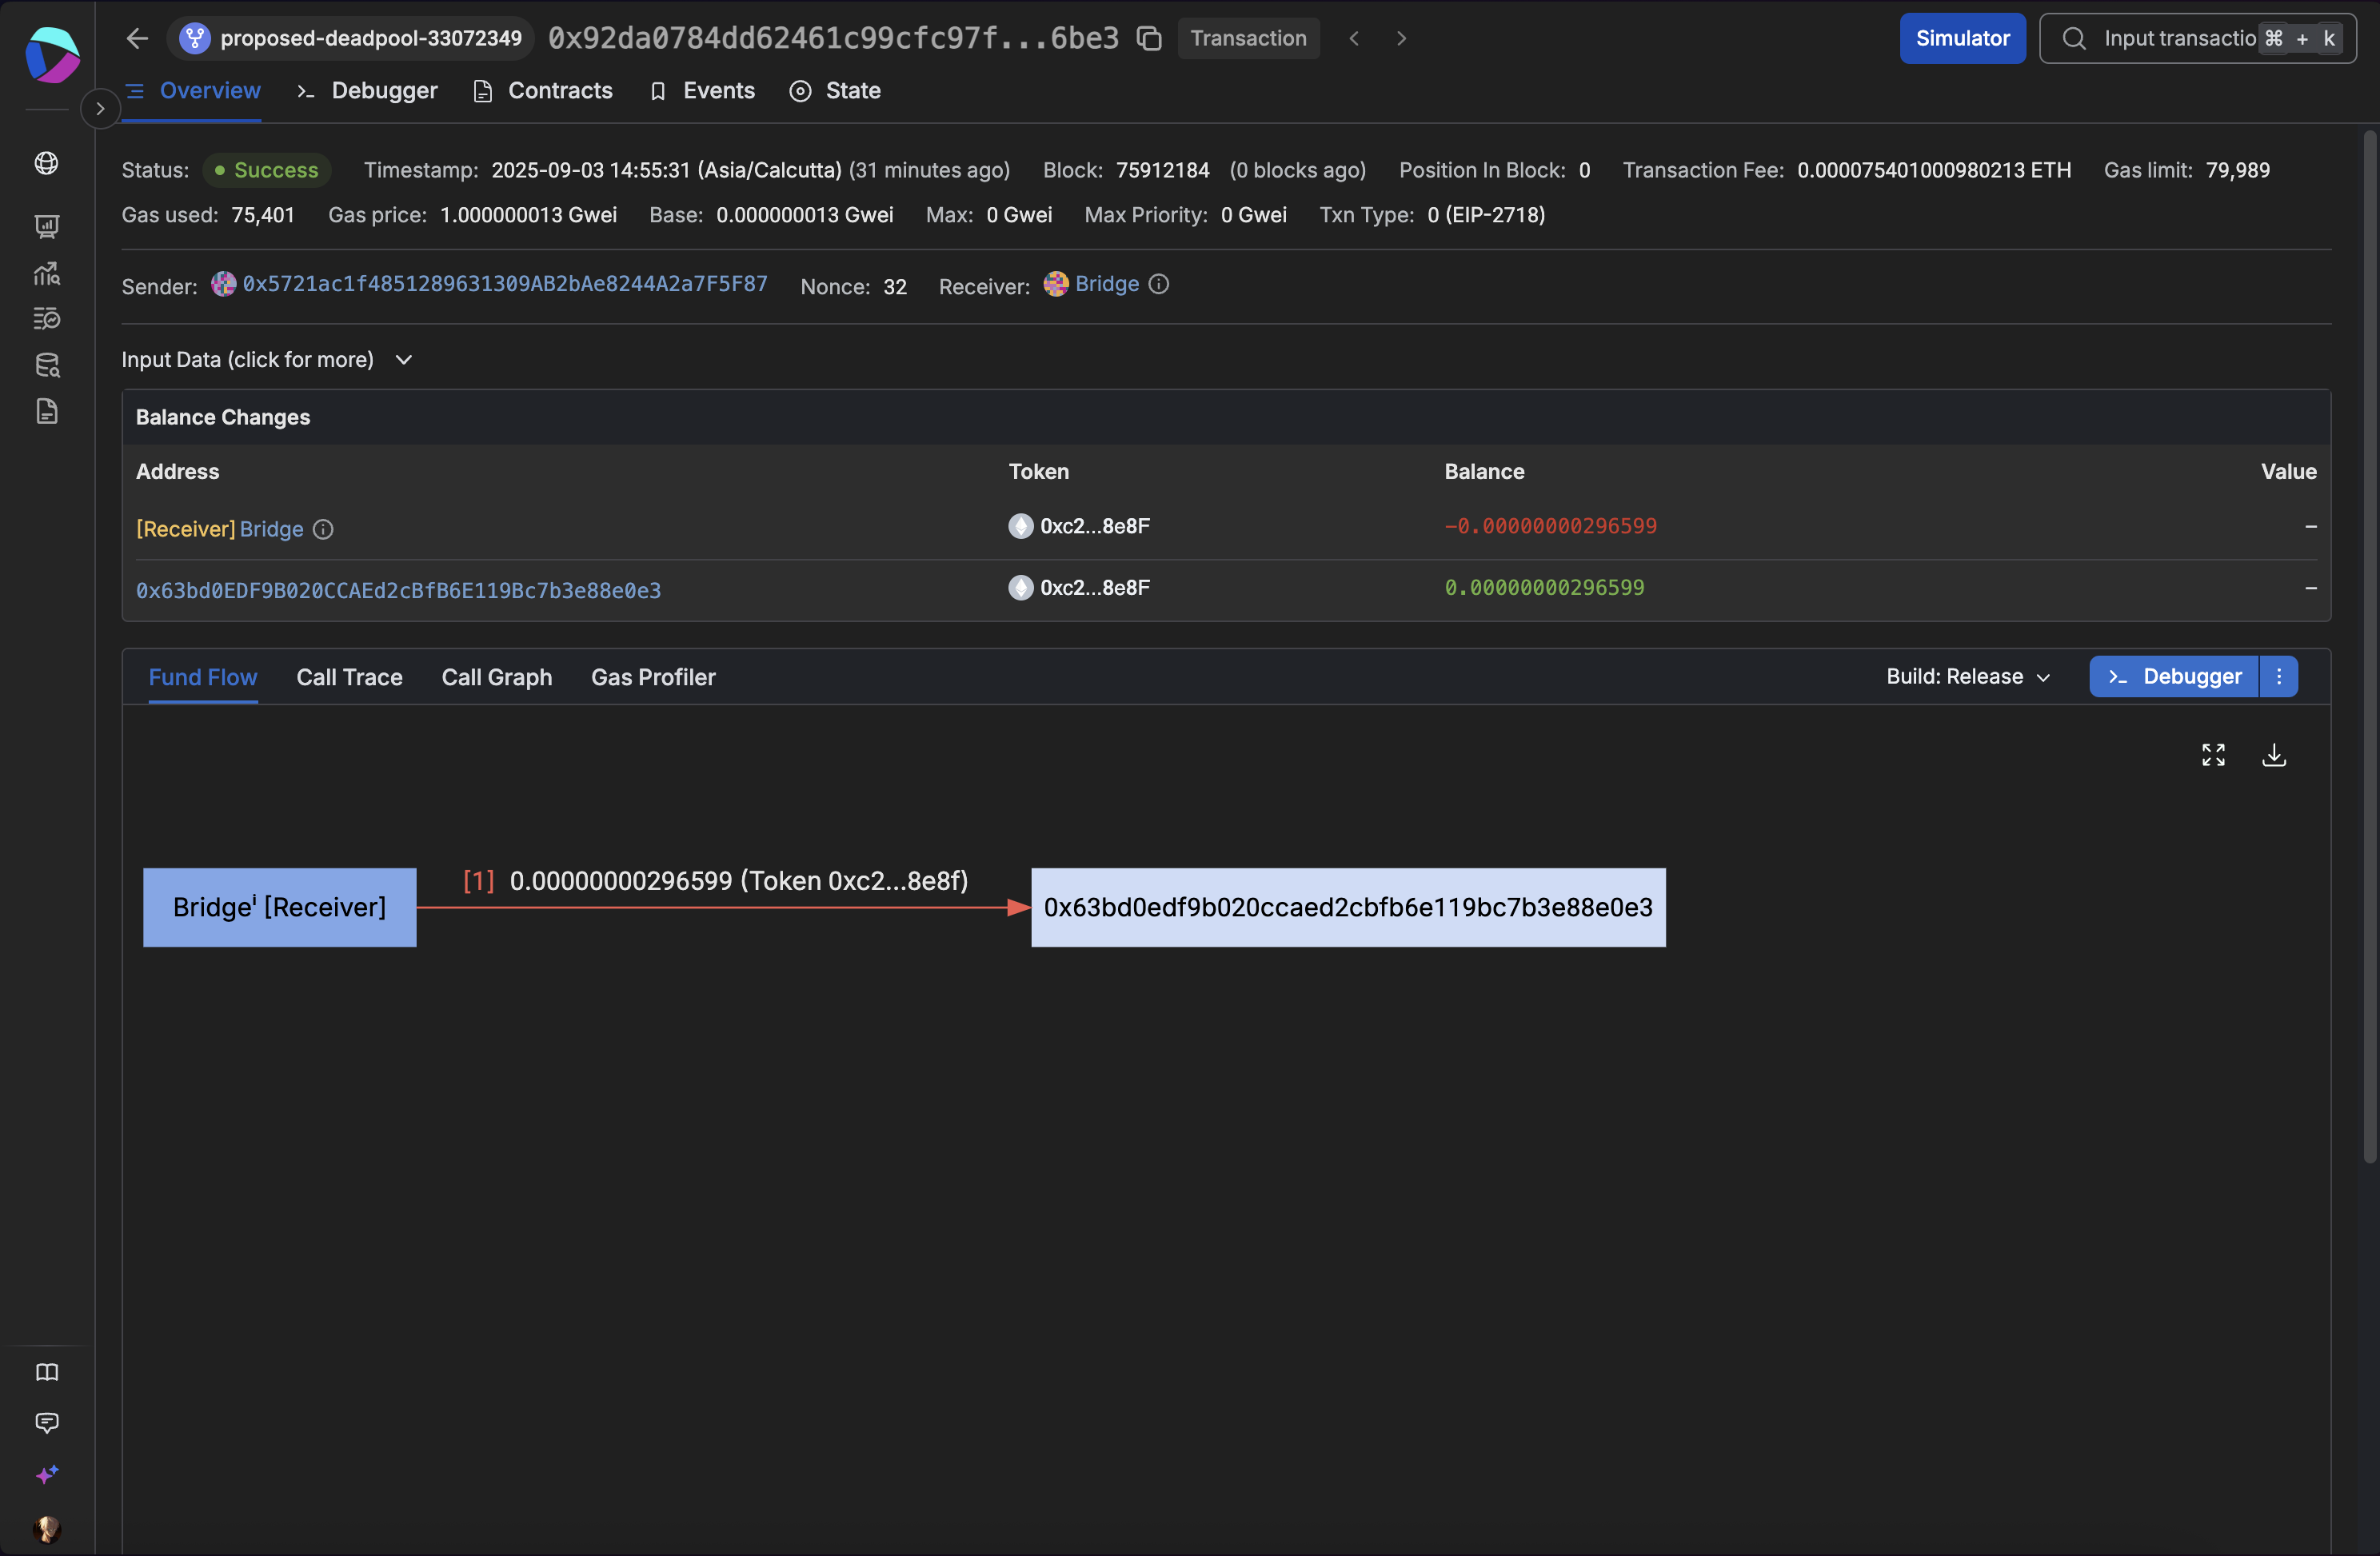
Fund Flow
Shows token movement out of the bridge to the receiver. Use it to confirm the final ERC20 transfer with the expected amount.
Call Trace
Execution path for the release call by the relayer. Check the nonce processing and the order of effects before the transfer.

Call Graph
Graph view of the destination call sequence during release. Helps verify checks effects interactions ordering and the final token transfer.
Events Tab
Verify TransferReleased with the same external nonce used on the source chain, along with token and amount fields.

State Tab
Inspect processedNonces and any relevant balances after the transfer to ensure idempotence and correct accounting.
That’s it. You now have a minimal, event driven cross chain bridge running end to end in BuildBear Mainnet Sandboxes. You can extend this demo by adding multi-sig relayers, accounting, fees, slippage controls, and stronger verification models.
Conclusion
You have now set up a minimal, event-driven bridge in BuildBear that uses Data Feeds Plugin for price quoting, verifies via Sourcify Plugin, and can be traced in Sentio Debugger Plugin, all in the BuildBear's Sandbox environment.
Using Chainlink Data Feeds with BuildBear Sandbox
Learn how to test Chainlink Data Feeds with UniLend and Aave protocols using BuildBear's Sandbox environment.
A Comprehensive Guide on Public Testnets
Understand the role of public testnets, their advantages, limitations, and how BuildBear can enhance your DApp testing experience.